
What’s worth knowing in the Squarespace world.
For designers, developers, and people building businesses around Squarespace.

Reduce Squarespace Image Size by 80% With WebP
Learn how to deliver WEBP image format on Squarespace, ensure your website quickly, increase engagement and boost SEO in general
This post is a collaboration with BeyondSpace.studio
Can you use WebP with Squarespace? Squarespace does not accept WebP files for upload; the officially supported types are JPG, PNG, and GIF. However, we can make it possible by leveraging 3rd party Image CDNs, let’s dive in
What is the WebP Image Format?
WebP is an image file format developed by Google, providing superior compression for web images. WebP files are smaller than JPEGs and can display transparent backgrounds like PNGs. Additionally, WebP supports animations, similar to GIFs.
Benefits of Using WebP
Enhanced Website Performance: WebP images are more lightweight compared to JPEGs and PNGs, leading to faster loading times for pages containing WebP images.
Bandwidth Savings: WebP helps save bandwidth, allowing websites to provide users with a more immersive media experience.
Improved SEO: WebP contributes to better search engine optimization (SEO) as recommended by Google's Core Web Vitals, highlighting the importance of modern image formats like WebP.
Drawbacks of WebP
Limited Compatibility: WebP is primarily focused on internet usage, making it less practical for offline image viewing. Additionally, older browsers such as Edge 12-17 and Firefox 2-64 do not support WebP, limiting its compatibility (refer to the full compatibility table for more details).
No Progressive Loading: Unlike Progressive JPEG, WebP does not support progressive loading, meaning you will choose between saving bandwidth and serving the image quickly to the client.
Let’s take a look at the example, can you spot the difference?
 View image
JPG - 291 kB - 2500 x 1667
View image
JPG - 291 kB - 2500 x 1667
 View image
JPG - 291 kB - 2500 x 1667
View image
JPG - 291 kB - 2500 x 1667
 View image
WebP - Quality: auto - 115 kB - 2500 x 1667
View image
WebP - Quality: auto - 115 kB - 2500 x 1667
This webp file is 60% smaller than its counterpart
How to deliver webp format on Squarespace?
The mechanism of this approach is to use 3rd party CDNs to cache and serve Squarespace pictures, meaning you don’t have to manually optimize and reupload image files. And manipulate Squarespace Imageloader into load the webp counterpart of the Images
First you need to understand how Squarespace images are delivered to client: first they create 7 variants of your Images and deliver them to browser based on certain conditions to ensure the best images are delivered, for example: large screen browser will likely received a 2500px wide variant, while a tablet will get a 750px wide variant. All of this is made possible with Squarespace ImageLoader
ImageLoader will expect the images on Squarespace to have either src, data-src or srcset so it can load the images effectively, based on our observation, srcset take higher priority than data-src, meaning if an image has both data-src and srcset, Squarespace will get the Image source from srcset first.
So if we can manipulate the srcset & data-src attribute of images, we can somehow force Squarespace to load any different pictures. In order to deliver webp images from Squarespace we need a on-the-fly transformation to convert and cache JPG and PNG assets and convert them to next-gen format like AVIF and WEBP, it is also required that the old browsers will still get the origin version to ensure maximum compatibility
I found the 2 services that can fulfill this requirement, include
Cloudinary
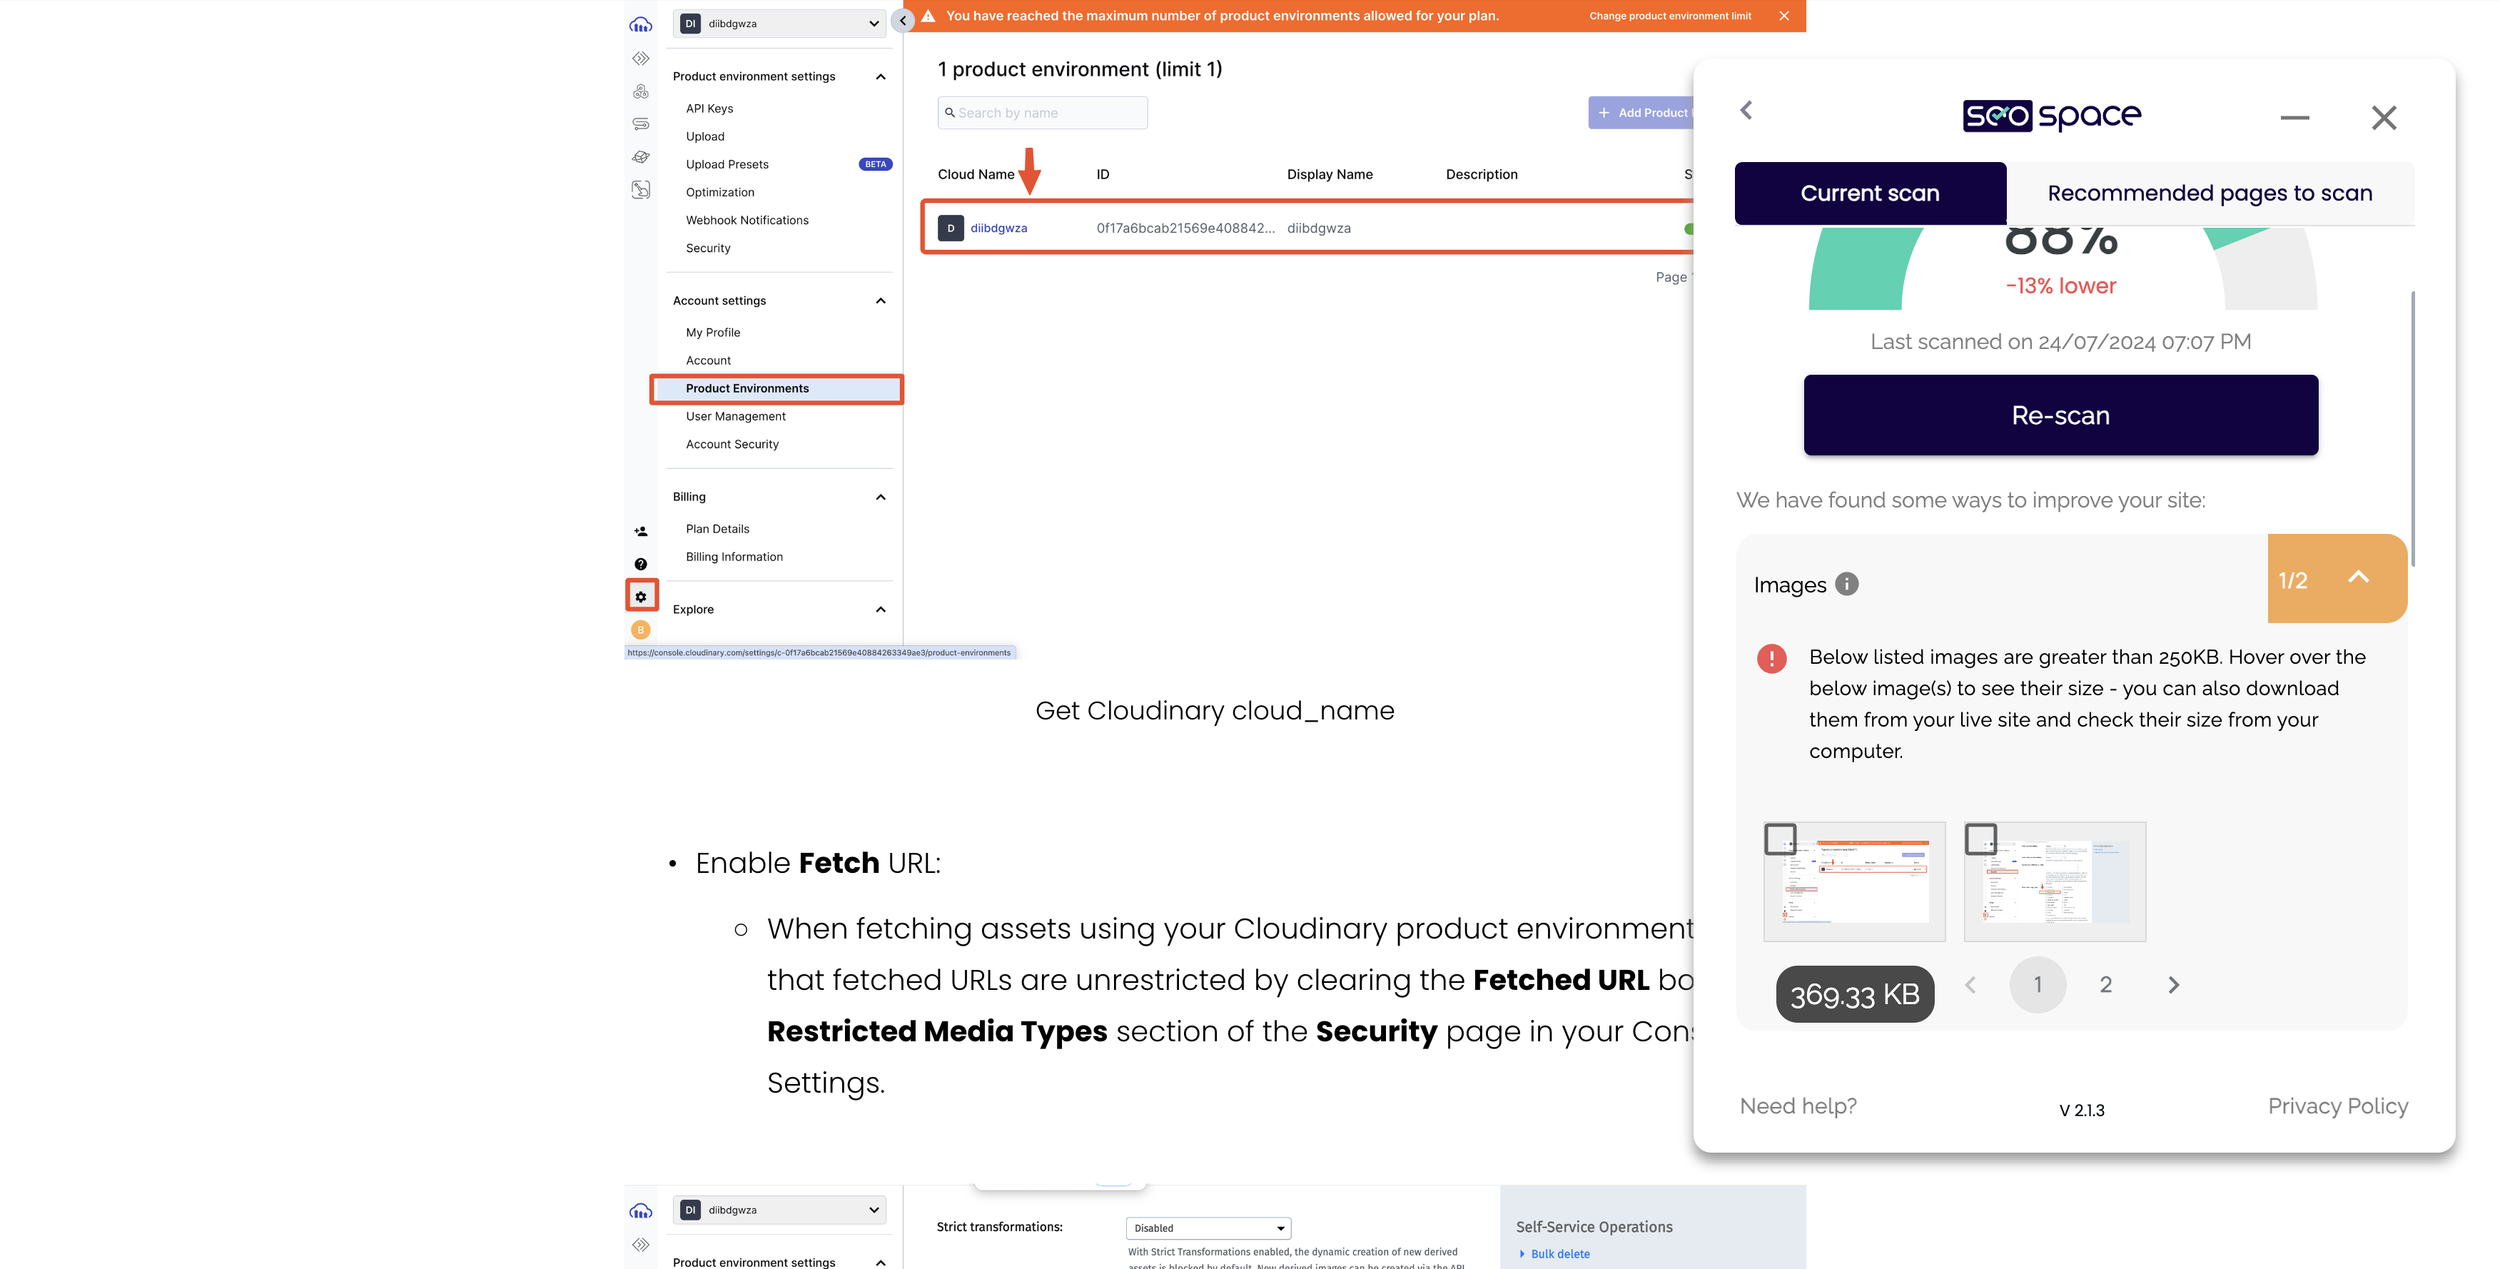
To deliver Squarespace pictures, you need to enable Fetch URL in order fetch the remote image (from Squarespace CDN)
Cloudinary's free plan gives you 25 units per month. These units can be used in three different ways:
Image transformations: You can change or optimize 25,000 images per month.
Storage: You can store up to 25 gigabytes (GB) of images or videos.
Bandwidth: Your visitors can view up to 25 GB worth of your images or videos per month.
These activities will count towards the total 25 units. To give you an idea of what 25 GB of bandwidth means in terms of website visits:
If an average page on your website has about 1 MB of images, 25 GB would allow for approximately 25,000 page views per month.
Assuming an average visitor looks at 3 pages, this translates to roughly 8,300 unique visitors per month.
Fetched assets count towards storage units, and the cache purges every 7 days.

ImageKit
It support Web server image origin, we can take advantage of this feature to serve image directly from Squarespace CDN.
The things I like about imagekit is remote images do not count toward the storage (free plan has 5Gb storage), so do the transformations, the only matter is the monthly bandwidth limit at 25GB. Video transformation is limited at 500 unit per month
Assume you have 5000 visits with everage 3 pageviews, in total of 15000 sessions, if you have 5 images on pages with average 250kb size, monthly bandwidth will be around 18GB.
Compared to Cloudinary, Imagekit has a much better analytics dashboard, allow you to view exact bandwidth and other statistics.

Ready to supercharge your Squarespace site's image performance?
Visit BeyondSpace blog for step-by-step instructions and code snippets to implement this WebP solution.
Testing
I tested the scripts using SEOSpace, which suggest images on the site should be smaller than 250KB, if you already uploaded a big file, serving them in webp can reduce the file size instantly without going through tedious process for resize and reupload.

I made another test with Cloudinary webspeed test & Pagespeed
| Image Source | Page URL | Cloudinary Image Test | PageSpeed Test |
|---|---|---|---|
| Squarespace CDN (origin) | 📸 View Image | 📝 View Test | 📋 View Test |
| Cloudinary CDN | 📸 View Image | 📝 View Test | 📋 View Test |
| ImageKit CDN | 📸 View Image | 📝 View Test | 📋 View Test |
Here are the results from our image source tests using different CDNs for these specific pages in Cloudinary Image Test, other test may return different resource size:
Origin JPEG (Squarespace CDN): The total file size is 32 MB.
ImageKit CDN: The total file size is significantly reduced to 4.8 MB.
Cloudinary CDN: The total file size is reduced to 5.7 MB.
Total Number of Images: 27
Using ImageKit and Cloudinary CDNs noticeably decreases the overall file size compared to the original JPEGs served from Squarespace's CDN. This reduction can greatly improve page load times and performance.
Takeaway
The JavaScript custom code above is set to run on the DOMContentLoaded event. However, since image loading in the browser is a race, it's impractical to override all image srcset attributes on pages. As a result, sometimes images may still be served in their original format, especially above-the-fold images. Therefore, images at the top of your page, such as fullscreen banners or background images, will still need to be optimized before upload.
Disclaimer: In the next few weeks, we will publish a complete solution using Cloudflare to replace all image src attributes before the page load.
Since we set the delivery format for these services to auto, the image file type is determined by the server. In rare cases, this might result in the server serving the JPG counterpart instead of WebP. While you can explicitly request WebP conversion, it’s not recommended to ensure maximum compatibility.
You still need to monitor bandwidth usage to see if the free tier plan meets your needs.
Conclusion
By exploring these services for your Squarespace image pipeline, you gain an efficient solution for serving next-gen format images with automatic optimizations and detailed analytics.
If your primary focus is on image delivery and detailed usage insights, ImageKit is the ideal choice.
For more advanced features and video transformations, Cloudinary remains a strong alternative.
Choose the option that best aligns with your specific needs for an optimized and engaging web experience.

6 Squarespace Integrations for Marketing Your Online Shop
Are you working with a Squarespace website? It’s important to have strategies in place for marketing your business. Here are some great tools that can help:
We love Squarespace for a number of reasons; the awesome themes, how easy it is to use… Reason #401 is that there are a number of great tools you can use for marketing your business.
If you’ve had a website for a little while, you’ll know that it’s not simply a case of “build it and they will come.” There are millions of websites online and you need to somehow draw just some of the browsing traffic to your website.
Building a good-looking, functional website is just your first task. Next up, you’ll need to tackle how you’re going to market it, by drawing more eyes to your site and keeping them interested once they’re there. Here are some great plugins and integrations that can help:
(Note: Some of these may contain affiliate links)
Get our tips for where to begin marketing a new website here
#1. Convertkit
If you’re wanting to drive more targeted traffic to your website, then email marketing is a great way to do this. The idea is that you build up a list of email subscribers who are part of your target market and interested in what you have to say.
People often wonder if it’s still worth bothering with email marketing given that the number of daily emails sent is projected to soar past 306 billion this year. Data from a few different email marketing studies indicates that it is worth doing. Consider these points:
Within ecommerce, email has higher conversion rates at 4.29% average than direct referrals (2.93%), search (3.04%) and social (1.81%). (Smart Insights)
59% of consumers say that email marketing influences their purchasing decision. (Hubspot)
Email marketing is worth doing, but in order to use it successfully, you need the right tools! You don’t want to be manually inputting email addresses or sending out email blasts to everyone when the content is only relevant to a segment, for example.
Convertkit is an excellent email marketing tool that integrates with Squarespace websites. The tool allows you to do things like:
Grow your email list using features like sign-up forms and landing pages. There are typically more design options than what you’ll find available through Squarespace.
Create smart, professional-looking emails.
Put marketing automation in place. This is essential for efficient email marketing. For example, you can set up automated sequences based on the actions or interests of people on your list. You can segment your audience based on their personal interests so that you can send the right message at the right time. The screenshot below shows a good example:

View reports and track metrics, so that you can decide upon what you might test or improve.
You can get started with Convertkit on a free plan, but paid tiers offer more features and more email numbers allowed per month.
#2. RightMessage
The power of segmentation is a key strategy for marketing effectively. Segmentation allows you to get the right message to the right people at the right time. It means your messaging can be highly relevant to the people who are seeing it, which is always going to get better results than a “one size fits all” approach!
As far as tools that integrate with Squarespace, RightMessage is a great choice for targeted messaging. It works by behaviourally segmenting your website visitors, so that they are seeing information that is relevant to them. In other words, every website visitor doesn’t always see the same things.
Visitors can be presented with offers based upon their customer journey. This is one way to keep it relevant - if they’ve looked at certain things or interacted with others, it shows what they are interested in.
RightMessage allows you to target:
Opt-in offers
Sales pages
Landing pages
Your email list.
They have features that allow you to set up surveys or quizzes on your website so you can learn more about the people who are visiting. The screenshot below shows an example of how they might help you to segment website visitors:

You can take a free 14-day trial of RightMessage and plans start at $29 per month.
#3. Product Color Image Swatch
Do you sell products with color variations? People will want to see exactly what those colors look like before they decide on a purchase, but it can be time-consuming photographing and uploading every variation.
This is where the Product Color Image Swatch plugin comes in. Instead of having a text drop-down for color variants, you can show a swatch image. You can set up the plugin with your own hex codes for colors and can also upload your own images or patterns.
An example is shown in the screenshot below:

Product Color Image Swatch is $39 for a standard license (one site), or $117 for a business license (more than one site).
#4. Product Gallery Video
Sometimes video really is the best way to give customers a better feel for a product they see online. After all, it’s not like brick-and-mortar stores where they can pick items up and look them over - you have to show all angles online so that they can approximate that experience.
Reviews of various studies show that product videos sell. For example, one online retailer found that product videos made customers 144% more likely to purchase. Of course, to make an impact, you need a high-quality video showing different angles of the product.
On Squarespace websites, you also need a reliable plugin to set up your video. This is where the Product Gallery Video plugin comes in. You can either set it up yourself, or get help from our concierge service.
Product Gallery Video is $27 for a standard license (single website) or $87 for a business license (multiple websites).
#5. SEMrush
Every successful marketer relies upon accessing good quality data. Why? Because you need to be monitoring the right metrics to track your progress and figure out what works.
SEMrush has a comprehensive package of features, providing insights and analysis for optimizing many areas of your marketing. For example:
SEO workflows
Analysis for paid traffic
Social media analysis
Content marketing insights
Market research data.
At the time of writing this, they offer around 35 different tools, monitor billions of keywords, and trillions of links and domains. They offer a seven-day free trial, after which you’d choose one of their tiered plans.
#6. Referral Candy
Customer referrals are a powerful way to market your business. We know that people look for recommendations from others whom they know and trust. Word-of-mouth referrals make up 20-50% of all purchasing decisions, so finding ways to encourage those referrals can be an important boost to your business.
One way to achieve this is to implement a referral program among your customers. Essentially, you’re rewarding them for referring new customers to your business. You can run this from your Squarespace website, but you need the right tools to do it.
Referral Candy is a customer referral program software that integrates with your Squarespace website. The system allows you to automate your referral program so that once it is set up, customers can refer via a set tracking process. They offer some great templates and promotion across different marketing channels.
Referral Candy offers a 30-day free trial, after which you sign up for a monthly plan.
More affiliate and referral plugins
Download our tips here for marketing a new website
Final thoughts
Squarespace provides you with great tools to build a beautiful website, but once that’s done, you need to market it!
The tools we’ve highlighted here cover a few different areas of marketing, all of which can play an important role for your business. Where should you start? We’d suggest starting with the things you can manage on your website, such as SEO and building an email list. You can always move onto some more advanced strategies (which can involve a bigger investment in software) once you’ve got some steady business coming in.
Wherever you choose to start, it’s important to have a strong marketing strategy in place. This is how you can get noticed among the millions of other websites.

How to Become a Pinterest Verified Merchant with Squarespace
Pinterest’s Verified Merchant Program (VMP) is a way to recognize trusted businesses, giving them a special badge and increased visibility.
This guide walks you through the requirements and steps to apply as a Squarespace store.
Eligibility Requirements
Before you begin the application, ensure you meet the following:
Pinterest Account: Your account must be a minimum of three months old.
Website: Your business website must be claimed (see below) on Pinterest and at least 13 months old.
Profile: Your Pinterest profile must have a profile picture and completed "About" section.
Merchant Guidelines: Your products and website must adhere to Pinterest's Merchant Guidelines.

Preliminary Steps
Before you can apply for the Verified Merchant Program, you need to complete a few preliminary steps. These steps are necessary to set up your Pinterest business account and verify your website.
Step 1: Convert Personal Pinterest Account to a Business Account

Click the drop-down arrow in the upper right corner of Pinterest.
Select Settings.
Select Account Settings.
Scroll down to Account Changes.
Select Convert Account.
Double-check that the email address is the one associated with your Pinterest personal account.
Click Continue.
Step 2: Verify your Website with Pinterest

Log in to your Pinterest business account.
Click the directional chevron down icon in the top-right corner to open your menu.
Select Settings.
Click Claimed accounts from the left-side navigation.
Click Claim next to Websites.
Click the text in the box below Add HTML tag to copy it.
Click Continue.
In a separate window, log in to your website.
Go to pages > Website Tools > Code Injection > Header and Paste the HTML Tag.
Return to Pinterest and enter your website URL in the text box.
Click Verify.
Now that you've completed the preliminary steps, you're ready to begin the application process. These steps involve connecting your product catalog, setting up conversion tracking, and ensuring that your tracking system sends the necessary data.
Become a Verified Merchant

Step 1: Connect Catalog
Connecting your product catalog to Pinterest is essential for creating Product Pins, which display important information about your products, such as price and availability. Here's how to connect your catalog:
Export your products from Squarespace.
Upload the CSV Below
Upload the CSV file you exported from Squarespace
Enter your domain (e.g., https://yourdomain.com).
Enter the country currency (e.g., USD).
Enter the appropriate Google Product Category for your products (you can find it here).
Go to Pinterest and upload your data source manually:
Log in to your Pinterest business account from your desktop.
Click the hamburger icon at the top-left of the page.
Under Business, click Catalogs and product groups.
Click Add data source.
Click the Upload manually tab.
Fill in the details for your data source (name, country/region, language, default currency).
Click Choose a file to select your data source from your desktop, or drag and drop your data source into the box.
Click Upload data source.
Step 2: Set Up Conversion Tracking
Choose one of these methods to track customer actions on your website. Option 1. Manual pinterest tagging or Option 2. Google Tag Manager.
Option 1: Pinterest Tag
Add the following code to the sitewide code injection:
The base code is required for conversion tracking. Change the part of the code below that says CHANGE-ME to your unique tag ID ID which can be found here:
It's generated in the Conversion Tag Manager (link requires login), and it contains your unique tag ID.

Go to Pages > Website tools > Code Injection > Header.
EXAMPLE BASE CODE

<!-- Pinterest Tag -->
<script>
!function(e){if(!window.pintrk){window.pintrk = function () {
window.pintrk.queue.push(Array.prototype.slice.call(arguments))};var
  n=window.pintrk;n.queue=[],n.version="3.0";var
  t=document.createElement("script");t.async=!0,t.src=e;var
  r=document.getElementsByTagName("script")[0];
  r.parentNode.insertBefore(t,r)}}("https://s.pinimg.com/ct/core.js");
pintrk('load', 'CHANGE-ME', {em: '{customerEmailAddress}'});
pintrk('page');
pintrk('track', 'pagevisit');

</script>
<noscript>
<img height="1" width="1" style="display:none;" alt=""
  src="https://ct.pinterest.com/v3/?event=init&tid=CHANGE-ME&pd[em]=<hashed_email_address>&noscript=1" />
</noscript>
<!-- end Pinterest Tag -->
Add the checkout code to the code injection order confirmation/status page:
<script>
pintrk('track', 'checkout',{
value: {orderGrandTotal},
order_quantity:1,
currency: 'USD'
});
</script>

<noscript>
<img height="1" width="1" style="display:none;" alt=""
src="https://ct.pinterest.com/v3/?tid=CHANGE-ME&event=checkout&noscript=1"/>
</noscript>
Add the "Add to Cart" event code to your shop page advanced code injection:
<!-- Pinterest Pixel - Tracking clicks on Buttons -->
<script>
  function ptTrackingClicks() {
    // Add to Cart
    var cartButton = document.querySelector('.sqs-add-to-cart-button');
    if (cartButton) {
      cartButton.addEventListener('click', function() {
        var productVariants = document.querySelector('.product-variants');
        if (productVariants) {
          var variantsData = productVariants.getAttribute('data-variants');
          if (variantsData) {
            var variants = JSON.parse(variantsData);
            if (variants && variants.length > 0) {
              var sku = variants[0].sku; // Assuming the SKU is associated with the first variant
              if (sku) {
                pintrk('track', 'AddToCart', {
                  product_id: sku // Use the SKU as the product ID
                });
              }
            }
          }
        }
      }, false);
    }
  }

  document.addEventListener('DOMContentLoaded', ptTrackingClicks);
</script>
<!-- end Pinterest Pixel - Tracking clicks on Buttons -->
Option 2: Google Tag Manager (Pending)
Step 3: Ensure Conversion Data
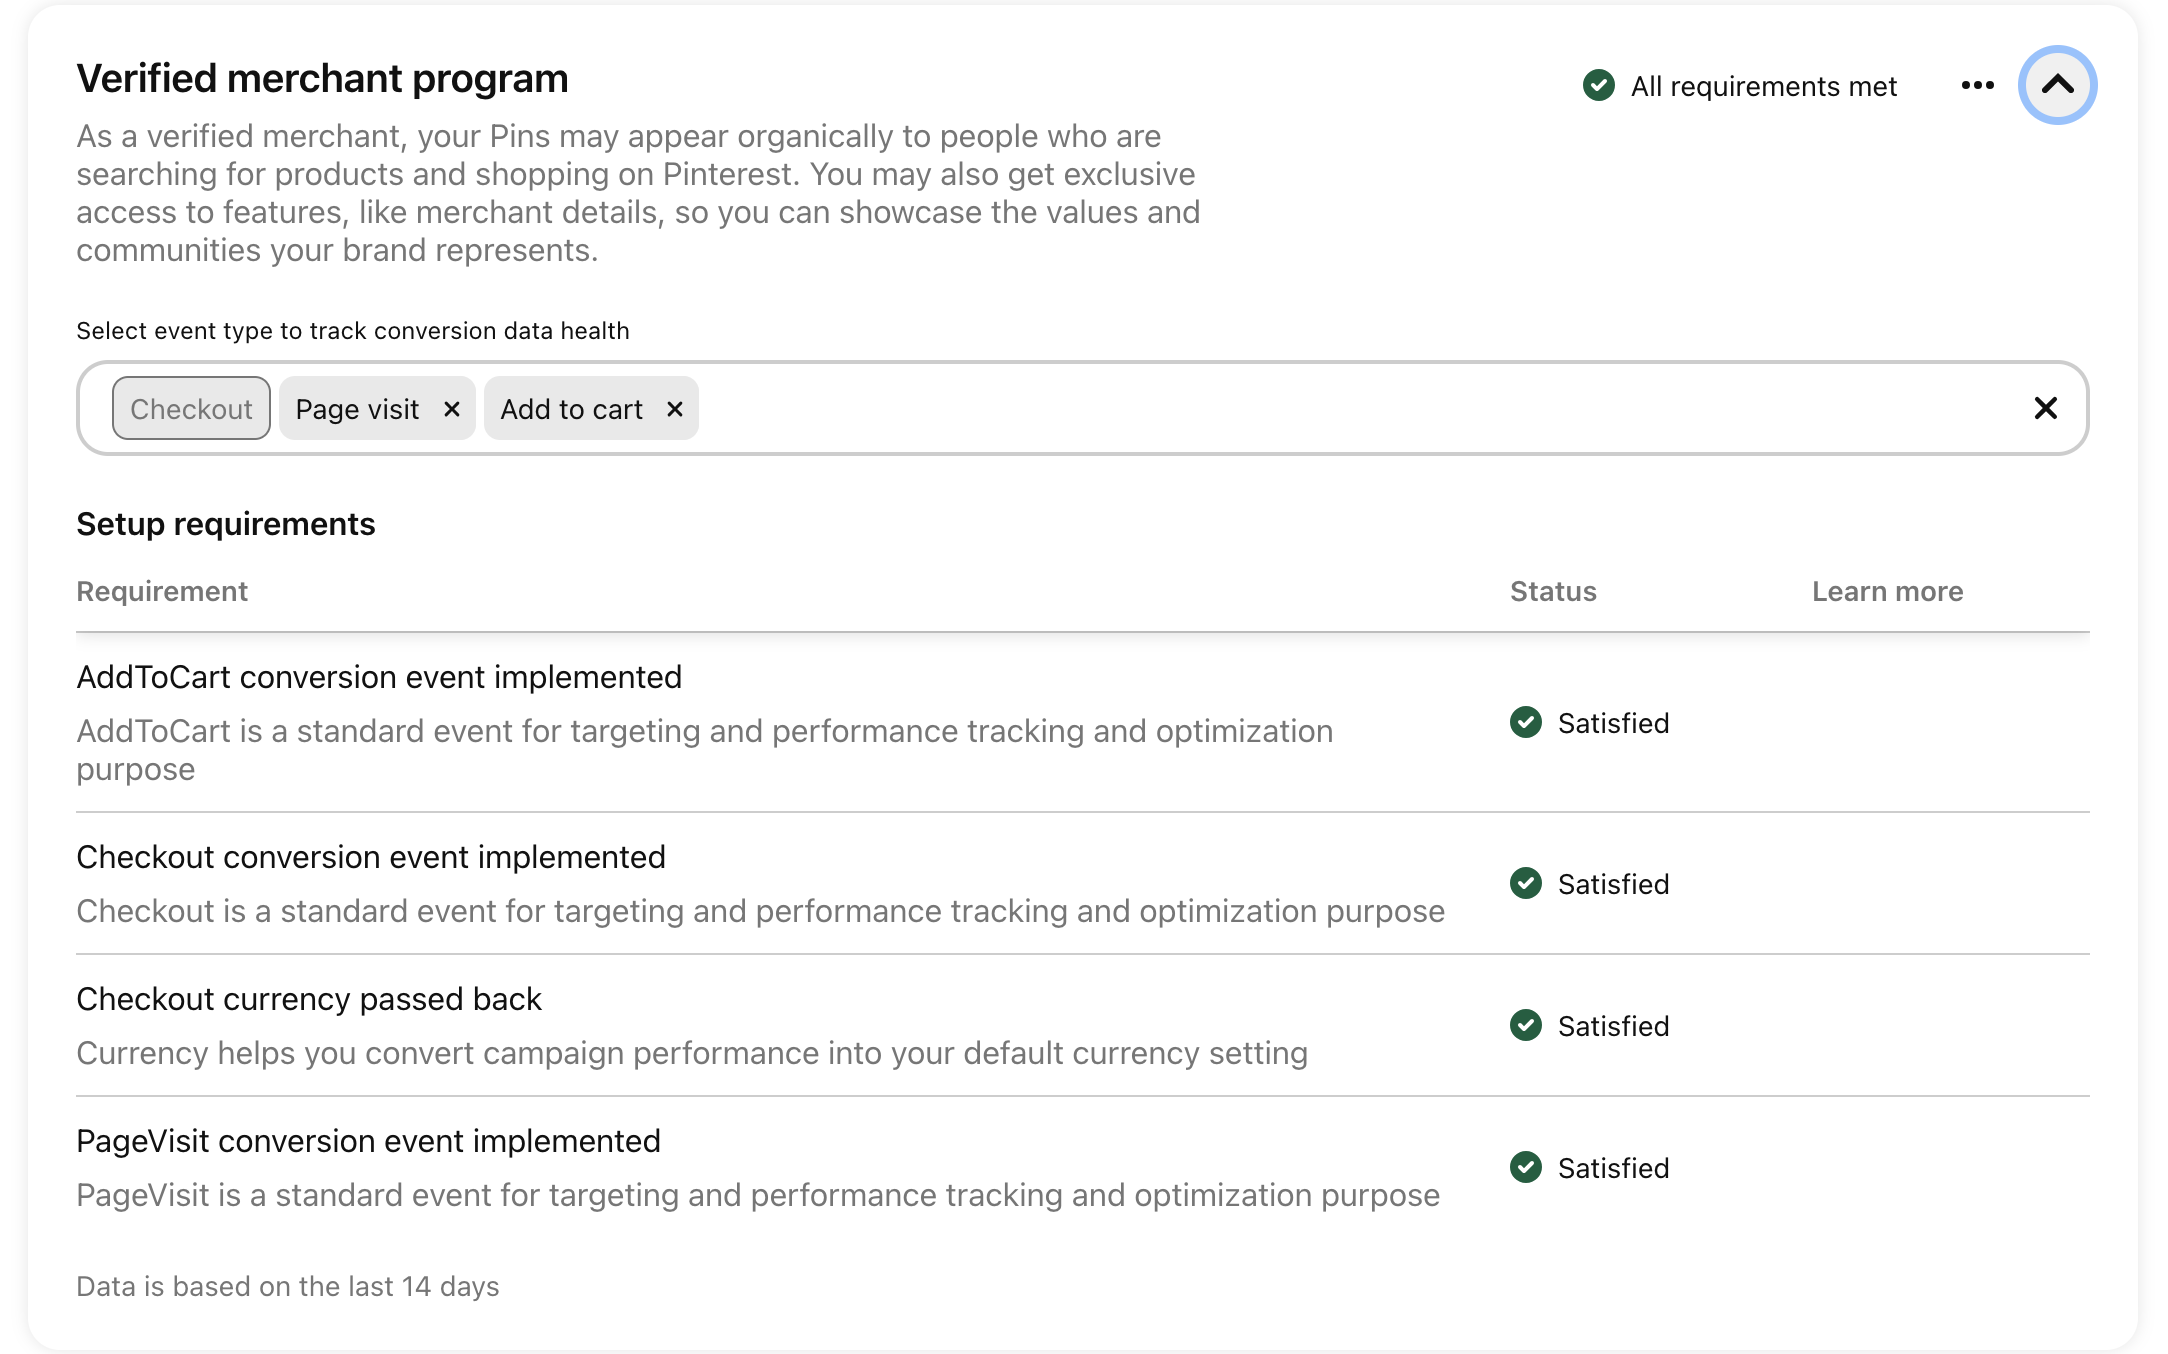
Within the last 30 days, your tracking system must have sent the following events (with checkout events including currency):
At least one 'Page Visit'
At least one 'Add to Cart'
At least one 'Checkout'
To make sure this happens, create a dummy order by creating a 100% off discount code and buying something from your shop.
In Pinterest go to Conversions > Events Overview to make sure it registered.
Take a look at an overview of event activity on your website.
Important Notes
If you don't meet the eligibility requirements, you won't be able to join the VMP.
Pinterest reviews your products and website after you upload your catalog. You'll be notified if you don't comply with the Merchant Guidelines, and you have the option to appeal the decision.
How to Apply Directly
Use this link to directly apply for the Verified Merchant Program: Apply to the Verified Merchant Program

