
What’s worth knowing in the Squarespace world.
For designers, developers, and people building businesses around Squarespace.

Essential Tweaks to Improve Your Squarespace Blog in 2025
This post is a collaboration with BeyondSpace.studio
Squarespace is a great blogging platform, but it still has some limitations that can slow down your workflow. Whether it’s inconsistent formatting, inefficient navigation, or missing features, these small frustrations add up over time. Fortunately, new tools and plugins can help bridge these gaps, making Squarespace blogging more efficient, user-friendly, and optimized for SEO.
Here’s a look at some key improvements that can transform how you manage content on your Squarespace blog.
Consistent Blog Date Formats for a Professional Look
One common frustration for Squarespace bloggers is the inconsistent date formatting across different areas of a site. Blog posts, summary blocks, and lists often display dates in different formats, disrupting the overall design cohesion.
Beyondspace Date Format plugin solves this by applying a uniform date format across your entire website. This ensures a polished, professional appearance while also making it easier for readers to navigate past content without confusion.
For instance, Ichiyamamart applies the YYYY-MM-DD format on its Magazine page, maintaining a clean and structured look.

Beyondspace date format in action
If you're looking for a detailed setup guide, Melody.tech provides an in-depth tutorial on adjusting date formats in Squarespace.
📌 Learn how to apply a consistent date format
A Smarter Way to Edit Publication Dates
Refreshing older content for SEO is a smart strategy, but Squarespace’s default date picker makes it unnecessarily difficult. Clicking through months one by one is frustrating—especially if you’re trying to update posts from years ago.
Beyondspace Publication Date Picker introduces a more intuitive navigation system with dedicated year and month views. This makes it easy to adjust blog post dates in just a few clicks, whether you’re republishing content, fixing errors, or aligning posts with a seasonal marketing strategy.
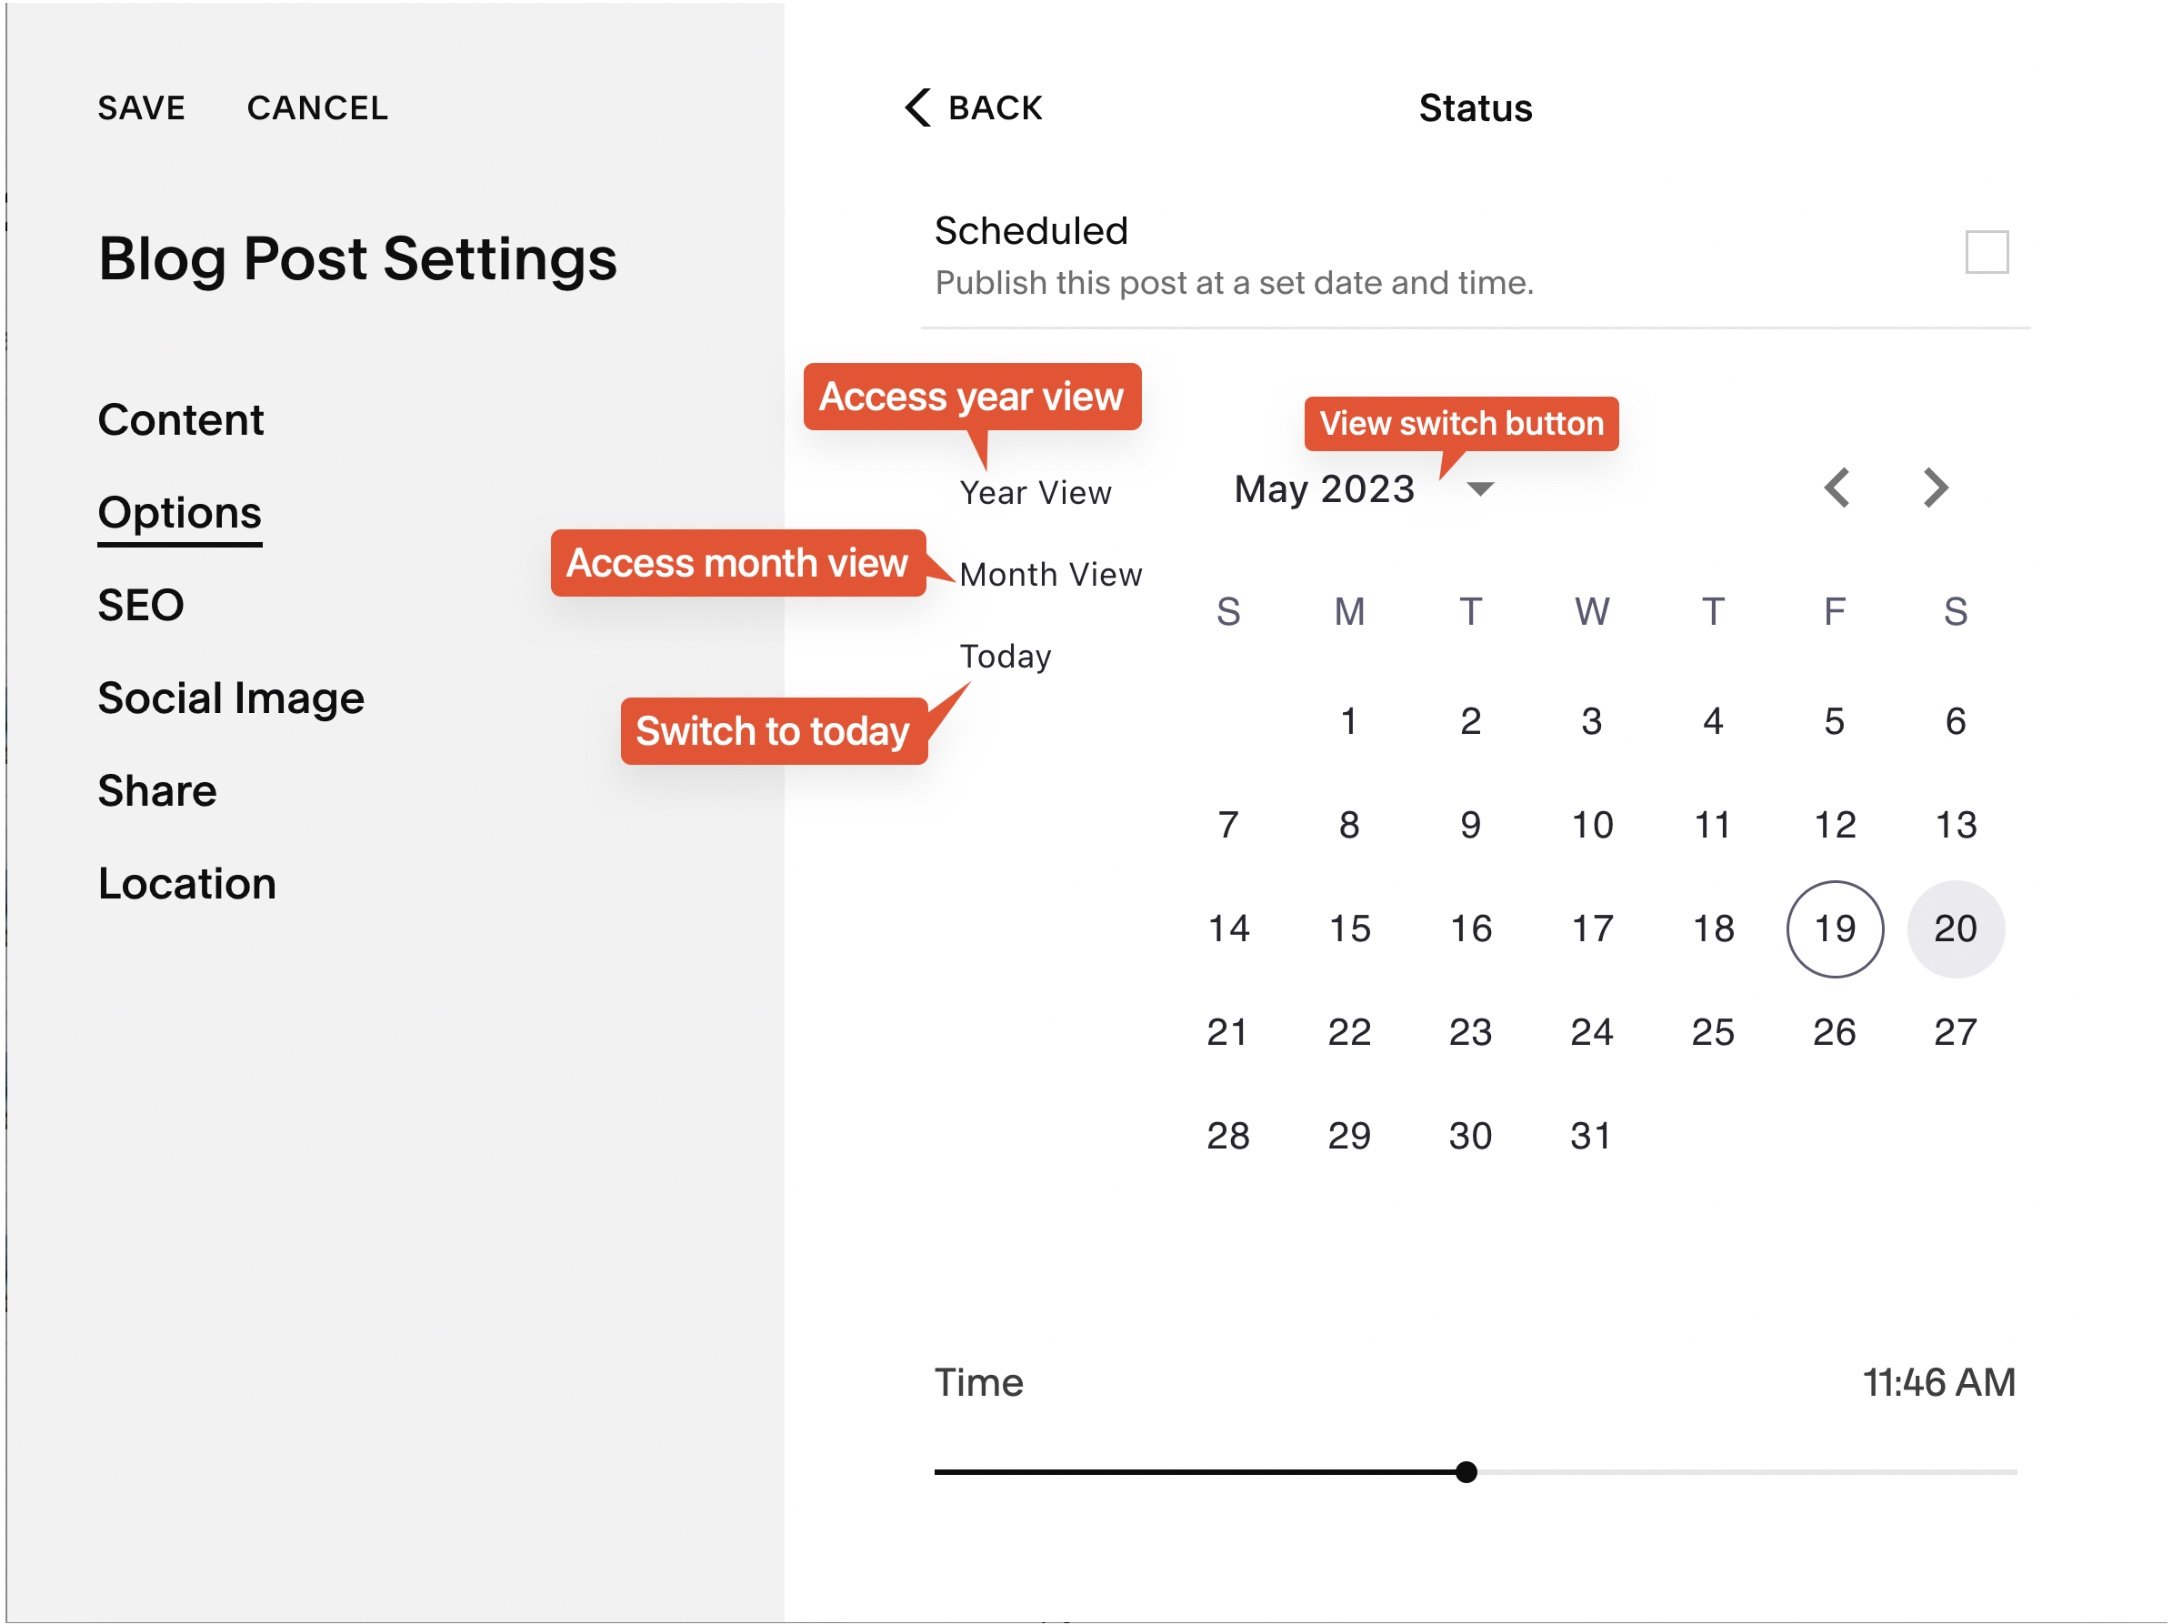
Beyondspace Publication Date Picker
Christy Price recently highlighted this plugin in her Squarespace Blogging Wishlist.
Smarter Internal Linking for SEO & Engagement
Squarespace’s built-in Link Editor lacks an automatic way to link to other blog posts, forcing users to manually copy and paste URLs.
Smart Link (LITE) from Beyondspace eliminates this hassle by introducing an intuitive internal linking system. Just type a dash (/) after a collection slug, and it will instantly suggest relevant internal posts. This feature enhances SEO, reduces bounce rates, and improves reader navigation by making it easier to cross-link relevant content.

Smart Link (LITE) from Beyondspace
Reuse Content Blocks Across Your Blog
If you frequently use the same elements—such as author bios, call-to-action banners, or promotional sections—updating them manually across multiple posts is time-consuming.
Beyondspace Synced Blocks simplifies this by allowing you to edit content in one place and automatically update it everywhere it appears. Unlike traditional Squarespace content blocks, which require manual duplication, Synced Blocks are embedded directly into the page’s HTML. This not only saves time but also enhances SEO, ensuring Google can efficiently crawl and index the content without JavaScript delays.
Katelyn from launchthedamnthing.com has streamlined her blog updates using Synced Blocks. Check out how she reuses Image Blocks for affiliate banners in her posts.
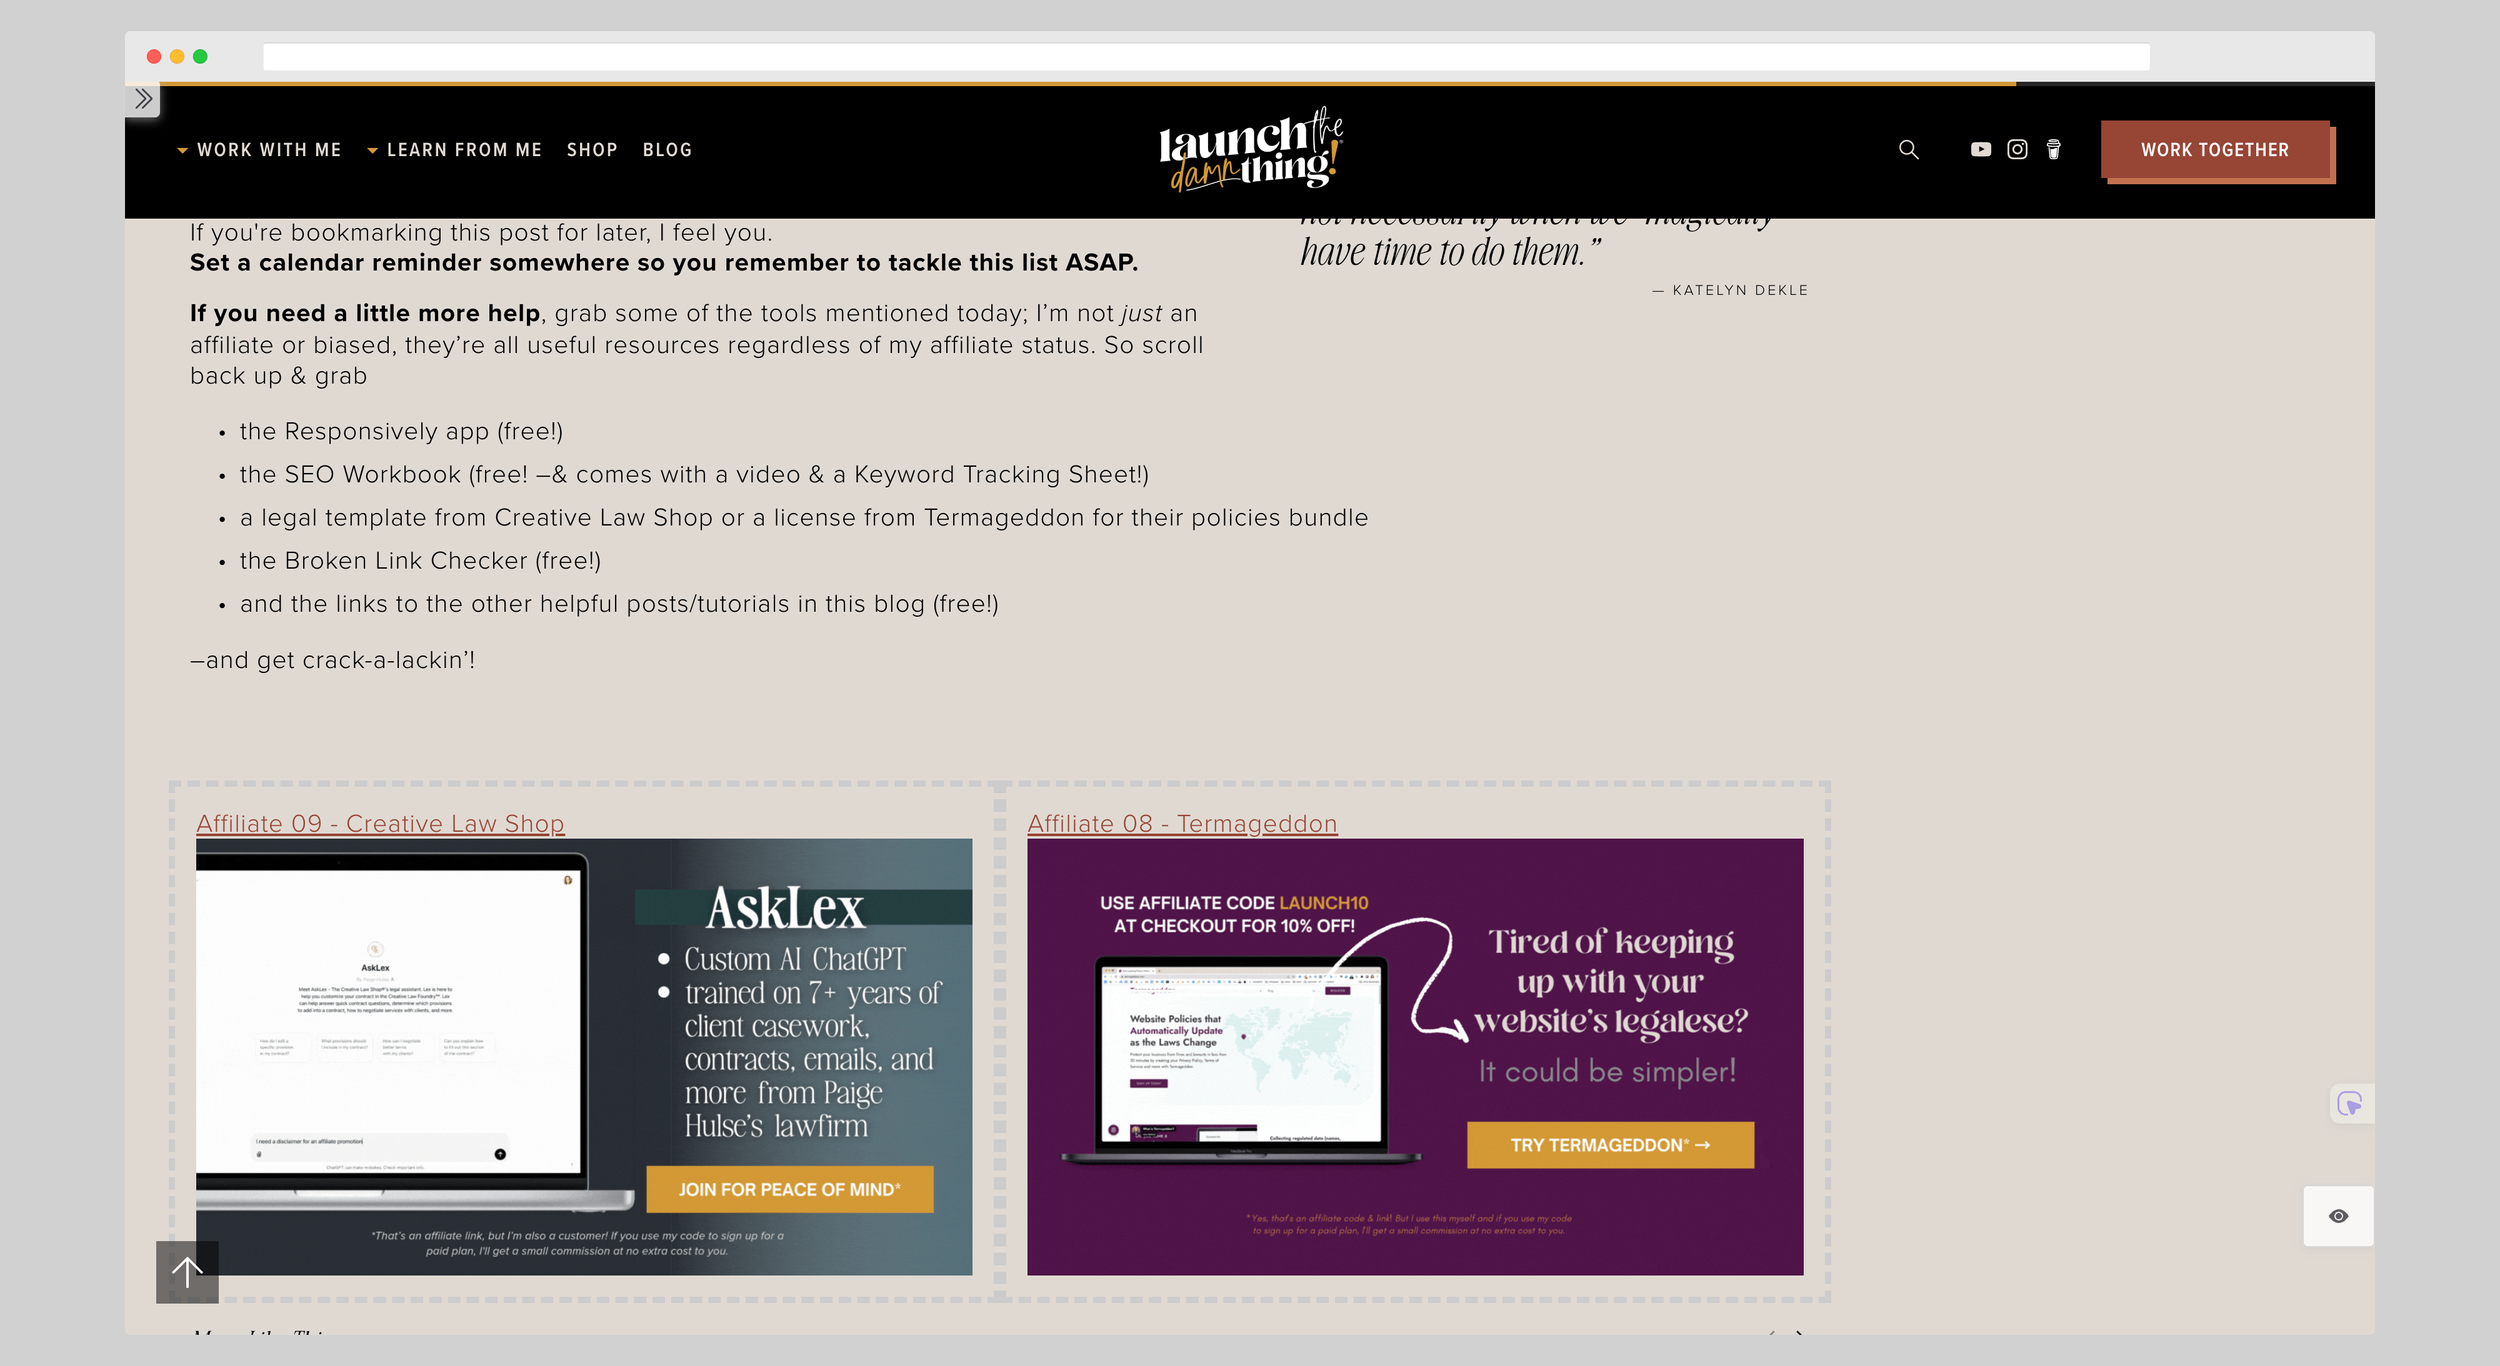
Synced Blocks example
📌 Get started with Synced Blocks
Improve Navigation with Direct Source Links
For bloggers who frequently reference external sources—whether for event listings, news updates, or curated content—making it easy for readers to access the original source is essential. However, Squarespace’s blog list does not provide direct redirection to source URLs in “Read More” link, and event collections lack built-in support for outbound links altogether.
Beyondspace Source URL Helper plugin solves this by enabling access to source URLs across collection pages, summary blocks, and calendar blocks for Events and Blogs collection. This small tweak improves user experience, keeps visitors engaged, and is particularly useful for affiliate marketers or news-focused blogs.
Advanced Search That Actually Works
Squarespace’s default search function often struggles with accuracy, displaying outdated or irrelevant results. This can frustrate visitors and lead to lost engagement.
Monocle for Squarespace is a full-text search plugin that significantly improves search accuracy, speed, and relevance. Unlike the native search, Monocle indexes all content—including gated or members-only posts—ensuring users find what they need quickly.

Monocle for Squarespace
📌 Enhance your site’s search experience
A Table of Contents for Easy Blog Navigation (Coming Soon!)
Long-form content can be difficult to navigate, leading to higher bounce rates if readers can’t find the sections most relevant to them.
A sticky Table of Contents solves this by providing a floating sidebar that allows users to jump to different sections instantly. This upcoming feature will be available soon across Beyondspace Blog.

Table of content sample
📌 See a live preview on Sqspthemes.com
Bulk Import & Update Blog Content
Moving your blog to Squarespace shouldn’t be a tedious, manual process. Whether you're switching platforms or restructuring your content, transferring posts one by one is time-consuming and prone to errors.
Sqspthemes Blog Upload Tool simplifies blog migration, allowing you to import entire blogs in minutes. Instead of manually copying and pasting, you can upload content in bulk while preserving formatting, structure, and metadata. This tool is especially useful for those looking to quickly create summary blocks or update content across multiple pages without repetitive work.
Additionally, for those managing multiple blogs or merging content, this converter seamlessly integrates new posts into an existing blog—offering flexibility whether you're starting fresh or building on an established archive.
📌 Learn how to migrate your blog seamlessly
Final Thoughts
These enhancements make Squarespace blogging not only more efficient but also better optimized for SEO and user experience. Whether you’re looking to improve content organization, streamline navigation, or boost search visibility, these tools provide simple but powerful solutions.





The 6 Stages of Squarespace Entrepreneurship
Over the years, I’ve interviewed dozens of entrepreneurs on this podcast, listening to their struggles, breakthroughs, and lessons learned while building successful ventures on Squarespace. Through these conversations, I’ve discovered that most Squarespace entrepreneurs progress through six distinct stages of growth. There’s no fixed timeline—some race through quickly, while others spend more time mastering each phase. Yet every stage comes with its own unique challenges, milestones, and opportunities.
My goal is to help you pinpoint where you are on this journey so you can channel your energy effectively and unlock your full potential.
Let’s dive in.
1. The Curious Creative
“Wait… people want to pay me for this?”
You’ve just created a Squarespace site for yourself. Maybe it’s a portfolio, a blog, or a website for a side project you’re passionate about. You’re proud of it, but then something unexpected happens - people start noticing.
“Who built your site?”
“Wow, this looks great—can you make one for me?”
Suddenly, you’re faced with a new question: Is this a thing? Could I actually make money creating websites for other people?

If this sounds familiar, welcome to Stage 1: The Curious Creative.
That first person who asks you to build a site for them—whether it’s a friend, family member, or colleague—is a defining moment. It’s exciting, but it also comes with new challenges.
This is where curiosity begins to shift. At first, you were just exploring Squarespace, building something for yourself. But now, you’re starting to wonder if this could be something bigger. Could creating websites could actually lead to freelancing—or even a business?
Common Questions at This Stage
How much should I charge?
You’re trying to figure out how to price your work, and it feels awkward. You don’t want to charge too much (what if they say no?), but you also don’t want to undercharge.Am I even qualified?
You might feel like an imposter like you need more experience or skills before you can call yourself an “expert.”What’s the next step?
You’re wondering if there’s a roadmap to follow. What tools, resources, or skills do you need to take this from a one-off request to something sustainable?
What now?
If you’re curious about turning this into a real opportunity, here’s how to take the next step:
Say Yes
Start with one project. Even if it’s for a friend or at a lower rate, the experience will teach you so much about working with clients and building sites for others.Learn as You Go
You don’t need to know everything right now. Focus on what you already know and build from there. There are plenty of tutorials and guides to help you fill in the gaps (more on that below).Keep It Simple
Start small and keep you’re offering simple. You don’t need to offer advanced features or complex integrations just yet.Find Your First Resources
Look for beginner-friendly tools to help you get started. Join a few Web design/Squarespace communities to get pro tips and advice.Some ideas on what to look for:
Pricing guides to help you figure out what to charge.
Proposal templates to streamline your first client interactions.
Client communication tips to set expectations from the start.
As you move through Stage 1, you’ll start to see what’s possible. With each project, your confidence will grow. You might decide to officially launch your freelance business—or at least start experimenting with the idea.
Stay curious, keep learning, and take one step at a time. You’re already further along than you think.
2. The Freelancer Awakens
“I just got paid to build a website… now what?”
You’ve said yes to your first project—or maybe even your first few. You’ve built something, handed it over to a paying client, and watched them light up when they see their new site live. It feels amazing, doesn’t it?
But along with that rush of excitement comes a flood of new questions:
What should I charge for the next project?
How do I find more clients?
Am I really ready to call myself a freelancer?

If this sounds familiar, welcome to Stage 2.
I’ll never forget my first $5,000 contract. It was for a State Senate candidate who needed a campaign website and social media strategy. I threw everything into it—building the site, organizing photo shoots, even managing their social media. But when it came time to get paid, the new campaign manager scoffed at my rate. “What are you, a lawyer?” she asked. A few weeks later, the campaign lost funding, and suddenly, they couldn’t pay me.
That’s when I realized freelancing wasn’t just about creative work—it was about business skills. If you’re in this stage, you might be wondering: How do I price my work? Where do I find more clients? More importantly, how do I avoid getting ghosted?
If you’re feeling that way, know that it’s normal. This stage is all about learning through experience. The more you practice, the easier it gets.
Key Milestone: Completing Your First 1–3 Client Projects
These initial projects are where everything starts to click. You’re figuring out how to:
Deliver on a client’s vision while balancing your creative instincts.
Communicate effectively, keeping clients informed and supported.
Charge for your time and skills, even if pricing still feels a bit awkward.
Every completed project acts as a stepping stone, helping you grow in both skill and confidence. Even better, those first three clients often lead to the next three—especially if you showcase your work in a simple portfolio or on social media. By highlighting your successes, you demonstrate real-world results and attract more inquiries naturally.
What Success Looks Like in Stage 2
Success in this stage isn’t about having everything figured out—it’s about learning the ropes and building momentum. Every project you complete brings you closer to:
Feeling confident in your ability to deliver great work.
Charging prices that reflect the value you provide.
Building relationships with clients who trust and recommend you.
How to Move Forward
Refine Your Pricing
Start by experimenting with project-based pricing instead of hourly rates. This gives clients a clear picture of what to expect and helps you avoid burnout. Use a simple formula to calculate your rates:Estimated hours to complete the project × your ideal hourly rate = Base price.
Add a buffer for revisions, communication, and unexpected challenges.
Build a Starter Portfolio
You don’t need dozens of projects to have a great portfolio. Start with your best 2–3 pieces and include:A screenshot of the site.
A short description of the client’s goals and how you helped them achieve those goals.
A client testimonial, if possible.
Create a Simple Proposal Template
Make it easy to pitch your services to potential clients by creating a reusable proposal template. Include:A summary of the client’s needs.
Your process and timeline.
A breakdown of what’s included in the project (and what’s not).
Clear pricing and payment terms.
Learn Basic Client Communication Skills
Strong communication can make or break a project. Focus on:Setting expectations early (e.g., what’s included in the project and how revisions work).
Responding to feedback professionally, even when it’s unclear or difficult.
Politely but firmly saying no to requests outside the scope of work.
Start Marketing Yourself
Your next client won’t always come from word of mouth. Start experimenting with simple ways to market your services, like:Posting about your work on social media.
Asking satisfied clients for referrals.
Creating a basic “Work With Me” page on your website.
What’s Next?
As you wrap up your first few projects, you’ll start to feel a shift. You’ll realize that freelancing is more than just building websites—it’s about building a business. And with each new project, you’ll gain the skills and confidence to take things to the next level.
3. The Expert in the Making
You’ve completed enough client projects to realize something big: not all work is created equal. Some projects light you up, others drain you, and some clients seem to fit your style perfectly while others feel like a constant struggle.
You’re starting to ask yourself:
What kind of work do I actually want to do?
Who do I want to work with?
How can I focus on the clients and projects that energize me—while saying no to the ones that don’t?

If you’re here, welcome to Stage 3.
After months of taking whatever gigs I could find—videography, music videos, startup branding—I was exhausted. I had no focus. Then my friend Nathan asked me a simple question: “What’s your biggest win?” I didn’t know how to answer. He pressed me: “What’s the one thing you can do right now that people actually pay you for?” The answer was right in front of me: Squarespace.
I had been landing Squarespace gigs for months, but I wasn’t treating it like a niche. Once I stopped fighting it and doubled down, everything changed. If you’re in this stage, you’ve probably noticed patterns in your own work. Some projects energize you—others drain you. The key now is to lean into what works and build a reputation around it.
If you’re hesitant to niche down, I get it. But remember: clarity creates confidence—and confidence attracts opportunities.
The Expert Mindset
This stage is about clarity. You’re ready to move beyond being “just another freelancer” and become the go-to expert for a specific type of client or project. The idea of niching down is exciting, but it’s also scary—what if you choose the wrong niche? Or worse, what if you narrow your focus and miss out on opportunities?
Common Challenges at This Stage
Fear of Niching Down
You might worry that focusing on one audience or service will limit your opportunities or leave you feeling boxed in.Maintaining Quality as You Scale
With more projects coming your way, it’s harder to keep up with everything. You might feel like you’re working longer hours just to stay on top of things.Creating Systems to Scale
You realize you need better workflows and processes to handle the growing demand for your services.Standing Out from Competitors
You’re wondering how to differentiate yourself in a crowded market and attract the right clients.
What Success Looks Like in Stage 3
Success in this stage is about narrowing your focus and building a reputation. You know you’ve arrived when:
Clients seek you out because they’ve heard you’re the person for their type of project.
You feel confident saying no to projects that don’t align with your niche or goals.
Your processes are dialed in, making your work more efficient and scalable.
How to Move Forward
Define Your Niche
Start by reflecting on your past projects. Ask yourself:Which projects did I enjoy the most?
Which clients were the easiest to work with?
Where did I add the most value?
These answers can point you toward a niche that aligns with your skills, passions, and market demand.
Optimize Your Workflow
Streamline your processes to save time and reduce stress. Focus on:Creating templates for proposals, contracts, and client communications.
Using project management tools to stay organized.
Automating repetitive tasks like invoicing and scheduling.
Update Your Portfolio
Showcase your niche by curating your portfolio to highlight projects that align with your focus. Use case studies to demonstrate your expertise and the results you’ve delivered for clients.Market Yourself as the Go-To Expert
Position yourself as a specialist by:Creating content that speaks directly to your ideal client’s needs (e.g., blog posts, case studies, social media).
Updating your website to reflect your niche and expertise.
Building relationships in communities where your ideal clients hang out (e.g., online groups, local meetups, industry events).
Learn to Say No
Not every opportunity is the right fit. By focusing on projects that align with your niche, you’ll create more meaningful work and build a stronger reputation.
Are You in Stage 3?
Have you started thinking about niching down or positioning yourself as a go-to expert? What’s your biggest challenge right now? Drop a comment and let’s chat—I’d love to hear where you are in your journey.
4. The Fork in the Road
“How can I make money without relying on client work?”
You’ve built a name for yourself as a skilled Squarespace freelancer. Clients love your designs, referrals are steady, and you’re regularly booked out. Yet, you find yourself thinking there must be a way to grow your business that doesn’t hinge solely on trading hours for income.
That’s when you notice the many roads branching before you. You can:
Build Software (plugins, extensions, or other add-ons)
Design Templates for niche audiences
Launch an Agency and hire a team to scale your services
Create Courses to teach your proven methods
Blend Approaches that combine any of the above
Whichever route you choose, the appeal is clear: you’re no longer limited to serving one client at a time. Instead, you can multiply your impact—and your revenue—by creating something that serves many people all at once.
By 2015, I had a steady flow of Squarespace clients, but I felt stuck. I was working nonstop, constantly tweaking client sites, but there was no leverage—I was still trading time for money. I saw an opportunity: Squarespace had no third-party template marketplace. If I could create templates, I could sell them over and over again instead of chasing clients.
But there was a problem—I wasn’t a great designer. My templates weren’t strong enough. So I pivoted. Instead of designing templates, I productized my services, turning common client requests into standardized Squarespace customization packages. That led me to plugins—small add-ons clients could install instead of hiring me for custom work.
This is the moment where freelancers hit a crossroads. You can keep scaling services (agency), transition into products (templates, plugins, courses), or do both. The key is realizing you don’t have to be stuck in client work forever.
If you feel ready to explore these options, trust the process. Your first venture beyond client services doesn’t have to be perfect; it just has to happen.
The Next-Level Growth Mindset
At this stage, you begin thinking more like an entrepreneur than a freelancer. You’re no longer just building websites for clients—you’re creating assets (or teams) that can scale your income and expand your reach.
Of course, with new territory come new questions:
Which path fits best with my strengths and interests?
How do I balance existing client work with developing a new product or service?
How do I effectively market something brand-new to my audience?
Key Milestone: Launching Your First Scalable Offering
Whether you’re coding a plugin, designing a Squarespace template, building an agency team, or creating an online course, the milestone is the same: you’ve taken that crucial step toward scaling your business beyond one-on-one client work. This marks your transition from freelancer to entrepreneur.
Common Challenges at This Stage
Balancing Client Work With New Endeavors
Your main source of income is still client projects. Finding time to develop software, build a template library, or hire and train team members can feel like a juggling act.
Marketing Your New Offering
It’s one thing to create a great product or service; it’s another to get people to notice (and buy) it. You’ll likely need new marketing tactics to stand out in a different arena.
Fear of Failure
It’s intimidating to invest time and energy into something untested. The ‘what if no one buys this?’ question lingers in every creator’s mind.
Building Systems for Scale
Managing sales funnels, deliveries, team processes, and customer support requires fresh workflows. You’re essentially setting up a mini-business within your business.
What Success Looks Like in Stage 4
Don’t expect to strike gold immediately. Success here is about:
Taking the Leap and learning through the process—whether that’s launching a plugin, rolling out a workshop, or onboarding your first hires.
Gaining an Understanding of how to market and sustain your new offering, even if you’re not hitting huge numbers right away.
Developing More Freedom by diversifying your income streams. Over time, that extra revenue can give you breathing room to innovate and grow further.
How to Move Forward
Start Small, Stay Focused
Your first foray into a scalable product or service doesn’t need to be massive. Solve a clear, specific problem. For example:
A Squarespace plugin that adds advanced functionality.
A mini-course on SEO for small businesses.
A pilot team of a few designers to handle projects under your agency brand.
Validate Your Idea
Before pouring hours into development or course creation, gauge real interest:
Survey your audience or run a poll.
Offer a freebie related to your idea and see how many people sign up.
Pre-sell your product or course to confirm demand.
Block Out Creation (or Hiring) Time
Whether you’re coding, recording videos, or recruiting and training new team members, treat it like a paid project. Block off focused hours each week so progress doesn’t stall.
Learn the Basics of Marketing & Operations
A successful launch depends on:
Growing an email list of potential buyers.
Sharing previews on social media or in a newsletter.
Setting up efficient systems (sales pages, payment processing, team workflows).
Prepare for the Launch
Even small launches need a plan:
Build anticipation with email teasers or beta invites.
Offer an introductory discount or bonus to early adopters.
Create a day-by-day strategy for the launch period (social posts, email sequences, etc.).
What’s Next?
After you unveil your first scalable product or service, you’ll see fresh possibilities. Maybe you’ll expand your software features, refine your marketing funnels, create additional templates, or build out a full-fledged agency brand. This stage is the turning point where your business starts evolving into something bigger than just you—and the options are endless.
Are You Here Now?
Thinking about building a plugin, designing a template line, hiring your first team member, or launching a course? Which path excites you the most—what’s holding you back? Jump into the comments and share your story. We’d love to follow along on your journey!
Thinking about selling templates? Get our Template Marketing Playbook FREE.
5. The Established Brand
"People know who I am, but how do I scale this into something bigger?"

By this point, you’ve carved out a niche, launched your first digital products, and built a steady stream of work. You’ve started to hear things like:
“I’ve heard of you!”
“You’re the go-to person for [your niche].”
In other words, you’re not just a freelancer or product creator anymore—you’re a recognized brand. But new visibility brings fresh hurdles: standing out in a crowded market, managing time and energy, and figuring out that all-important “next big move.”
You’re ready to level up your expertise and influence, but you also need structures that help you grow without burning out. That might mean narrowing your focus to a signature service or product—the thing you want to be known for—while also being more intentional in how you attract new customers. By strengthening your personal brand, exploring advanced marketing strategies, and automating administrative tasks, you can keep delivering top-quality work without running yourself ragged.
Challenges at This Stage
Differentiation becomes a priority as competitors multiply. With more opportunities coming your way, time management can get tricky. It’s also essential to remain consistent with content—blog posts, newsletters, social media updates—so you stay visible and relevant. Scaling without losing quality is another concern; the personal touch that made you successful in the first place can be hard to maintain if you’re overextended.
What Success Looks Like in Stage 5
In Stage 5, it’s less about hitting a certain income level and more about becoming a true authority in your niche. When people start seeking you out specifically for your expertise—and your flagship service or product drives most of your revenue—you’ll know you’re on track. Ideally, you’ll have established systems that grant you more freedom, giving you the flexibility to experiment with new ideas or rest when needed.
6. The Mentor
“It’s time to pay it forward and leave a legacy.”

You’ve built a thriving business. You’re known as a go-to expert in your niche, and your work has created a steady stream of income and recognition. But something deeper is calling you now.
You’re no longer just focused on what you can create—you’re thinking about the impact you can have on others. You’ve learned so much along the way, and you see people who are just starting out, where you once were. You know you can help them avoid the same mistakes, shorten their learning curve, and build something meaningful.
This is Stage 6.
When I stepped into the role of mentor, it wasn’t because I had everything figured out—it was because I realized how much I could help others by sharing what I’d already learned. At first, I felt nervous about teaching, but once I saw the impact my guidance had on others, I knew I was in the right place.
If you’re in this stage, lean into it. You don’t have to be perfect or have all the answers. You just have to be willing to share what you know and guide others toward success.
The Mentor Mindset
This stage is about stepping into your role as a teacher, guide, or thought leader. You’re no longer just building websites, creating templates, or selling products—you’re building people. You’re creating a lasting impact by sharing your expertise and empowering others to succeed.
But mentoring isn’t without its challenges. You’re juggling multiple ventures, trying to scale your influence, and wondering how to teach while staying true to yourself.
Key Milestone: Launching Workshops, Courses, or Coaching Programs
The hallmark of this stage is creating resources to help others succeed. Whether it’s workshops, online courses, group coaching programs, or 1:1 mentorship, this is where you take your knowledge and turn it into something that changes lives.
Common Challenges at This Stage
Balancing Mentorship with Other Ventures
You’re still running your business, managing clients, or selling products—and adding mentorship to the mix can feel overwhelming.Staying Authentic While Scaling
You want to reach more people, but you don’t want to lose the personal touch or authenticity that made you successful in the first place.Creating Effective Teaching Materials
Turning your expertise into structured lessons, workshops, or programs requires a new set of skills—and it can be intimidating to know where to start.Overcoming Imposter Syndrome (Again)
Even as an expert, it’s easy to wonder: Am I really ready to teach others? Do I have enough to offer?
What Success Looks Like in Stage 6
Success in this stage is about impact. You know you’ve reached it when:
You’ve created resources that help others grow—whether it’s a course, a program, or a workshop.
People turn to you not just for your work, but for your wisdom and guidance.
You feel a sense of purpose, knowing you’re giving back to your community and industry.
How to Move Forward
Define Your Mentorship Style
Ask yourself:What kind of mentor do I want to be?
Who do I want to help the most?
What’s the best way for me to share my expertise—workshops, courses, group programs, or 1:1 coaching?
Your mentorship style should align with your strengths and the audience you want to serve.
Start Small with a Pilot Program
Before launching something big, start with a pilot program to test your ideas. For example:Host a small workshop to teach a specific skill.
Offer a beta version of your course to a small group.
Work with a handful of mentees 1:1 to refine your approach.
Focus on Impact, Not Perfection
Mentorship isn’t about having all the answers—it’s about guiding others based on your experience. Focus on creating value, and don’t worry about being perfect.Build a Scalable Framework
As you grow, it’s important to have systems that allow you to scale your mentorship without burning out. Consider:Recording your workshops or lessons to create an evergreen course.
Using tools like Kajabi or Teachable to host your content.
Automating onboarding and communication with your mentees.
Leverage Your Personal Brand
Your audience already knows and trusts you—use that to your advantage. Share your journey, highlight your students’ successes, and invite others to join your mentorship programs.
What’s Next?
As a mentor, you’re creating a ripple effect. The people you teach will go on to create their own success, impacting others in ways you may never see. This is how you leave a legacy—by sharing your knowledge and empowering others to grow.
So, which stage best describes where you are right now?
Drop a comment below and share your biggest insights or sticking points. Let’s keep the conversation going—and keep growing, together.

How Squarespace renders content: Server-Side vs. Client-Side
Understand how Squarespace renders content with SSR & CSR using the Summary and Calendar blocks example. See how Synced Blocks boost SEO with direct HTML rendering.
This post is a collaboration with BeyondSpace.studio
Rendering methods in Squarespace affect everything from page speed to SEO and user experience. Squarespace uses both server-side rendering (SSR) and client-side rendering (CSR) for different types of blocks. Understanding how these work can help you make informed decisions about which blocks to use and what to expect in terms of performance.
What is Server-Side Rendering (SSR)?
With server-side rendering (SSR), the content is generated by the server before being sent to the browser. This means when a user visits a page, they receive a fully rendered HTML document, with all necessary content already in place. JavaScript may enhance the page with additional interactions, but the core content is visible immediately.

Server side rendering - Image source: prismic.io
✅ Benefits of SSR:
Faster initial load times since the browser doesn’t have to fetch data separately.
Better for SEO because search engines can index content directly without executing JavaScript.
More reliable performance, as content appears even if JavaScript fails to load.
❌ Drawbacks:
SSR increases server load since each request must be processed before sending the page.
Rendering complex, content-heavy pages can take longer compared to client-side rendering.
Pages rely on full reloads for updates, making them less dynamic.
Interactive elements are limited until the page fully loads.
How Squarespace Uses SSR: Summary Block
The Summary Block (used to display blog posts, events, or other collection items) is an example of Squarespace leveraging SSR.
The server generates and delivers the entire collection list as part of the initial page load.
JavaScript is then triggered to apply styling and interactivity, such as hover effects or pagination.
The content is immediately available—users don’t have to wait for it to load dynamically.

Squarespace summary block rendering
This means that even if a visitor has JavaScript disabled, they will still see the content, making SSR a more robust option for content-heavy blocks.
What is Client-Side Rendering (CSR)?
With client-side rendering (CSR), the browser initially loads only a minimal HTML structure, and JavaScript is responsible for fetching and displaying the content dynamically. This approach reduces the initial page size, but it also means users may experience a delay while content loads.

Client site rendering - Image source: prismic.io
✅ Benefits of CSR:
More efficient for large datasets because only the necessary data is fetched as needed.
Better for interactive applications, allowing for dynamic updates without refreshing the page.
Lighter initial load, improving performance for first-time visitors.
❌ Drawbacks:
Longer perceived load times, as content appears only after JavaScript finishes loading and processing.
SEO challenges, since search engines may struggle to index dynamically loaded content.
Depends on network speed, meaning slower connections will take longer to fetch content.
How Squarespace Uses CSR: Calendar Block

Squarespace calendar block rendering
The Calendar Block (used to display event or blog listings) is an example of CSR in Squarespace.
Initially, only the wrapper of the Calendar Block is loaded—users will see a blank structure or a small loading indicator.
JavaScript then fetches the event data over the internet, meaning the loading speed depends on the user’s network connection.
Once the data is retrieved, it is parsed into the calendar cells and displayed as event items.
This process repeats each time the user navigates to the next or previous month, meaning there’s a slight delay every time a new month is viewed.
With Beyondspace Source URL Helper, effortlessly redirect users to the original event or blog post directly from your Calendar or Summary block.
👉 Try Beyondspace Source URL helper
CSR makes sense for the Calendar Block because it allows events to be updated dynamically without requiring the entire page to reload. However, it also means that initial loading takes longer compared to SSR blocks like the Summary Block.
Comparison: SSR vs. CSR in Squarespace
| Rendering Type | Block Example | How It Loads | Pros | Cons |
|---|---|---|---|---|
| Server-Side Rendering (SSR) | Summary Block | Content is preloaded and styled by JavaScript | Faster initial load, good for SEO | Content can't be fetched dynamically |
| Client-Side Rendering (CSR) | Calendar Block | Content is loaded via JavaScript after page load | Reduces initial page size, allows dynamic updates | Requires extra loading time, relies on network speed |
Boost SEO with SSR and Synced Blocks
When it comes to SEO, server-side rendering (SSR) has a clear advantage because content is immediately available to search engines. This is where the Synced Blocks plugin makes a difference. Unlike dynamically loaded content, Synced Blocks ensure that reusable content is rendered directly in the page’s HTML, making it easier for Google to index.
Studies suggest that Google takes up to 9X longer to crawl JavaScript-based content compared to HTML. With Synced Blocks, you eliminate that delay while also streamlining content management. By embedding reusable content blocks directly into the page’s HTML, Synced Blocks ensure faster indexing, consistent branding across multiple pages, and improved visibility and SERP rankings.
Conclusion
Both client-side rendering (CSR) and server-side rendering (SSR) play a key role in how content loads on your Squarespace website, each with its own advantages and limitations. While you can’t change Squarespace’s built-in rendering methods, understanding how they work helps you make smarter choices when selecting content blocks and third-party plugins. By choosing the right approach for your needs, you can optimize performance, improve SEO, and enhance the overall user experience on your site.