
What’s worth knowing in the Squarespace world.
For designers, developers, and people building businesses around Squarespace.

Squarespace Font Guide: How to Change Fonts, Colors, and Sizes
Squarespace makes it easy to customize your site’s fonts, colors, and text sizes using the Site Styles panel.
Here’s how to do it step by step.
Step 1: Open the Site Styles Panel
This is where you’ll make all design changes.
How to access Site Styles:
Go to your website editor (log in and click on your site).
Click the Paintbrush icon (top-right corner of the editor).
OR, go to Design > Site Styles from the main menu.
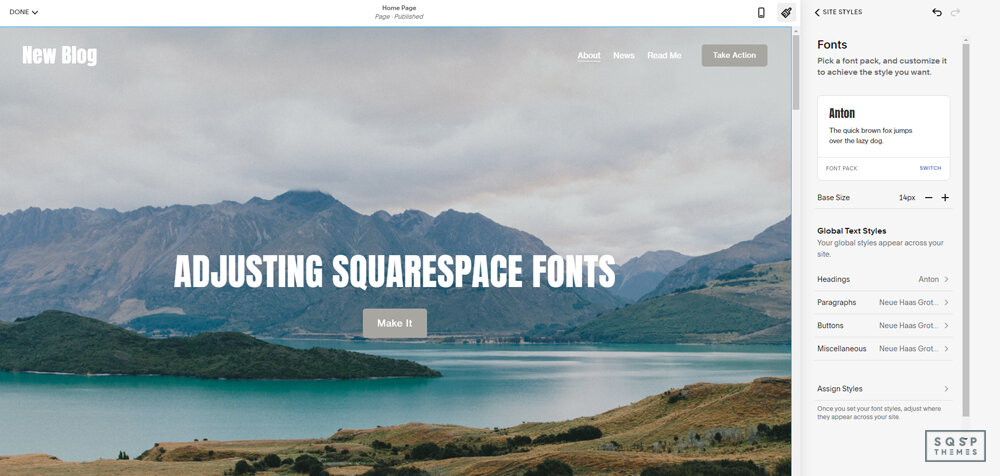
This opens the Site Styles Panel, where you can adjust Fonts, Colors, and other design settings.
Step 2: Change Fonts
You can either pick a font pack (pre-designed styles) or choose fonts manually.
Option 1: Use a Font Pack (Quick & Easy)
Click Fonts in the Site Styles panel.
Click "Switch Font Pack" (you’ll see different font combinations).
Pick the one you like – it automatically applies to headings, paragraphs, and more.
Click Save when happy with your selection.
Option 2: Customize Fonts Manually
Go to Site Styles > Fonts
Click on the text type you want to change (Headings, Paragraphs, Buttons, etc.)
Click the font name to open the font selector.
Browse or search for a font (Squarespace supports 1,600+ fonts from Google & Adobe).
Click on a font to apply it.
Save your changes.
💡 Pro Tip: You can set different fonts for Headings (H1, H2, H3, etc.) and Paragraphs (P1, P2, P3).

Squarespace supports web fonts from Google and Adobe. Google Fonts has over 1,000 different fonts on offer, of which Squarespace supports around 600. Adobe Fonts has 2,300 different fonts in their library, of which Squarespace offers 1,000 of them. Why the limitation? I’m not sure. It may be that they offer full access and Squarespace simply hasn’t updated the numbers they mention as supported since there were lower numbers of fonts in the libraries.
It’s worth mentioning that, because Google and Adobe are third-party companies, sometimes they change their service without warning. They can remove fonts, regardless of how many people are using them. When this happens, the font will still work for your site, but if you choose to change away from the font, you won’t be able to change back if you decide you don’t like the new one. Thankfully, there are thousands of fonts available, and a lot of them look similar enough to one another that you can probably find an adequate replacement. That’s if you’re in this specific situation which is unlikely to happen.
If you know a specific font you want to use, you can search for it by name. If you don’t know the name of a font, you can browse through available fonts to find one you like.
Squarespace doesn’t offer unfettered access to all fonts right away. They highlight a handful of fonts to give you options first. These options include a handful of popular fonts, as well as any fonts you’ve chosen to use recently or added to your site in other places.
Click here to learn how to add custom fonts to your Squarespace 7.1 site
Step 3: Adjust Font Size & Text Styles
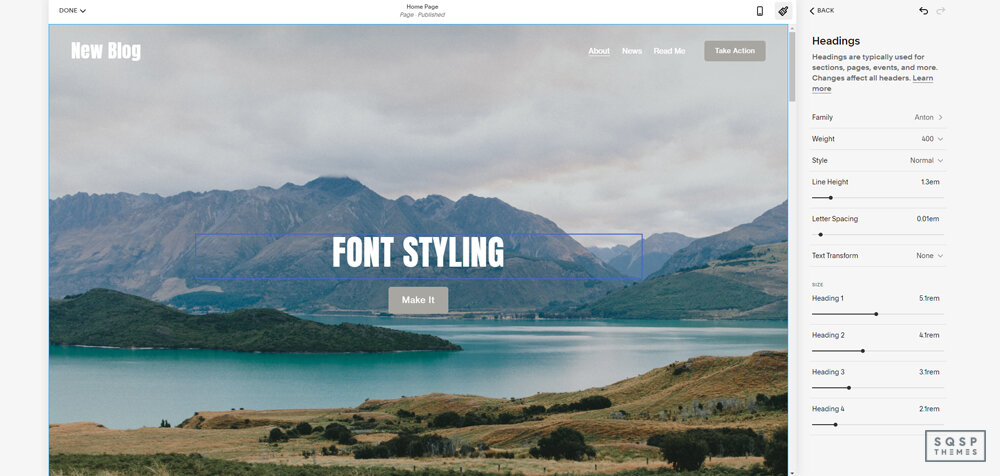
After choosing fonts, you may want to tweak size, boldness, or spacing.
How to change font sizes:
Open Site Styles > Fonts
Click on the text type you want to adjust (Headings, Paragraphs, etc.)
Look for the Size slider and drag it to increase or decrease text size.
Adjust other settings if needed:
Font Weight (Normal, Bold, Extra Bold, etc.)
Line Height (Space between lines)
Letter Spacing (Adjust the space between letters)
Text Transform (Uppercase, lowercase, or capitalized styling)
Click Save when done.
💡 Tip: Always preview your changes on mobile and desktop to make sure it looks good.
Adjusting Site Colors
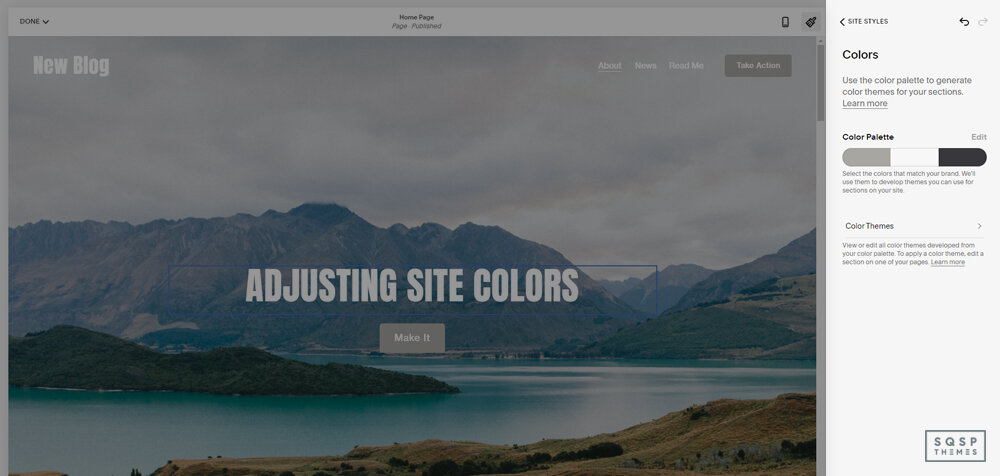
As of Squarespace 7.1, you no longer have to deal with colors on an individual basis, picking specific elements and coloring them and hoping everything looks good and is consistent across different kinds of pages. Instead, you pick color themes, which are color palettes that work together and color different elements of your site across the board. While it might seem less flexible, it’s just as customizable as before, just differently.
Step 4: Change Site Colors
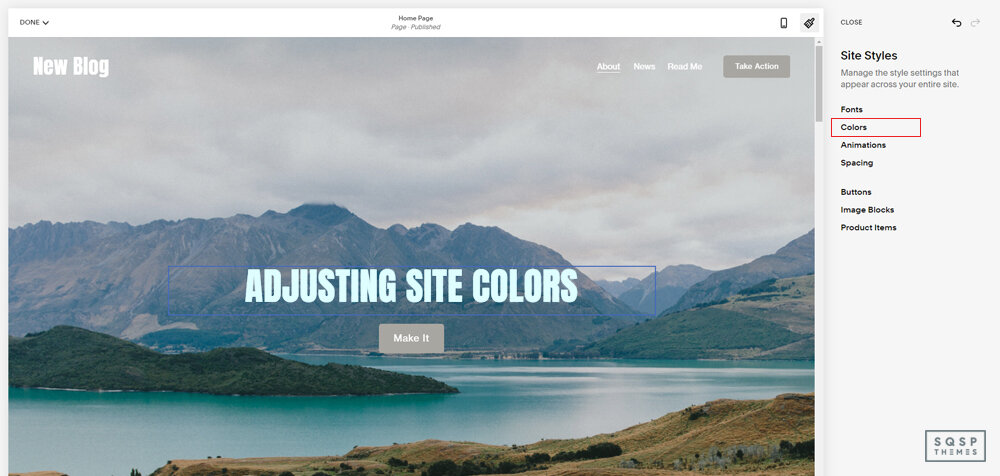
Squarespace 7.1+ uses a Color Palette system to ensure consistent styling across the entire site.
How to change your site’s colors:
Open Site Styles > Colors
Click Edit Palette
Choose your color scheme:
Use a Preset Palette (ready-made color sets).
Extract colors from an image (upload an image, and Squarespace will generate colors from it).
Pick a main color and let Squarespace create a matching palette.
Manually select colors using the color picker (if you have specific brand colors).
Save your palette – this updates colors across your site.
Step 5: Change Colors for Specific Sections
Each section on your website has a Color Theme (Light, Dark, Bright, etc.). You can customize them!
How to change a section’s colors:
While editing a page, hover over a section and click "Edit Section".
Click the Colors tab in the section settings.
Choose a Color Theme (Squarespace will apply your palette’s matching colors).
Save your changes.
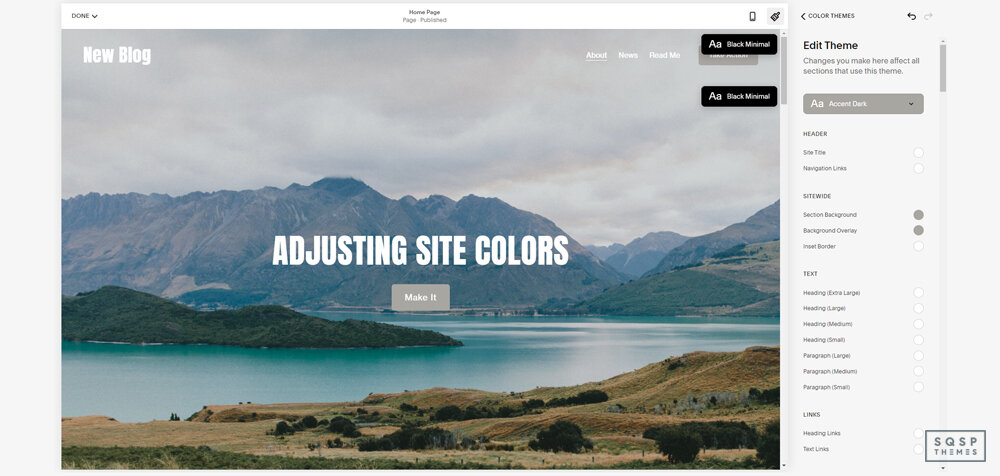
💡 Need more control? You can edit specific colors within a Color Theme:
Open Site Styles > Colors
Click on a Color Theme (like "Bright 2" or "Dark 1").
Adjust specific elements (Background, Text, Buttons, etc.).
Save – all sections using that theme will update.
Adjustments in 7.0
Everything I’ve written above is for Squarespace 7.1. I figured that, since it’s the newest version and a lot of people are still shifting over and learning how it works, it’s where most of the common questions come up.

For 7.0 sites, everything is more complicated, but also, most people already know how to do it. Since 7.0 has been the default for years, it’s more institutionalized as knowledge in how to customize a site. Still, it might be worth covering in brief.
Changing fonts in 7.0 depends on the theme you’re using, which fonts it supports, and the process you use to choose them. Pick a page template you want to edit, click on Design, choose Styles, and all of your font options are right there.
Choosing a specific font works in much the same way, but is on a per-element basis on each page type. If you want to change how your body paragraph text appears across different pages on your site, you’ll need to change the font on each page type. You can still use the same sort of font-family drop-down menu to look up fonts by name or even run a search for them (if you know what font you want to use).
You can also choose to use the custom fonts option to add an Adobe font that Squarespace doesn’t support by default. If you choose to do this, be aware that some of the configurations in Squarespace, like transforms, might not work right on it and you may need to use custom CSS to do what you want. That said, with the sheer range of font options available to you, I don’t often find people wanting to use CSS just to add a different font outside of extreme, limited, and custom circumstances. If you want to explore CSS values, Mozilla wrote a great guide on the subject.
To add a custom font, it has to be an Adobe font (Google fonts don’t work) and you have to use the custom fonts section to do it. Instructions can be found on this page. Essentially, you need to have a subscription to the Adobe Creative Cloud and link that account with Squarespace. You can then choose a custom selection of Adobe fonts, which will replace the fonts accessible to you in your existing site styles. Be careful if you use these for other purposes on your site; you don’t want to overwrite the fonts you use.

Tweaks to the text can also be added from this menu.
Font Size: changing the size of the font element on the page.
Light Height: changing the space between lines, vertically. Beware of using 0em, it can cause text to overlap.
Letter Spacing: the spacing between letters. This is similar to Kerning, but not quite the same concept.
Text Transform: choosing whether your text can be capitalized as you type it, or if it’s by default all caps, no caps, or traditional capitalization.
Text Decoration: adding elements to text, such as overlines, underlines, or strikethroughs.
Text Alignment: left, right, or center alignment for your text.
This isn’t quite the same selection of options, but it’s close.
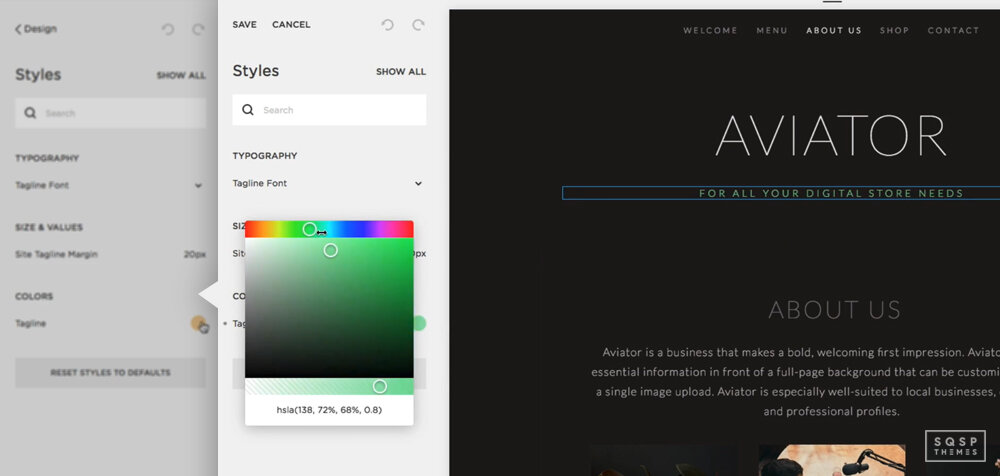
Changing colors for your site works pretty much the same way on 7.0 as it does on 7.1. The main difference is that you choose colors on a per-page basis rather than a per-site basis. Thus, if you want to change colors across your whole site, you need to make the color adjustment on each page. You can read about the individual color adjustments you can make, and how to make them, here.
Overall, Squarespace 7.1 has done a lot to streamline and remove the finicky little repetition that was inherent in the font and color customization systems. It’s all part of streamlining their themes, going from individual theme families to one centralized theme with variations and modular adjustments. It’s an adjustment, to be sure, but this simplification is welcome.
Recap (Quick Cheatsheet)
✅ Change Fonts:
Go to Site Styles > Fonts, choose a Font Pack OR select fonts manually.
✅ Adjust Font Size & Style:
In Site Styles > Fonts, use the Size slider & tweak weight, spacing, and style.
✅ Change Colors (Site-Wide):
Go to Site Styles > Colors, edit your Color Palette, and save.
✅ Change Colors (Per Section):
Click Edit Section > Colors to switch between Light, Dark, Bright themes.
Final Tips
Preview changes on desktop & mobile before saving.
Use Font Packs & Preset Colors for quick styling.
Customize individual sections if you want unique looks for different areas.

Top Print on Demand Products to Sell on Squarespace

Print on demand (POD) is an innovative business model that allows entrepreneurs to sell products without carrying inventory. Talking about the POD business model, Squarespace is a popular platform for creating professional-looking websites, and it offers a variety of features that can help you sell POD products with ease. This article will discuss the top POD products to sell on a Squarespace store. Whether you are a seasoned entrepreneur or just starting out, this article will provide valuable information on optimizing your Squarespace store with POD products.
What is Print on Demand
Print on demand is a business model where products are printed only when an order is received. This means that the seller does not have to carry inventory, and the product is only made when someone places an order. This model is beneficial because it eliminates the need to invest in large quantities of products upfront. It also allows entrepreneurs to test out new products without risking a lot of money.
POD is commonly used for products like custom jackets, t-shirts, phone cases, and mugs. The design is created by the seller, and the POD company handles the printing, shipping, and fulfillment. This means that the seller can focus on creating designs and marketing the products rather than worrying about production and shipping.
Why Selling Print on Demand Products on Squarespace is Beneficial for You
Selling print on demand products on Squarespace is beneficial for entrepreneurs for several reasons. Firstly, Squarespace is an all-in-one platform allowing individuals to create a professional-looking website without coding knowledge. This feature is especially useful for those who are not tech-savvy and want to create a website without hiring a developer.
One of the key benefits of using Squarespace to sell POD products is its user-friendliness. The platform is easy to navigate, and users can create a website in minutes. Additionally, there are a variety of templates to choose from, making it easy to create a visually appealing website. Another benefit of Squarespace is its customization options. Users can customize their website to match their branding by adding their own logo, changing the colors, and even adding their own custom CSS.
This allows entrepreneurs to create a unique website that stands out from their competitors. Squarespace also has an integrated commerce platform that allows users to sell products directly from their website. This eliminates the need for third-party platforms, making it easy for entrepreneurs to manage their sales and inventory all in one place. Users can set up a store, add products, and process payments all within the Squarespace platform.
Marketing is an essential part of any business, and Squarespace recognizes this by providing built-in marketing tools that can help entrepreneurs promote their products. These tools include email campaigns, social media integrations, and SEO tools to drive traffic to their website. This feature is especially useful for those who are just starting and may not have a large marketing budget.
Lastly, Squarespace provides detailed analytics that can help entrepreneurs track their sales, website traffic, and customer behavior. This information can be used to optimize their website and improve their marketing strategies. By analyzing the data provided by Squarespace, entrepreneurs can make informed decisions about their businesses and adjust their strategies accordingly.
Popular Print on Demand Products that Sells Best on Squarespace
There are many different types of POD products that you can sell on Squarespace, but some are more popular than others. Here are eight of the most popular POD products that sell best on Squarespace:
1. T-shirts
T-shirts are a popular POD product because they are easy to customize and have a wide appeal. You can create designs for specific niches, like sports teams or hobbies, or create general designs that appeal to a wider audience. When it comes to designing custom t-shirts, it's important to think about the audience you're targeting. You can create designs that cater to specific interests or hobbies or go for more general designs that appeal to a wider audience.
2. Phone cases
Phone cases are another popular POD product because they are highly customizable and have a high perceived value. Personalization is key when it comes to designing phone cases. You can create designs that cater to specific phone models, such as iPhone or Samsung, or go for more general designs that appeal to a wider audience. Consider using bright colors, bold typography, and eye-catching graphics to create designs that stand out.
3. Mugs
Mugs are a great POD product because they are functional and have a wide appeal. You can create designs for specific niches, like coffee lovers or pet owners, or create general designs that appeal to a wider audience. You can also consider using unique textures or patterns to make your designs stand out. Additionally, you can start making custom water bottles along with mugs to increase your market.
4. Posters

Posters are a highly popular print on demand product due to their affordability and ease of shipping. They offer a great way to showcase your design skills, as you can create designs that cater to specific niches, such as music or movies, or go for more general designs that appeal to a wider audience. Creating designs that cater to specific niches increases the likelihood of customers finding and purchasing your products.
5. Tote bags
Tote bags are a practical and eco-friendly POD product that can be customized in many different ways. Consider creating designs that cater to specific niches, such as book lovers or travelers, or go for more general designs that appeal to a wider audience. You may want to consider incorporating unique patterns or illustrations to make your designs stand out. This can help your products appear more eye-catching and memorable to potential customers.
6. Stickers
Stickers are a fun and affordable POD product that can be used for a variety of purposes. You can create designs that cater to particular interests, such as gamers or environmentalists, or create more general designs that appeal to a wider audience. Stickers are also easy to ship and versatile. You can use them as promotional items or give them away as gifts to your customers. Consider creating designs that feature bold graphics, funny quotes, or popular memes to make your stickers stand out.
7. Hoodies

Hoodies are a sought-after POD product due to their comfort and broad appeal. Whether you want to target a specific audience like schools or sports teams or cater to a wider audience, hoodies are a great option for customization. Experiment with different design elements like unique patterns or textures to make your designs stand out. Consider what will resonate with your audience and create designs showcasing your creativity and brand.
8. Canvas prints
Canvas prints are a popular POD product because they are a great way to display art and photography. Whether you're looking to create designs for specific niches like nature or abstract art or appeal to a wider audience with more general designs, canvas prints offer an upscale option for showcasing your creativity. With the ability to cater to specific niches, or by using unique textures or color palettes, canvas prints can add an element of elegance to any space.
Tips for Optimizing Your Squarespace Store with Print on Demand Products
If you're looking to sell POD products on your Squarespace store, there are several steps you can take to optimize your website and increase your sales. By following these tips, you can improve the user experience on your site, attract more customers, and showcase your products in the best possible light. Here are some tips for optimizing your Squarespace store with print on demand products:
1. Use high-quality images
When creating your product images, make sure to use high-quality images that showcase your designs. This will help your products stand out and look more professional.
2. Write compelling product descriptions
Your product descriptions should be clear, concise, and compelling. Use language that speaks to your target audience and highlights the features and benefits of your products.
3. Offer multiple product variations
Offering multiple product variations, like different colors or sizes, can help increase your sales. This allows your customers to find the product that best fits their needs.
4. Optimize your website for SEO
Squarespace has built-in SEO tools that can help you optimize your website for search engines. Make sure to use relevant keywords in your product titles and descriptions to help your products rank higher in search results.
5. Use social media to promote your products
Social media is a powerful tool for promoting your products and driving traffic to your website. Use platforms like Instagram and Facebook to showcase your designs and engage with your audience.
Conclusion
Selling POD products on a Squarespace store can be a lucrative business opportunity for entrepreneurs. With Squarespace's user-friendly platform and integrated commerce tools, creating a professional-looking website and selling your products is easy. You can increase your sales and grow your business by offering popular POD products like t-shirts, phone cases, and mugs and optimizing your website with high-quality images, compelling product descriptions, and SEO strategies.
How to migrate your store from Squarespace to Shopify
How to migrate products from Squarespace to Shopify
Exporting steps
The first thing you need to do is export your data from Squarespace. Don’t forget to keep your Squarespace site live whilst completing this step. In the Home Menu, click Settings.
Click Advanced, and then click Import/Export.
Click Export.
Select Products from the Export Site menu.
Click Download. Your products will download as a products.csv file.
So easy, right?
Importing steps
There is a whole bunch of ways how to get your products imported, whether it’s through an automated service offered on the app store, or manually entering small product catalogs.
Without further ado, here is a guide on how to import your Squarespace .csv product file to Shopify:
Steps:
1. Go to your Shopify admin and choose Products tab.
2.Click Import.
3. Click Choose File in the Import products by CSV file window.
Locate your CSV file, then click Open.
Click Upload file.
A confirmation letter from Shopify will be sent to your email address as soon as your CSV file is uploaded.
How to migrate blog content from Squarespace to Shopify
Exporting
I am pretty sure the next stop you will want to do is export the content from your website including blogs, text and image blocks, and pages.
You are welcome to use our guide below.
1. In the Home Menu on Squarespace, click Settings.
2. Click Advanced, and then click Import / Export.
3. Click Export.
4. Click the WordPress icon.
Note: Click this icon even though you are going from Squarespace to Shopify, not Wordpress.
5. If you have more than one Blog Page on your site, a “Select Primary Blog” message will appear. Only one Blog Page can be exported.
6. Select a Primary Blog from the drop-down menu, and then click Export.
7. Wait for the export to process, which may take you to wait for a few minutes.
8. Download the exported file.
9. When the export is complete, a Download option will appear. Click Download to save the .xml file to your computer, or click Clear to erase the export.
Importing
For Shopify Plus members there is a possibility to use the Transpoprter App and comm and-line tool to import their content into Shopify.
First thing you need to do is decide the way you will migrate your content and in what order. You have a few options here :
1. Copy-paste your content from your old site.
2. Use existing migration apps from the Shopify App store.
3. Develop an app that uses the Admin API.
4. Migrate your content manually with the help of CSV files.
How to choose a Shopify theme
Creating a custom theme for Shopify, thanks to which your online store will stand out from the mass of competitors, is a responsible task as the visual representation of your business is of great importance.
We recommend using search and filtering options for this aim.
There is an option to search by theme feature, which you can find with the help of the top bar search field on Shopify Theme Store, for example product filtering, video, related products, etc.
You can also search by collection to be able to discover themes with a desired style or layout, or by industry. In order to do that you need to go to the Shopify Theme Store. Click “Collections” or “Industries”, and then select a category.
How to switch your domain
The main condition is that your Squarespace domain has been registered for at least 60 days. Then, the transfer can happen.
Step 1 - Unlock the domain
In the Home Menu, click Settings, and then click Domains. You can also press the key while any panel is open and search domains.
Click the domain you want to transfer.
Scroll down and uncheck Lock Domain.
Step 2 - Get transfer key
The Get Transfer Key button will appear at the bottom of the panel after unlocking the domain. Click Get Transfer Key and copy the transfer key that appears. You'll provide this code to your new domain provider to authorize the transfer. Your provider may also call this an “EPP code” or "authorization code."
Step 3 - Transfer the domain
To transfer your domain away from Squarespace, send your new domain provider the transfer key you just copied.
Steps:
From your Shopify admin, click Online Store > Domains.
If this is the first domain that you're connecting to your Shopify store, then click Connect existing domain, then click transfer in your domain:
If you already have a domain connected to your Shopify store, then click Transfer domain:
Enter the domain that you want to transfer to Shopify. Do not include www. at the beginning of the domain.
Click Next.
Click Verify domain.
If the domain is ready to be transferred, you see DOMAIN UNLOCKED. Click Next to continue.
In the Verification code box, enter the authorization code, or EPP code, that your domain provider gave you.
Click Next.
Click Buy and transfer.
Check the email account associated with your domain for an email from your domain provider. The email varies by domain provider, but you need to approve the domain transfer by clicking a link such as Confirm Transfer or Approve Transfer:
After you've approved the domain transfer, it takes up to 20 days for the transfer to be complete. You will receive an email from Shopify confirming that your domain is transferred.
How to redirect your urls for SEO
When migrating from a Squarespace store, you don’t want to lose any of the website features or links. You would want to minimize or avoid the loss of SEO ranking from the page changes.
This is how you can manage your redirects:
Make sure to backup everything.
Find your sitemap on Squarespace.
Convert it to a CSV and download.
Upload the file to Google Sheets (to make it safe).
Create the SEO redirects.
You have 3 courses of action:
Forward it to the same page on the new site, i.e About Page to About Page, Red Shirt to Red Shirt
Combine it with another page. This is just like forwarding it to the same page, but maybe you combined your About Us and Contact Page, or you no longer have Hoodies but you still have Sweaters. Just send it to the most similar page.
Send it to the homepage. Do not ignore it or else it will give a 404 error. As we stated, Google hates 404s and it will negatively impact your SEO ranking.
Tools you can use to automate the process
There is a whole lot of various tools which contribute to automating the migration project.
Spare some time to review some of the tools we recommend, they are definitely worth your critical eye.
1) Litextension. This tool provides you with a high level of security and accuracy while transferring your Squarespace store to Shopify. A few minutes – and the connection between the two carts is established.
2) Cart2Cart is another time and energy-saving service you should consider. In just 3 steps the transfer is completed and your nerves are preserved.
By and large, if you aim at creating an internationally acknowledged online store and attract traffic from other countries, Shopify will be a good tool for implementing a plan to reach the western world and fulfill your wildest dreams!