
What’s worth knowing in the Squarespace world.
For designers, developers, and people building businesses around Squarespace.

5 Ways to Format Your Logo on Your Squarespace Website

You’ve decided on a site name and a brand name. You’ve picked a template for your Squarespace site. You’ve tweaked it to look exactly the way you want it. There’s just one thing left; a logo!
A logo is a key part of modern branding. There’s evidence that Google prefers sites that use graphical logos over sites with simple text. Squarespace allows you to use a text site title just fine, but there’s a place for a logo, and it’s almost always a good idea to get one up and running.
Don’t worry too much about picking a final logo right away. As a small site, you have the luxury of being able to change as you grow. A company like Pepsi or Home Depot needs to make a big deal about changing its logo. A small brand can pick a logo and, if it doesn’t fit the brand in a year, change it without issue.
My point is this: get a logo up and running! Make one that looks decent and works as a placeholder, that you’re not upset at using, and call it good enough. You can invest in a better one later if you want, but for now, a basic logo is better than nothing.
Squarespace has some quirks and interesting features of its logo system that are worth knowing. Formatting a logo properly, for different forms and positions, is crucial. Sure, you can just put up a square JPG file and call it good, but there’s a better way.
General Logo Formatting
First of all, it’s worth knowing that your site logo takes the place of your textual site header. When you type in the name of your site, that appears under your site title. However, you need to make sure to specify your site title anyway. This is because your site title is what the image uses as alt text when you upload it. Alt-text is hugely important for SEO and accessibility, so you don’t want something as important as your logo to lack it.

Another important note is that, on Squarespace, your logo will always link back to your homepage by default. Now, 99.999% of the time, that’s what you want it to do. Virtually every site on the internet makes their logo link back to their homepage, it’s just a standardized part of the internet these days. However, if you wanted to do gimmicks with your logo or make it link to other pages on specific holidays or something, you have to do it with custom code.

Larger is generally better for the image you use for your logo. However, that doesn’t mean you can upload a 100,000x100,000 pixel file as a logo. Squarespace will scale your image file to fit the display area it is given in your site template. This varies depending on your template on version 7.0 but is standardized across templates on 7.1.

An image that is too small will scale up, and that can make it appear pixelated. Conversely, a larger image will be scaled down. For simple, clean logos, this is fine. For complex images, you can lose some detail. Make sure your logo looks good at different scales!
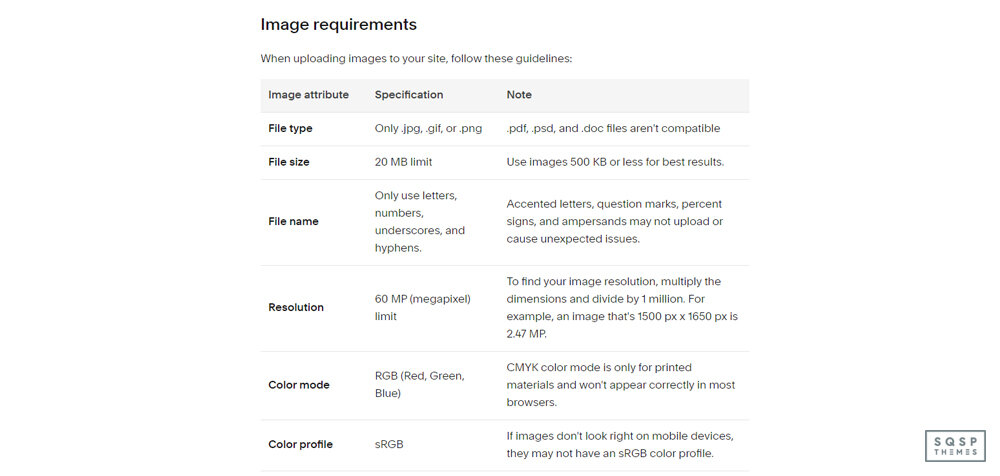
Squarespace has some general requirements for images, including those used in logos.
Only JPG, PNG, and GIF files are allowed. You can’t use things like PDF, DOC, or PSD files.
Your image cannot be larger than 20 MB. However, since site speed is a search ranking factor and images are often the slowest part of a site, you should try to keep your files under 500kb. Consider using an image optimization tool to smush down an image while keeping the quality.
File names for images can only use letters, numbers, underscores, and hyphens. You can’t use symbols like “?”, “&”, or “%”, and you can’t use accented characters, due to how the code on the back end works.
Available resolutions are super high; 60 megapixels. Your logo will probably not be even a single megapixel, so this shouldn’t be an issue. This is of more concern for general images uploaded to your blog and product pages.
The color mode for images is RGB. CMYK images are generally for print, and won’t display properly on a browser without optimization.
The ideal color profile is sRGB. If you don’t know what that means, don’t worry about it; just about every image manipulation app you’ll use for your logo will export properly.
Transparent backgrounds are allowed (so you don’t have to match colors to your site background color), but you need to use a PNG file to save with transparency.
I have a bunch of details, quirks, and exceptions to go over later in this post, but for the most part, this is all you’ll need to worry about.
Creating a Logo Image
Creating your logo is a daunting task, especially if you’re not a graphic designer. Luckily, it’s not actually all that difficult.

While you can use Photoshop or your favorite image editor to produce an image, you can also just use Squarespace Logo. Squarespace Logo is an online tool Squarespace offers, that lets you make a logo out of nothing. You type in your brand name, your tagline, and choose a symbol to add. Positions, fonts, colors; you can choose all of that for each element. The symbol library looks small at first glance, but type anything you want in the search bar and dozens more will show up.
If you find Squarespace’s generator to be a little simplistic or lacking in the design you want – or if you want something more AI-generated, or more custom – you can use a different logo maker. There are a lot of different services out there that allow you to put in a brand name, some keywords, and some other details, and will generate a huge pile of logos you can pick through.

And, of course, there’s always the option to use a service like Canva to create one from scratch with a larger library of custom elements.
Site Header Logo Picture
Adding your logo image is easy. Once you have an appropriate file chosen, you can follow these steps depending on your site version and your platform.
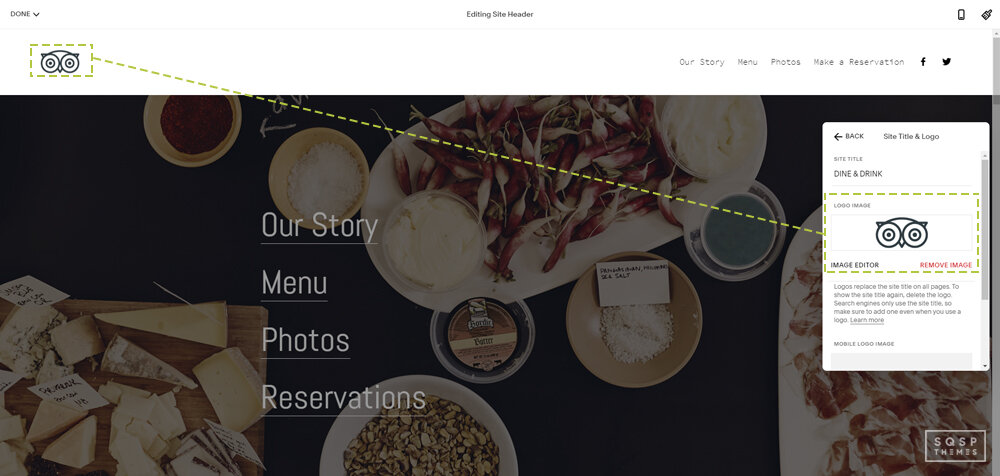
For 7.1 on a computer, click Edit, then hover over the header and click Edit Site Header. Click “Site Title & Logo”, make sure the text is specified, and then drag-and-drop your logo image into the image box. Alternatively, click the box and choose the file. You can scroll down and change the image height for responsive screens. Make sure to save.
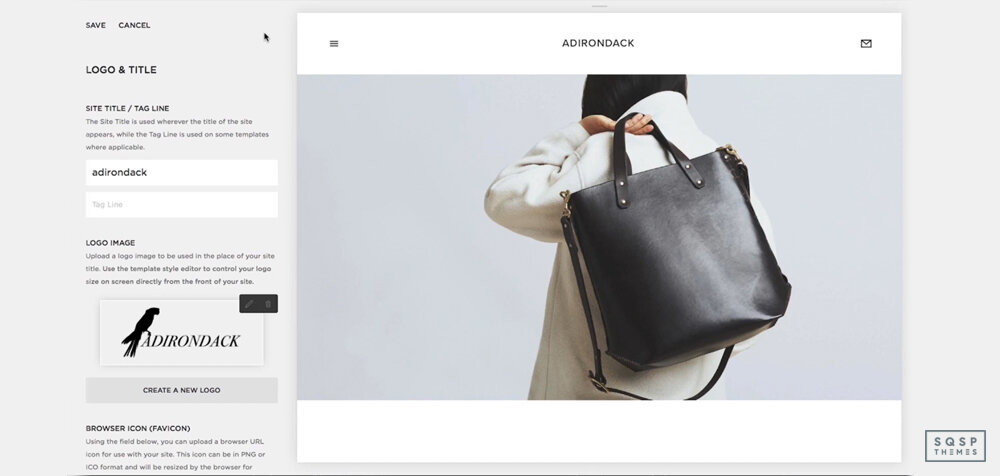
For 7.0 on a computer, hover over your logo on any page and click edit. Alternatively, go to the home menu, click design, and then logo & title. Upload your image, and save it.
For either, using the Squarespace App, tap settings, then logo & title. Tap the logo, then upload your image. Tap back, then save.
Your logo will change in appearance and layout depending on your template. Every 7.0 template has a different way to display the logo, and a different method for changing it, if you can change it at all. For example:
Avenue – Logo can display left, center, or right. You can change this using the Layout Style tweak.
Bedford – The logo only displays on the left and cannot be changed.
Momentum – The logo is on the left, but can be above or below the navigation bar. Use the Navigation Position tweak to change this.
You can read the differences for each set of templates here.
Logo Size Options
When you initially upload a logo to your site, it may be dramatically off in how big you want it to display. Now, you can go in and edit the image so it’s exactly the right size to fit the space. Unfortunately, this means you’ll need a bunch of different logo files for different display modes, and since you can only upload one logo, it doesn’t quite work out. Luckily, Squarespace allows you to set the size.
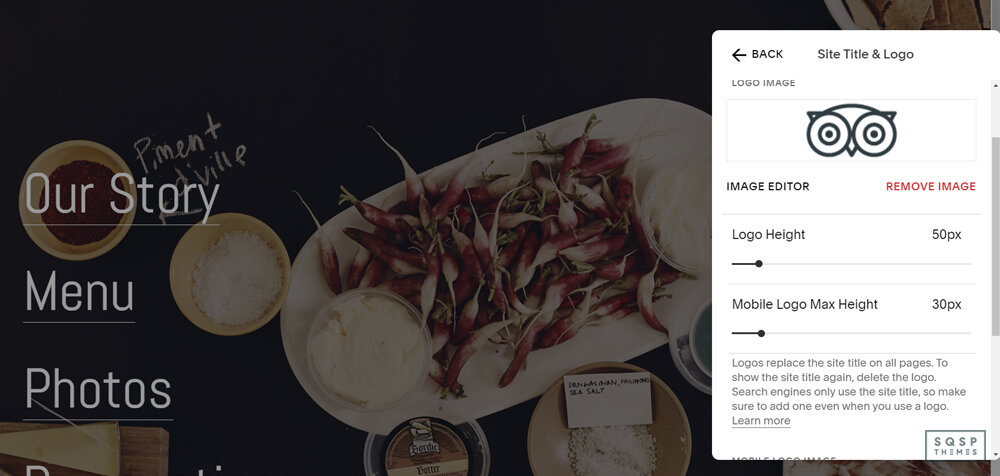
Go into your style editor, and find the section for your logo image size. It’s under the Header Branding section. You have to specify the width of your logo, and the height will be generated based on the dimensions of the image you uploaded. It won’t skew the image, so don’t worry about that. Just keep in mind that images that are too tall will stretch out your page.

If you don’t mind your image skewing, or you want to set a maximum height just to make sure, there are some CSS tweaks you can make. You need to find the CSS image class for your template, so go to your site and right-click on your logo, then inspect the element. You should be taken right to it. Then you can paste in some relevant CSS in your site code, following the instructions on this page.
Logo size is really easy to edit on a 7.1 site. Just go into your site header editor and specify the dimensions there. Boom, you’re done!
Logo Text Options
If you don’t upload an image, you get text styled to match your site design, in place of a logo. If you upload an image, you get the image, but the text becomes alt text. What happens, then, if you want a logo with text, something like TinySeed or BeAligned?
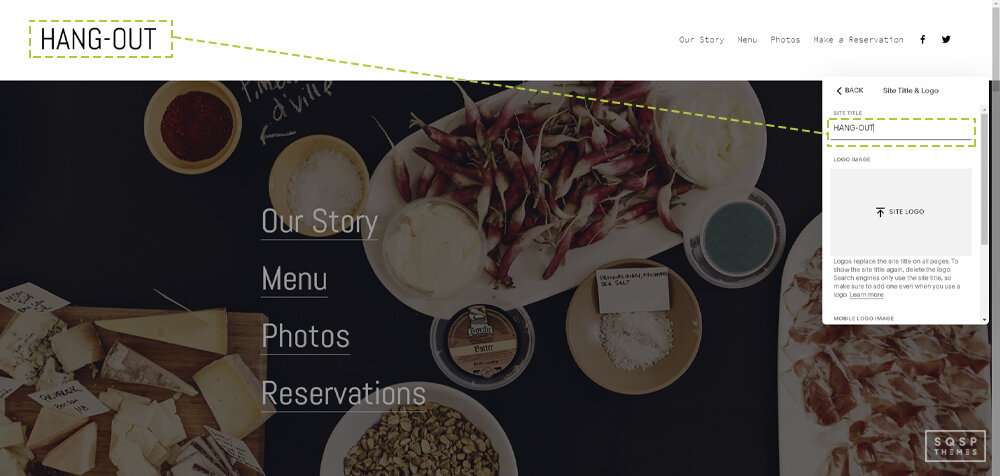
Well, if you inspect their logo, you see the trick. They make the image contain the text. So, all you need to do is produce your logo with text in the image.
The tricky part here is making sure it’s the right size and fidelity to avoid blurring when it’s scaled for different versions of your site. A large image with text that is not overly thin or intricate is the way to go. I can’t give you too many specifics because it all comes down to your font choice, style, and size. Try not to make your initial image too big and you should be fine when it scales.
Favicon Formatting
A favicon, also known as a browser icon, is the symbol that appears in the tab your site is loaded in, on both mobile and desktop browsers. It’s essentially a tiny version of your logo. However, if your logo is larger, more complex, or uses text, it doesn’t fit right in a favicon. How do you produce a good favicon?

First, you should know that the image specifications for the favicon are different than a logo.
Favicons display at 16x16 pixels, but you generally want to upload a larger image, typically between 100x100 and 300x300. Favicons are always square or circular, so rectangles don’t work well.
You should generally use a PNG or ICO file. PNG doesn’t work with really old versions of internet explorer, but I’ve never had a problem with it.
Your file needs to be small. Under 100kb small.
Adding your favicon is simple, at least. In 7.1, click on your home menu, then Design, then Browser Icon.

Upload your image there and save it. On 7.0, click on the home menu, then Design, then Logo & Title. The browser icon will be further down on the page.
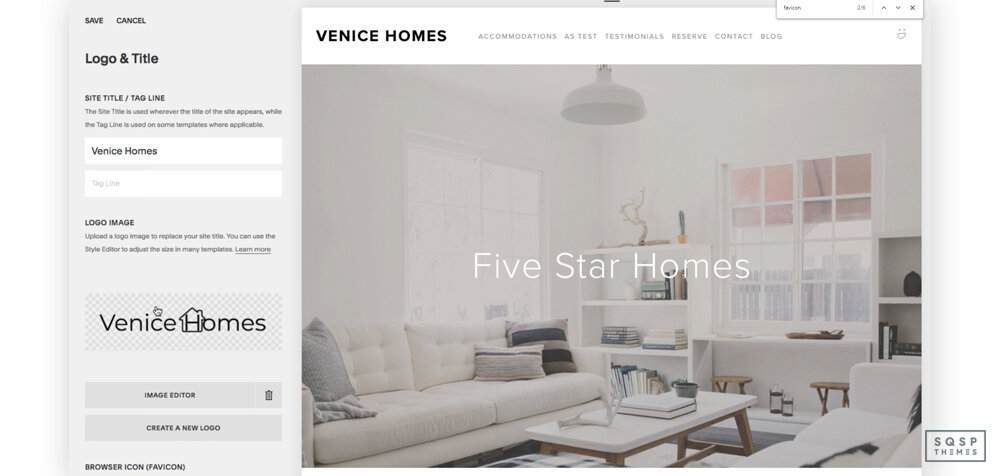
Upload it and save.
Using an SVG Logo
If you’re aware of vector graphics, you might wonder if you can use an SVG file for your site logo. SVGs are essentially text instructions for creating a vector-based image that scales infinitely well. They’re very powerful, very lightweight, and not true image files as we traditionally know them. Unfortunately, Squarespace doesn’t support them by default. However, you can still use them if you want.
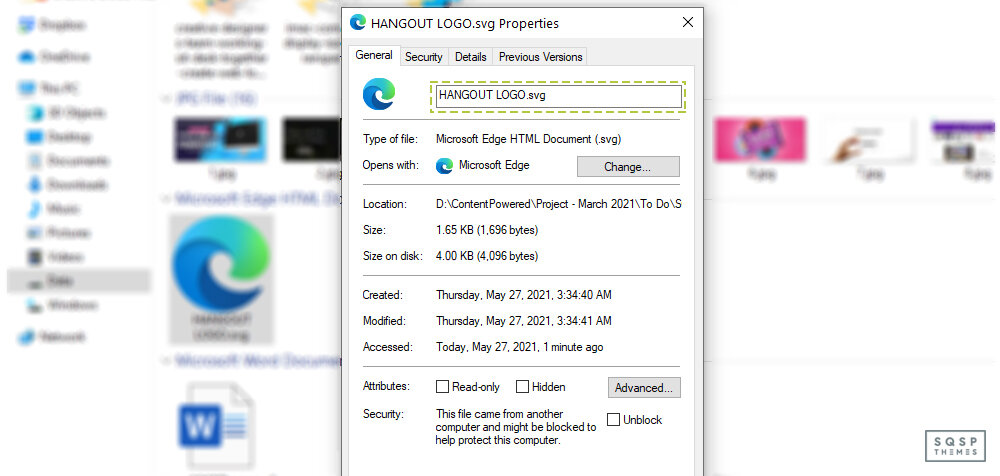
To do this, you essentially need to trick Squarespace into loading the SVG using custom code.
First, replace your header logo image with a transparent PNG file of the right size you want the header image to be.
Next, create your SVG logo. Here’s a guide on how to do it.
Once you have your SVG, you need to upload it. On any page of your site, highlight some text and click the link icon. Instead of linking to a page, click to link to a file, and upload your SVG file. This is basically a workaround for uploading your file to the Squarespace servers, as it doesn’t require any extra software and is a pretty quick process.
Once your logo file is uploaded, click the link to get the file name. It will look like this:
https://yoursitename.com/s/svglogoname.svg
Sometimes it can have a long file name, such as:
https://static1.yoursitename.com/static/605d8c67275bb80d4f-1b1fcb/t/602e9274f59cb32c9e67195c/1613265654987/file-name.svg
That’s fine. Copy that and set it aside. You can delete the link to the file, you don’t need to save it on whatever page you created it.
Next, use some custom code to add CSS to your header. The exact code you need depends on your site template, so I can’t list them all. Just search for “SVG logo in template name” to find a guide, like this one for Brine. Make sure to do the same for your mobile logo as well.
That’s it! You’ll have a perfectly scaled SVG logo all ready to go.

How to Choose a Squarespace Template
One of the very first choices you will make creating your website is your Squarespace theme. Here’s how you can make that decision:
Building a Squarespace website?
The first question you’re going to have to answer is “which theme will I use?” For many people, that is closely followed by “how do I choose the right Squarespace template?”
One of the advantages of using Squarespace is that you have many themes to choose from. There are the themes available through Squarespace itself, then there are themes from third-party designers, such as SQSP themes.
Squarespace is known for its commitment to beautiful, professional-level designs, so you’re really left with choosing which is the best fit for you. Here’s a rundown on how we would choose:
Download here: Resources for choosing Squarespace themes
Understand Squarespace templates
There is some Squarespace-specific terminology to understand. First, there are two different versions of Squarespace: 7.0 and the newer 7.1. If you are looking to refresh a site built on the 7.0 platform, your template plays a bigger role because it has a fixed set of style parameters that can’t be changed.
In contrast, if you are on version 7.1, the template you choose is just a starting point. You can customize your site in any way as all 7.1 sites are part of the same template “family” and have the same features and style options.
“Family,” you ask? That’s another Squarespace term. A template family means that templates within a family all have the same underlying structure and functionality. This is particularly important on 7.0 as your limitation is the features and style options in different families. Squarespace offers template comparison charts where you can compare features and look for templates in the same family.
We also love the work done here by I Love Creatives in grouping the templates into families. This gives you a nice visual of how the templates are related.

Check out Squarespace templates by category
You can always start by browsing the themes Squarespace has available by category. To find them, go to their theme page and browse through the categories available at the left-hand side. For example, if you’re a musician, look under musicians and bands; if you’re a photographer, look under photography.

The advantage of searching this way is that Squarespace has already created these themes with precisely the stated job in-mind. The core functions that you’re likely to need are already embedded.
Check out the theme preview and also take a look at what other Squarespace customers have done with the same template. It’s important to analyze the actual structure of the pages rather than be distracted by the content. The theme controls the structure and that’s what you’ll be getting. This will help to give you an idea of whether the theme will work for you.
If there’s a downside to choosing a template this way, it’s that you run the risk of looking like everyone else who runs a competing business in your area. If every restaurant in LA clicked on “restaurants”, there’s a high chance they’ll end up looking similar!
With that said, don’t think you have to stick with a template that has been made for your particular category. As long as the template has the features you need, you can make it work for your site.
Quick tip: if you’re using version 7.0 and looking for something super-versatile, Brine tends to be the top pick. There are a number of templates in the same family and it has the greatest flexibility and functionality. If you’re using 7.1, it doesn’t matter - all functionality is available.
Free download: Get our resources for choosing Squarespace themes here
Know your must-have features
You might already know that you have some very specific, must-have features required for your website. Great! This is a good way to help narrow down what can be an overwhelming number of choices.
In fact, we recommend that you write a list of must-haves first. It helps to not have already fallen in love with a particular template, only to find it doesn’t have that particular feature you really want.
Where should you start? Write down a simple flow of actions you want someone who lands on your website to take. For example, if you are a service business (like a Squarespace website builder), you might want them to go from a home page, to an about page, to a service page that also has a contact form for them to get hold of you. This is a super-simple flow, but some people will want extra features, such as parallax scrolling or a slideshow portfolio.
With your list of preferred features, you can look for a template that matches. I Love Creatives has a cool feature comparison if you scroll down this page; or Using My Head has a more detailed comparison here.


Squarespace template guides
If you’re running on version 7.0 and have chosen a template from Squarespace, then these template guides are for you. This page was last updated for 2020 and has key links to working with templates, making style changes and working with each specific template.
If you’re really stuck on choosing a template, reading through the guide for the template you think you want can help. You can research every little detail before making your final decision!
If you’re on 7.1, every detail can be found here. Note the following key points:
“Version 7.1 doesn't currently support:
Template switching - To change your site's design, use pre-built pages, customizable page sections, and style themes.
Album and Gallery Pages - Instead, add Audio Blocks and gallery sections.
Developer Mode - The Developer Platform is only available in version 7.0.”
You also can’t switch site versions, although you can rebuild a 7.0 site on 7.1.
Third-party Squarespace themes
What’s a great way to make sure your website doesn’t look just like everyone else’s? Well, there are a couple of ways: 1) you can make customizations (or hire someone to make customizations) to your site or, 2) look for a third-party theme - that’s where we come in at SQSP Themes.
All of our themes are curated to ensure that we uphold the very high standards people have come to expect of any Squarespace theme. They are feature-rich and you will be able to find something for almost any need you have.
There is also the possibility of adding functionality, via various plugin choices. For example, you might want to add a video lightbox, related posts and products, countdown timers or testimonial sliders. An advantage of plugins is that they’re easy to turn on or off, meaning you can add functionality without a major redesign.
Need to switch templates?
How to switch templates from Squarespace 7.0 to 7.0
How to switch templates from Squarespace 7.0 to 7.1
How to switch templates from Squarespace 7.1 to 7.1
Final thoughts
So there are a few things to know about Squarespace before getting into theme choice, particularly whether you are running on 7.0 or 7.1. The difference matters in terms of ensuring you’ll have both the theme AND the function that you want.
Overall, we love Squarespace for its attractive websites and slick designs. If you know the features you need, you can safely pick virtually any theme that meets those features and have a beautiful website.

How to create a course with Squarespace member areas
Online courses are a fantastic way to share your expertise, build a loyal audience, and create an additional income stream. If you're looking for a platform to host your course, Squarespace might be a surprisingly good fit. This blog post will guide you through the basics of course creation on Squarespace, while our accompanying YouTube video provides a detailed visual demonstration.
Squarespace as a Course Platform
Let's take a look at the pros and cons of using Squarespace to create your online course:
Pros:
Ease of use: Squarespace is well-known for its user-friendly interface and drag-and-drop website builder, making course creation less intimidating.
Integrated design tools: Create a beautiful, professional-looking course that matches your existing brand and website.
Streamlined branded experience: Keep everything within your Squarespace ecosystem for a seamless student experience.
Cons:
Limited advanced course features: Squarespace lacks the more robust features found on dedicated course platforms (like complex quizzes, progress tracking, advanced analytics, etc.).
Transaction fees: Squarespace charges transaction fees on course sales, which can add up over time.
Best for:
Simple online courses: Squarespace shines with courses aimed at self-paced learning without the need for fancy bells and whistles.
Creators who already use and love Squarespace: If you already have a Squarespace website, adding a course can be a natural extension.
Step-by-Step Guide
Setting Up Your Member Area
Begin by accessing the Member Areas feature within your Squarespace dashboard.
Give your member area a descriptive name and establish the basic access settings (password protected, invite-only, etc.).
Connect your preferred payment processor (Stripe, PayPal) to enable student enrollment.
Customizing Your Course Experience
Email Notifications: Craft personalized welcome messages, payment confirmations, and any other automated emails your students will receive. Match the tone and branding of your course.
Member Navigation: Design a clear and intuitive navigation menu within your member area. Guide your students to their lessons, any community features, and their account settings with ease.
Structuring Your Lessons
Squarespace leverages its blogging functionality for course creation. Each lesson becomes a blog post.
Utilize clear titles, video embeds, text content, downloadable resources, and any other elements that enhance the learning experience.
Consider using categories or tags to organize lessons into modules or topics for easy navigation.
Creating Your Sales Page
Design an eye-catching sales page that clearly outlines the benefits of your course and what students will learn.
Include testimonials or social proof to build trust.
Feature a prominent "Join Now" button that seamlessly takes potential students to the secure checkout process.