
What’s worth knowing in the Squarespace world.
For designers, developers, and people building businesses around Squarespace.

How to Write a Web Design Case Study That Actually Wins Clients
Most web designers make the same mistake when writing case studies.
They focus on what they did instead of why it mattered.
A case study isn’t just a recap of your project. It’s proof that your work solves real business problems. Potential clients aren’t interested in the fact that you built a new homepage or improved site speed—they want to know how those changes made an impact.
They want to see a transformation.
So let’s talk about how to write a case study that doesn’t just fill your portfolio but actually gets you hired.
Start With the Problem
Every great case study starts with a clear, compelling problem.
Imagine a small boutique coffee roastery, Golden Bean Coffee. They’ve spent years perfecting their craft, sourcing beans from the best growers in the world, and building a loyal local following. But their website? It’s a mess.
Customers struggle to navigate it. The checkout process is frustrating. Their online sales are almost nonexistent.
And that’s the real problem—not that the website looks bad, but that it’s losing them money.
If your case study starts with a sentence like:
“Golden Bean Coffee needed a new website.”
You’ve already lost your reader. There’s no tension, no reason to care.
Instead, try something like:
“Golden Bean Coffee built a thriving local business, but their online store told a different story. Customers struggled to navigate the site, and abandoned carts were piling up. Their website was costing them sales—so they called us.”
Now, we’re invested. We understand why the project mattered.
Show Why the Old Site Wasn’t Working
Before you get into the redesign, paint a clear picture of what wasn’t working. Don’t just say the website was outdated—explain how it was failing the business.
Maybe it was slow. Maybe the navigation was confusing. Maybe it wasn’t mobile-friendly.
For Golden Bean Coffee, let’s say:
“Visitors would browse the shop but leave before purchasing. The site took too long to load, and product pages buried key details. Mobile users had an even harder time—half of them abandoned their carts before checkout. Every day, potential sales were slipping through the cracks.”
Now we can see the problem. We feel the frustration. And that means we’ll care about the solution.
Explain Your Approach (Without Jargon)
Once you’ve set up the problem, it’s time to introduce your solution.
This is where a lot of web designers go wrong. They start listing technical details:
“We updated the navigation, improved site speed, and optimized the checkout process.”
Technically true, but deeply uninteresting. It doesn’t tell us why those changes mattered.
Instead, explain your thought process. Why did you make those changes? How did they improve the experience for real users?
For Golden Bean Coffee:
“We streamlined the navigation so customers could find their favorite roasts faster. We restructured the product pages to highlight tasting notes, origin details, and brewing tips—turning casual browsers into confident buyers. And we rebuilt the checkout flow, making it mobile-friendly and frictionless.”
This is still simple and easy to understand, but now we can see the impact of your design choices.
Make the Transformation Undeniable
Your case study should have a clear before-and-after contrast. Don’t just say the new site looks better—prove that it works better.
This is where results matter. Maybe sales increased. Maybe bounce rates dropped. Maybe customer engagement went up.
For Golden Bean Coffee, the transformation might look like this:
“With a faster, clearer, more intuitive shopping experience, sales didn’t just improve—they skyrocketed. Online revenue doubled in the first three months. Mobile purchases jumped by 60%. Customers weren’t just browsing anymore—they were buying.”
See how concrete that is? Even if you don’t have precise metrics, you can still highlight changes in behavior. Maybe support requests about the website dropped. Maybe the business owner told you they finally feel proud sending people to their site. The goal is to make the transformation feel real.
Let the Client Have the Last Word
A strong case study ends with the client’s perspective. A testimonial is more than just social proof—it reinforces the impact of your work in their own words.
If your client says:
“We love our new website.”
That’s nice, but it doesn’t say much.
If they say:
“Our online sales have never been better. The checkout process is smooth, customers love the new design, and we’re finally seeing the growth we hoped for.”
Now that’s powerful. It shows that the project didn’t just change the website—it changed their business.
Tie It All Together
By now, your case study should feel like a transformation story, not just a list of deliverables.
Start with a compelling problem
Show why the old site wasn’t working
Explain your approach in a way that’s easy to understand
Make the before-and-after contrast undeniable
End with a strong client takeaway
And finally, close with an invitation.
Not a hard sell. Not “Hire me now.” Something subtle but effective, like:
“A website should be as seamless as the business it represents. If yours isn’t, let’s talk.”
Because at the end of the day, a great case study doesn’t just show off your skills.
It makes your next client think, That’s exactly what I need.
Your Next Steps
Use this framework for your next case study.
Focus on the transformation, not just the tasks.
Share it where potential clients will see it—your website, LinkedIn, email list.
And if you already have a case study, drop a link in the comments. I’d love to take a look and give you feedback.

Elevate Your Personal Brand with Squarespace: Sell Trainings, Launch a Podcast, and Showcase Your Expertise
Below is a step-by-step guide to help you (or anyone) create a personal-brand website using Squarespace Blueprint AI, with a focus on offering paid trainings, showcasing work, and hosting a podcast. It’s written in an article style and includes practical tips to get you started quickly—even if you’ve never built a site before.
1. Understand Your Personal Brand Goals
Before diving into the technical aspects, clarify what you want your personal brand to stand for and accomplish:
Purpose: Are you trying to establish yourself as a thought leader in a specific industry? Sell trainings? Grow an audience for your podcast?
Audience: Think about who you want to reach—professionals, hobbyists, executives? Your target audience influences your site’s design and content style.
Core Offerings: Pin down your offerings—paid digital trainings, coaching sessions, a weekly podcast, downloadable resources, etc.
Having these details in mind will help the Squarespace Blueprint AI (and you) shape the right layout, pages, and content sections.
2. Getting Started with Squarespace Blueprint AI

Squarespace Blueprint AI helps you quickly set up a site that matches your style and content goals. When you begin building:
Start a New Site: Choose Build with AI during setup.
Answer the Prompts: Blueprint AI will ask about your website’s topic, style preferences (e.g., minimal, modern, professional), and needed features (e-commerce, blog, podcast, etc.).
Review the Initial Layout: Squarespace will generate a starter site with suggested pages—like Home, About, Services/Trainings, and a Podcast or Blog page.

You can fully customize the AI-generated design. Think of it as a quick “blueprint.” Even if it’s not 100% perfect, it gives you a framework to work from—and you can modify colors, fonts, layouts, and pages as you go.
3. Choose a Template (or Stick to the AI Design)
If you prefer to manually select a base template (in addition to or instead of the AI version), Squarespace has many excellent themes. For a personal brand, look for templates geared toward portfolio sites, coaches, or podcasters. These typically have clean layouts, large headline sections for your photo/name, and strong calls to action (CTAs).
Template Must-Haves for a Personal Brand
Hero Banner: A large section at the top of the page to introduce yourself, your brand, and your key offering.
Podcast/Blog Area: A dedicated section or page to house audio content or articles.
Sales/Services Page: For marketing your trainings (could be a membership or a store page).
Clean Navigation: Straightforward menus so visitors can easily find key info (About, Podcast, Courses, Contact).
(Pro Tip: Don’t stress about finding the “perfect” template. Since Squarespace is easy to customize, pick one close to your style, then tweak it to match your brand personality.)
4. Craft Your Essential Pages

Home Page
The first impression of your brand. Typically includes:
A hero section with your name, title, or brand message (“I help professionals level up in X”).
A call to action (“Sign up for my newsletter” or “Browse my trainings”).
A short about blurb—who you are, what you do, why it matters.
Social proof, if relevant: testimonials, media features, or quotes from past clients.
About Page
Expand on who you are and why you’re passionate about your field. Share your career highlights, experience, and any fun facts that show your personality. Keep it professional yet approachable—personal branding is about authenticity.
Trainings / Services Page
For marketing your offerings, whether that’s digital courses, speaking engagements, consulting, or coaching sessions. Include:
Short descriptions of each program (include bullet points of benefits, pricing, or “what’s included”).
Clear signup or purchase links (we’ll set up e-commerce or scheduling shortly).
Podcast Page
If you’re hosting your podcast directly on Squarespace, you can use their Audio Block or the built-in Podcasts feature to upload episodes and create a feed. Alternatively, you can embed episodes from your podcast host (like Anchor, Libsyn, Buzzsprout) onto your site. Whichever route:
Include show notes for each episode with a summary, guest info, and a CTA (“Subscribe on Apple Podcasts / Spotify”).
Use images or headshots for each episode to add visual interest.
Make it easy to browse past episodes with a clean layout or blog-style feed.
Contact Page
A straightforward contact form is essential. You might have a separate form for general inquiries vs. booking requests. Squarespace has user-friendly form blocks; you just drag and drop a Form block onto the page, configure your fields (Name, Email, Message, etc.), and set up an email address for submissions.
5. Enable E-Commerce or Membership Features for Paid Trainings
If you’re selling digital trainings or courses, consider one of these approaches:
Squarespace Commerce (Digital Products)
Use the built-in Squarespace Commerce features to create product listings for your trainings.
Each training can be set up as a digital product—when someone purchases, they receive a download link or an email with access info.
Perfect for one-off downloadable resources (PDFs, video files, or a link to a private video library).
Squarespace Member Areas
Allows you to offer restricted, member-only pages or content.
You can create multiple membership tiers (e.g., Basic, Premium) with different access rights.
This is ideal if you want an online course hub or a resource library for paying members.
Third-Party Integration
Tools like Teachable, Podia, or Thinkific can host your video courses, but you can still embed or link them on your Squarespace site.
Use a simple button or link in your “Trainings” page to direct users to your hosted course platform.
No matter which you choose, highlight the value of your trainings. Emphasize real-world results or learning outcomes (“By the end of this course, you’ll be able to…”) and make the checkout process simple to reduce friction.
6. Integrate a Podcast Seamlessly
Squarespace supports podcast hosting directly, or you can embed a player from your existing host:
Squarespace’s Native Podcast Feature
Upload audio files through the Blog section (it can double as a podcast feed).
Add the necessary details—title, show notes, episode number, etc.
Squarespace can generate an RSS feed to submit to Apple Podcasts, Spotify, etc.
Audio Blocks
If you have a dedicated podcast host, embed each episode using the “Audio” block or a custom embed code (like Spotify’s web player).
This approach keeps hosting separate but still presents episodes beautifully on your site.
(Pro Tip: Ensure your CTAs—“Listen Now,” “Subscribe on Apple Podcasts,” “Join My Newsletter”—are prominent. People shouldn’t have to hunt to find your show or sign up for your updates.)
7. Set Up a Custom Domain

A custom domain is crucial for credibility—e.g., yourname.com or yourbrandname.com. Squarespace allows you to:
Buy a New Domain
Head to Settings > Domains and search for an available name.
Purchase it directly from Squarespace for seamless integration.
Connect an Existing Domain
If you already own a domain from a registrar (GoDaddy, Namecheap, etc.), Squarespace’s step-by-step guides help you connect it to your new site.
Be sure to make your custom domain the primary domain so visitors always see it (instead of a squarespace.com subdomain).
8. Launch and Grow
Once you’ve customized your site, tested your e-commerce setup, and tweaked your design, it’s time to go live:
Preview & Proofread: Double-check for typos, broken links, or missing images.
Publish Your Site: Hit that “Go Live” button (or remove the site password if you had one).
Promote: Share your new site on LinkedIn, Twitter, Facebook—any platform your audience is on.
Iterate Over Time: Keep refining as you gain feedback. Add new trainings, episodes, testimonials, or blog posts to stay fresh.
(Pro Tip: Consistency is key. Regularly updating your content—be it new podcast episodes, blog posts, or training offers—keeps your audience engaged and helps the people who are ultimately looking for it.)
Wrapping Up
Building a personal brand website can feel daunting, but Squarespace Blueprint AI (combined with Squarespace’s intuitive interface) makes it straightforward to:
Pick a design template that suits your brand’s style
Showcase your expertise, podcast, and paid trainings
Collect leads, sell digital products, and grow an audience
Maintain professional branding with ease
By following these steps—defining your brand goals, setting up essential pages (Home, About, Podcast, Trainings/Services, Contact), implementing e-commerce or membership features, and staying consistent with updates—you’ll have a polished online presence that elevates your personal brand and grows your reach.
Now that you know the basics, it’s time to launch your personal brand site, share your knowledge with the world, and watch your audience grow. Good luck, and enjoy the journey!

Building Your First Photography Website with Squarespace Blueprint AI
Setting up your first photography website can feel overwhelming, but Squarespace Blueprint AI makes it easy by guiding you through each step. It starts by asking what your site is about—as shown in the screenshot below, you’ll select "Photography" as your category to ensure the AI tailors the design to your needs.

This guide will walk you through choosing a template, creating a portfolio, adding a booking system, starting a blog, connecting a custom domain, and optimizing for SEO—all with practical tips to help you build a site that looks professional and attracts clients.
Choosing the Right Template for Your Photography Portfolio
1. Let Blueprint AI Jump-Start Your Design
When you begin a new Squarespace site, select the option to use Blueprint AI. The AI will ask about your site’s goals, industry, and style preferences. Since you’re building a photography portfolio, you’ll want to indicate that you need a portfolio-style site to showcase images.

Based on your responses, Blueprint AI will generate a personalized site layout with a suggested color palette, fonts, and even some starter content. For example, if you prefer a modern, minimal look, the AI will preview a clean design that keeps your images front and center.
2. Pick a Template That Highlights Your Photography
Once the AI generates your site, you can choose a template manually or refine the AI’s suggestion.

The best photography-focused templates typically include:
Full-width image banners to showcase stunning shots.
Gallery pages for organized portfolios.
Minimalist design to keep the focus on your work.
3. Build Your Homepage
Your homepage is the first impression visitors will get, so it should be visually striking and easy to navigate. Squarespace Blueprint AI helps by recommending sections that fit your goals—like an intro section, services overview, and a call-to-action for bookings.

Choose a layout that complements your photography style—whether that’s bold and dramatic or clean and minimalist. You can always edit the text, replace demo images, and tweak the layout later to make it uniquely yours.
4. Adding Pages to Your Site
A well-structured website makes it easy for clients to find what they need. Blueprint AI suggests essential pages like About, Contact, Services, and Appointments based on your site’s purpose.

You can add, remove, or customize these pages anytime, but starting with the recommended pages ensures you have a solid foundation. If you plan to sell prints or offer online courses, you can include Shop or Course pages as well.
5. Choosing Fonts and Colors to Match Your Style
Typography and color schemes play a huge role in your brand identity. Squarespace Blueprint AI suggests pre-selected font and color combinations based on your preferences.

If you want a sleek, modern look, go for fonts like Space Grotesk or Syne Mono paired with a black-and-white or neutral-toned palette.
If you prefer a bold, artistic feel, you can choose Shrikhand or Young Serif, combined with richer colors like deep blues or warm earth tones.
Keep it cohesive! Your font and color choices should reflect your photography style—whether that’s dark and moody, clean and editorial, or playful and vibrant.
By leveraging Blueprint AI and selecting a clean photography-oriented template, you’re setting up your portfolio for success from the start. Next, let’s move on to building your portfolio pages and adding a booking system!
Setting Up a Portfolio to Showcase Your Work
With your template in place, it’s time to build out your portfolio pages. Squarespace makes it easy – you can add a Portfolio page to your site with just a few clicks. Here’s how to organize and showcase various types of photography:

Create a portfolio or gallery page: In the Squarespace site editor, open the Pages panel. Click the “+” to add a new page and select Portfolio (or Gallery, depending on the template). Squarespace will add a new portfolio section to your navigation. (If you used Blueprint AI, a portfolio page may already exist; you can edit that one rather than adding a new page.)
Organize by photography type: Think about the different genres or categories of photography you do – for example, Weddings, Portraits, Landscapes, Events, etc. It’s often best to create separate gallery pages or sections for each category.
This way, visitors (and search engines) can easily navigate your work. For instance, under your Portfolio, you might have sub-pages or sections for each type of shoot. On Squarespace, you can achieve this by adding multiple gallery sections or using a folder of pages under a main “Portfolio” menu item.
Add your images and projects: Upload your best photographs to the appropriate gallery pages. Squarespace supports high-resolution images and will automatically create optimized versions for different screen sizes. You can choose from layout options like grids, full-screen slideshows, lightbox pop-ups, etc., to display your work in an engaging way. Take advantage of features like setting a focal point on each image (so important parts of the photo are always centered in thumbnails).
Include captions or descriptions (optional): It can be effective to include brief captions or project descriptions along with your images – for example, the location or client name, or a one-line story behind the photo. This adds context for visitors and can incorporate keywords (useful for SEO, which we’ll discuss later). Just be sure the text doesn’t overwhelm the images; keep it subtle and consistent.
By structuring your portfolio into clear sections, you make it easy for people to find what they’re looking for. A bride-to-be can jump straight to your Weddings gallery, while a potential client interested in family portraits can view your Portraits section. This organization not only improves user experience but also helps Google understand your content (boosting your SEO).
Practical Tip: Use descriptive titles for your galleries. For example, title a page “Wedding Photography Portfolio” rather than just “Portfolio” – this will help attract visitors searching for wedding photographers.
Adding a Booking System to Streamline Scheduling
If you occasionally shoot gigs or want to allow clients to book sessions with you, integrating a scheduling system into your site can save you a lot of back-and-forth emails. Squarespace offers a built-in solution called Squarespace Scheduling (Acuity), which lets clients see your availability and book appointments online. Here’s how to set it up:
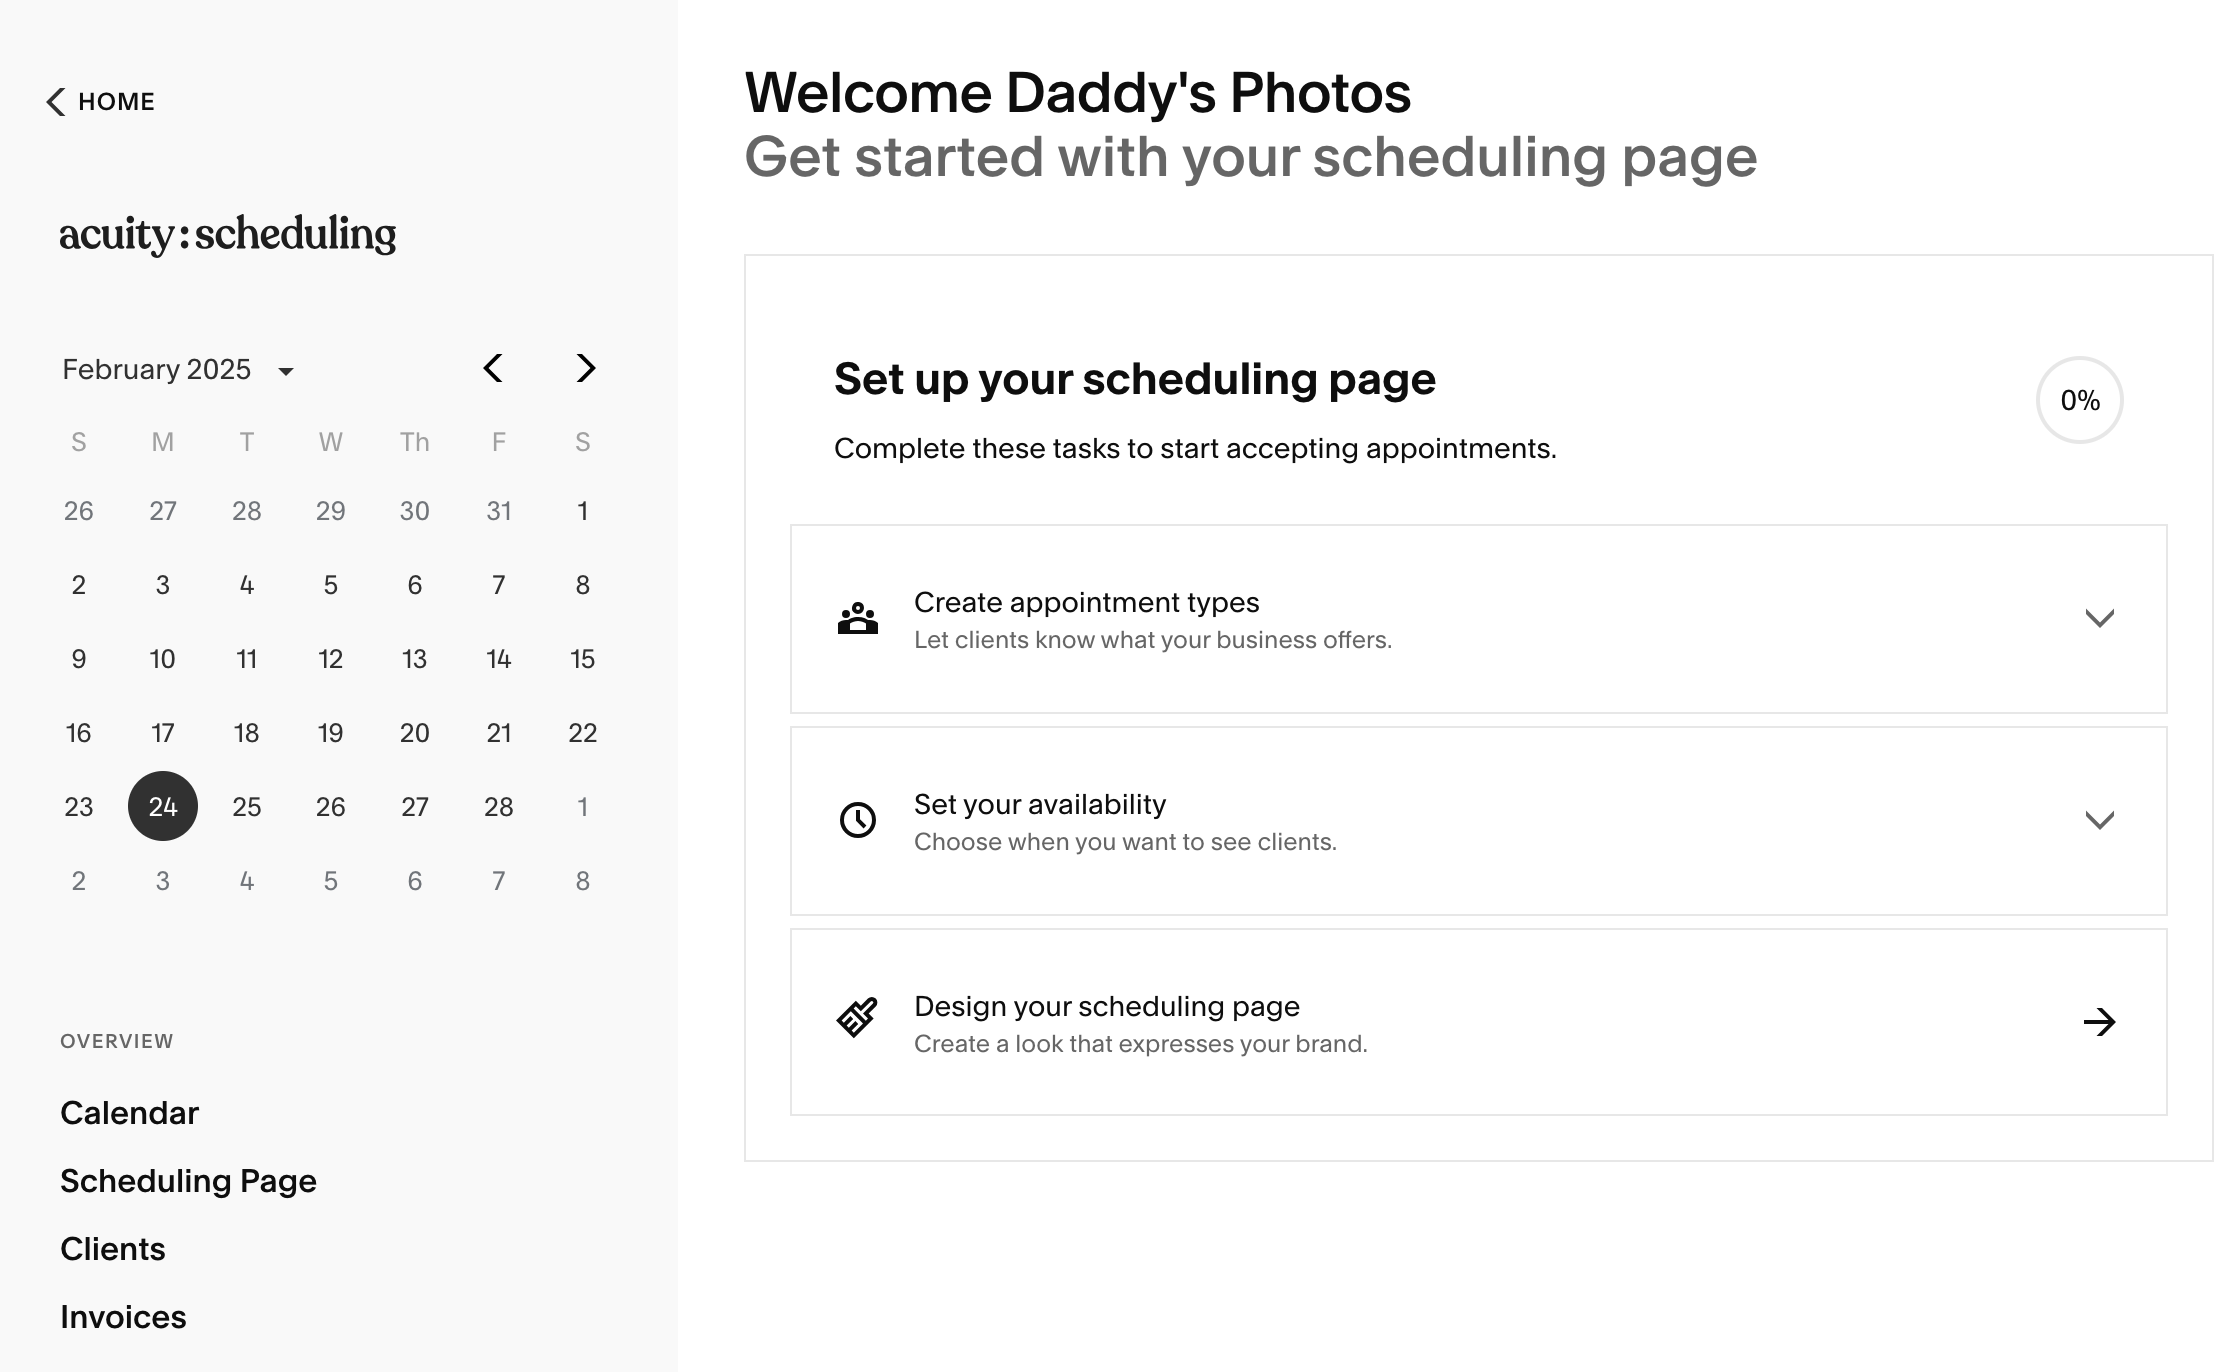
Set up your scheduling account: Squarespace Scheduling (formerly Acuity) might be included in your Squarespace plan or available as an add-on. Begin by creating an Acuity Scheduling account (you can do this via Squarespace’s interface). This tool is “our solution for clients to book appointments and classes through a Squarespace site”. Configure your availability, appointment types (e.g. 1-hour photoshoot, 30-minute consultation), and any intake questions on the Acuity side first.
Add a scheduling block to your site: Navigate to the page where you want the booking calendar to appear – for example, you might create a page called “Book a Session.” In the page editor, click an insert point (the “+” button) and choose Scheduling from the block menu. Squarespace will insert a scheduling block (a calendar/booking interface) on the page.
Connect your calendar: Click the pencil icon on the new Scheduling block to open its settings. If your Squarespace account is linked to Acuity, you’ll see options to select which scheduler to display. Choose the appropriate calendar or appointment type from the dropdown – for instance, you could show your general availability, or a specific calendar for portrait sessions only. If, for some reason, you need to use an external Acuity account not linked to Squarespace, you can select “Custom Link” and paste in your scheduler’s URL (though using a linked account is more seamless).
Customize and test: Adjust the design of the booking section if needed (Squarespace will usually match it to your site style). Save your changes, then test the booking flow as if you were a client – click on a date, select a time slot, and see that the booking form works. All Acuity plans support embedding the scheduler on Squarespace (note: if you’re on a free Acuity plan outside of Squarespace, embedded booking isn’t supported, but any Squarespace-linked plan will work). Make sure you receive the confirmation emails or notifications as expected.
With your scheduling system in place, clients can conveniently book shoots 24/7 through your website. This not only streamlines your workflow but also gives a professional touch – your site can “attract new customers and allow clients to book your services” automatically.
Practical Tip: If you prefer to vet inquiries before confirming a booking, you could instead use a simple contact form for inquiries. However, using online scheduling will save time once you’re comfortable with it. You can always set buffer times, require approval for appointments, or password-protect your scheduling page if you want control over who can book.
Creating a Basic Blog to Engage Visitors and Improve SEO
Adding a blog to your photography site is highly beneficial. It gives you a place to share stories and updates, show your personality, and incorporate fresh content that can boost your search engine visibility. Even a simple blog that you update occasionally can make a difference. Here’s how to get started:

Add a Blog page
In your Squarespace editor’s Pages panel, click the “+” and choose Blog to add a blog section to your site (Squarespace might call it “Blog” or “News” depending on the template, but it’s the same thing). This will create a blog page where you can publish posts. The template likely includes a sample post you can edit or delete. Customize the layout if desired – for example, you can typically choose between a classic blog list or grid of posts.
Start posting content
Think of your blog as an extension of your portfolio – it’s a space to engage visitors with more depth than a caption or gallery can provide. You might post behind-the-scenes looks at recent shoots, tips for clients (e.g. “How to Prepare for a Photoshoot”), personal projects, or highlights from events. For instance, you could write articles like “5 Tips for Choosing the Perfect Wedding Photoshoot Location” or “Before and After: How I Edit My Portraits”. Not only do these posts provide value to readers, they also naturally allow you to include relevant keywords (like wedding photoshoot, portrait editing, etc.) which helps with SEO.
Keep it simple and authentic
You don’t need to be a professional writer – just write in your own voice as if speaking to a client. A short 300-500 word post with a few images can be enough. The key is consistency; try to publish new posts periodically (e.g. once a month) so that your site stays active. Each new post is a fresh opportunity to “naturally incorporate keywords, which helps your site rank higher in search engines”. Plus, it shows potential clients that you’re active and passionate about your work.
From an SEO perspective, a blog is one of the best tools for a local business. In fact, Squarespace’s own local SEO guide recommends creating a dedicated blog page to share your knowledge and story. Over time, your posts (especially if they mention your locale or niche) can attract local visitors searching for those topics. So, a basic blog isn’t just for fun – it’s a strategic asset for growing your audience and climbing search rankings.
Registering a Domain and Linking It to Your Squarespace Site
A custom domain makes your site look professional and easy to find. Instead of using a Squarespace subdomain (e.g., yourname.squarespace.com), get a personalized .com that fits your brand, like janedoephotography.com.
1. Choose & Register Your Domain
Brainstorm a name that reflects your business—your name + “photography” often works well. Search for available domains in Squarespace > Settings > Domains. If your ideal name is taken, try variations or different extensions (.net, .studio, .photo).
Pro Tip: Some Squarespace plans include a free domain for the first year.
2. Connect Your Domain
Bought through Squarespace? It’s automatically linked.
Using an existing domain? Go to Settings > Domains, select “Use a domain I own,” and follow the steps to update your DNS settings on your registrar (GoDaddy, Namecheap, etc.). This may take a few hours to take effect.
3. Finalize Settings
Set your custom domain as the Primary Domain so visitors don’t see the Squarespace subdomain.
Enable SSL (HTTPS) for security (this is handled by Squarespace).
SEO Best Practices for Local Search and Attracting Local Leads
With your site live, let’s make sure local clients can find you. If you’re a photographer looking to attract inquiries in your area, follow these key local SEO strategies:
1. Use Local Keywords in Your Content
Naturally mention the areas you serve throughout your site. Instead of just saying “wedding photographer,” try “Wedding Photographer in Bridgeport, Connecticut.” Add location-specific phrases on your Home, About, and Service pages, as well as in blog posts or portfolio descriptions.
2. Optimize Page Titles & Descriptions
Your page titles and meta descriptions should clearly state what you do and where. For example:
Title: Jane Doe Photography – Bridgeport Wedding & Portrait Photographer
Description: Specializing in natural, timeless wedding and portrait photography in Bridgeport, CT. Book your session today.
Also, rename gallery sections with keyword-rich titles like “Bridgeport Wedding Photography Portfolio” for better search visibility.
3. Optimize Your Images
Use alt text to describe your photos with relevant keywords, e.g., “Bride and groom at Seaside Park wedding in Bridgeport.” Rename files before uploading (e.g., bridgeport-wedding-photo1.jpg instead of DSC_1234.jpg) and ensure images are compressed for fast loading—Google favors speed.
4. Claim Your Google Business Profile
Set up and optimize your Google Business Profile to appear in local searches and Google Maps. Include your location, website link, services, and photos. Encourage clients to leave Google reviews—they improve rankings and build trust.
5. Get Listed in Local Directories
Submit your business to platforms like Yelp, Bing Places, and local business directories. Ensure your Name, Address, and Phone (NAP) information is consistent across listings to improve credibility and search rankings.
6. Leverage Social Media & Local Connections
Link your Instagram, Facebook, and other social profiles to your website. Use local hashtags (#BridgeportPhotography) and tag locations in your posts. Collaborate with local vendors (e.g., wedding venues) to earn backlinks and referrals.
Congratulations – you now have a simple, effective Squarespace website for your photography portfolio! By choosing a suitable template (with a little AI help), showcasing your work in organized galleries, enabling easy bookings, blogging occasionally, using a custom domain, and practicing good SEO, you’ve built a strong online foundation for your photography side business. Remember to keep your site updated with new photos and info as you grow. With Squarespace’s user-friendly tools and the Blueprint AI, you’re in control – so you can focus on what you love: taking great photos.