
What’s worth knowing in the Squarespace world.
For designers, developers, and people building businesses around Squarespace.

Building Your First Photography Website with Squarespace Blueprint AI
Setting up your first photography website can feel overwhelming, but Squarespace Blueprint AI makes it easy by guiding you through each step. It starts by asking what your site is about—as shown in the screenshot below, you’ll select "Photography" as your category to ensure the AI tailors the design to your needs.

This guide will walk you through choosing a template, creating a portfolio, adding a booking system, starting a blog, connecting a custom domain, and optimizing for SEO—all with practical tips to help you build a site that looks professional and attracts clients.
Choosing the Right Template for Your Photography Portfolio
1. Let Blueprint AI Jump-Start Your Design
When you begin a new Squarespace site, select the option to use Blueprint AI. The AI will ask about your site’s goals, industry, and style preferences. Since you’re building a photography portfolio, you’ll want to indicate that you need a portfolio-style site to showcase images.

Based on your responses, Blueprint AI will generate a personalized site layout with a suggested color palette, fonts, and even some starter content. For example, if you prefer a modern, minimal look, the AI will preview a clean design that keeps your images front and center.
2. Pick a Template That Highlights Your Photography
Once the AI generates your site, you can choose a template manually or refine the AI’s suggestion.

The best photography-focused templates typically include:
Full-width image banners to showcase stunning shots.
Gallery pages for organized portfolios.
Minimalist design to keep the focus on your work.
3. Build Your Homepage
Your homepage is the first impression visitors will get, so it should be visually striking and easy to navigate. Squarespace Blueprint AI helps by recommending sections that fit your goals—like an intro section, services overview, and a call-to-action for bookings.

Choose a layout that complements your photography style—whether that’s bold and dramatic or clean and minimalist. You can always edit the text, replace demo images, and tweak the layout later to make it uniquely yours.
4. Adding Pages to Your Site
A well-structured website makes it easy for clients to find what they need. Blueprint AI suggests essential pages like About, Contact, Services, and Appointments based on your site’s purpose.

You can add, remove, or customize these pages anytime, but starting with the recommended pages ensures you have a solid foundation. If you plan to sell prints or offer online courses, you can include Shop or Course pages as well.
5. Choosing Fonts and Colors to Match Your Style
Typography and color schemes play a huge role in your brand identity. Squarespace Blueprint AI suggests pre-selected font and color combinations based on your preferences.

If you want a sleek, modern look, go for fonts like Space Grotesk or Syne Mono paired with a black-and-white or neutral-toned palette.
If you prefer a bold, artistic feel, you can choose Shrikhand or Young Serif, combined with richer colors like deep blues or warm earth tones.
Keep it cohesive! Your font and color choices should reflect your photography style—whether that’s dark and moody, clean and editorial, or playful and vibrant.
By leveraging Blueprint AI and selecting a clean photography-oriented template, you’re setting up your portfolio for success from the start. Next, let’s move on to building your portfolio pages and adding a booking system!
Setting Up a Portfolio to Showcase Your Work
With your template in place, it’s time to build out your portfolio pages. Squarespace makes it easy – you can add a Portfolio page to your site with just a few clicks. Here’s how to organize and showcase various types of photography:

Create a portfolio or gallery page: In the Squarespace site editor, open the Pages panel. Click the “+” to add a new page and select Portfolio (or Gallery, depending on the template). Squarespace will add a new portfolio section to your navigation. (If you used Blueprint AI, a portfolio page may already exist; you can edit that one rather than adding a new page.)
Organize by photography type: Think about the different genres or categories of photography you do – for example, Weddings, Portraits, Landscapes, Events, etc. It’s often best to create separate gallery pages or sections for each category.
This way, visitors (and search engines) can easily navigate your work. For instance, under your Portfolio, you might have sub-pages or sections for each type of shoot. On Squarespace, you can achieve this by adding multiple gallery sections or using a folder of pages under a main “Portfolio” menu item.
Add your images and projects: Upload your best photographs to the appropriate gallery pages. Squarespace supports high-resolution images and will automatically create optimized versions for different screen sizes. You can choose from layout options like grids, full-screen slideshows, lightbox pop-ups, etc., to display your work in an engaging way. Take advantage of features like setting a focal point on each image (so important parts of the photo are always centered in thumbnails).
Include captions or descriptions (optional): It can be effective to include brief captions or project descriptions along with your images – for example, the location or client name, or a one-line story behind the photo. This adds context for visitors and can incorporate keywords (useful for SEO, which we’ll discuss later). Just be sure the text doesn’t overwhelm the images; keep it subtle and consistent.
By structuring your portfolio into clear sections, you make it easy for people to find what they’re looking for. A bride-to-be can jump straight to your Weddings gallery, while a potential client interested in family portraits can view your Portraits section. This organization not only improves user experience but also helps Google understand your content (boosting your SEO).
Practical Tip: Use descriptive titles for your galleries. For example, title a page “Wedding Photography Portfolio” rather than just “Portfolio” – this will help attract visitors searching for wedding photographers.
Adding a Booking System to Streamline Scheduling
If you occasionally shoot gigs or want to allow clients to book sessions with you, integrating a scheduling system into your site can save you a lot of back-and-forth emails. Squarespace offers a built-in solution called Squarespace Scheduling (Acuity), which lets clients see your availability and book appointments online. Here’s how to set it up:
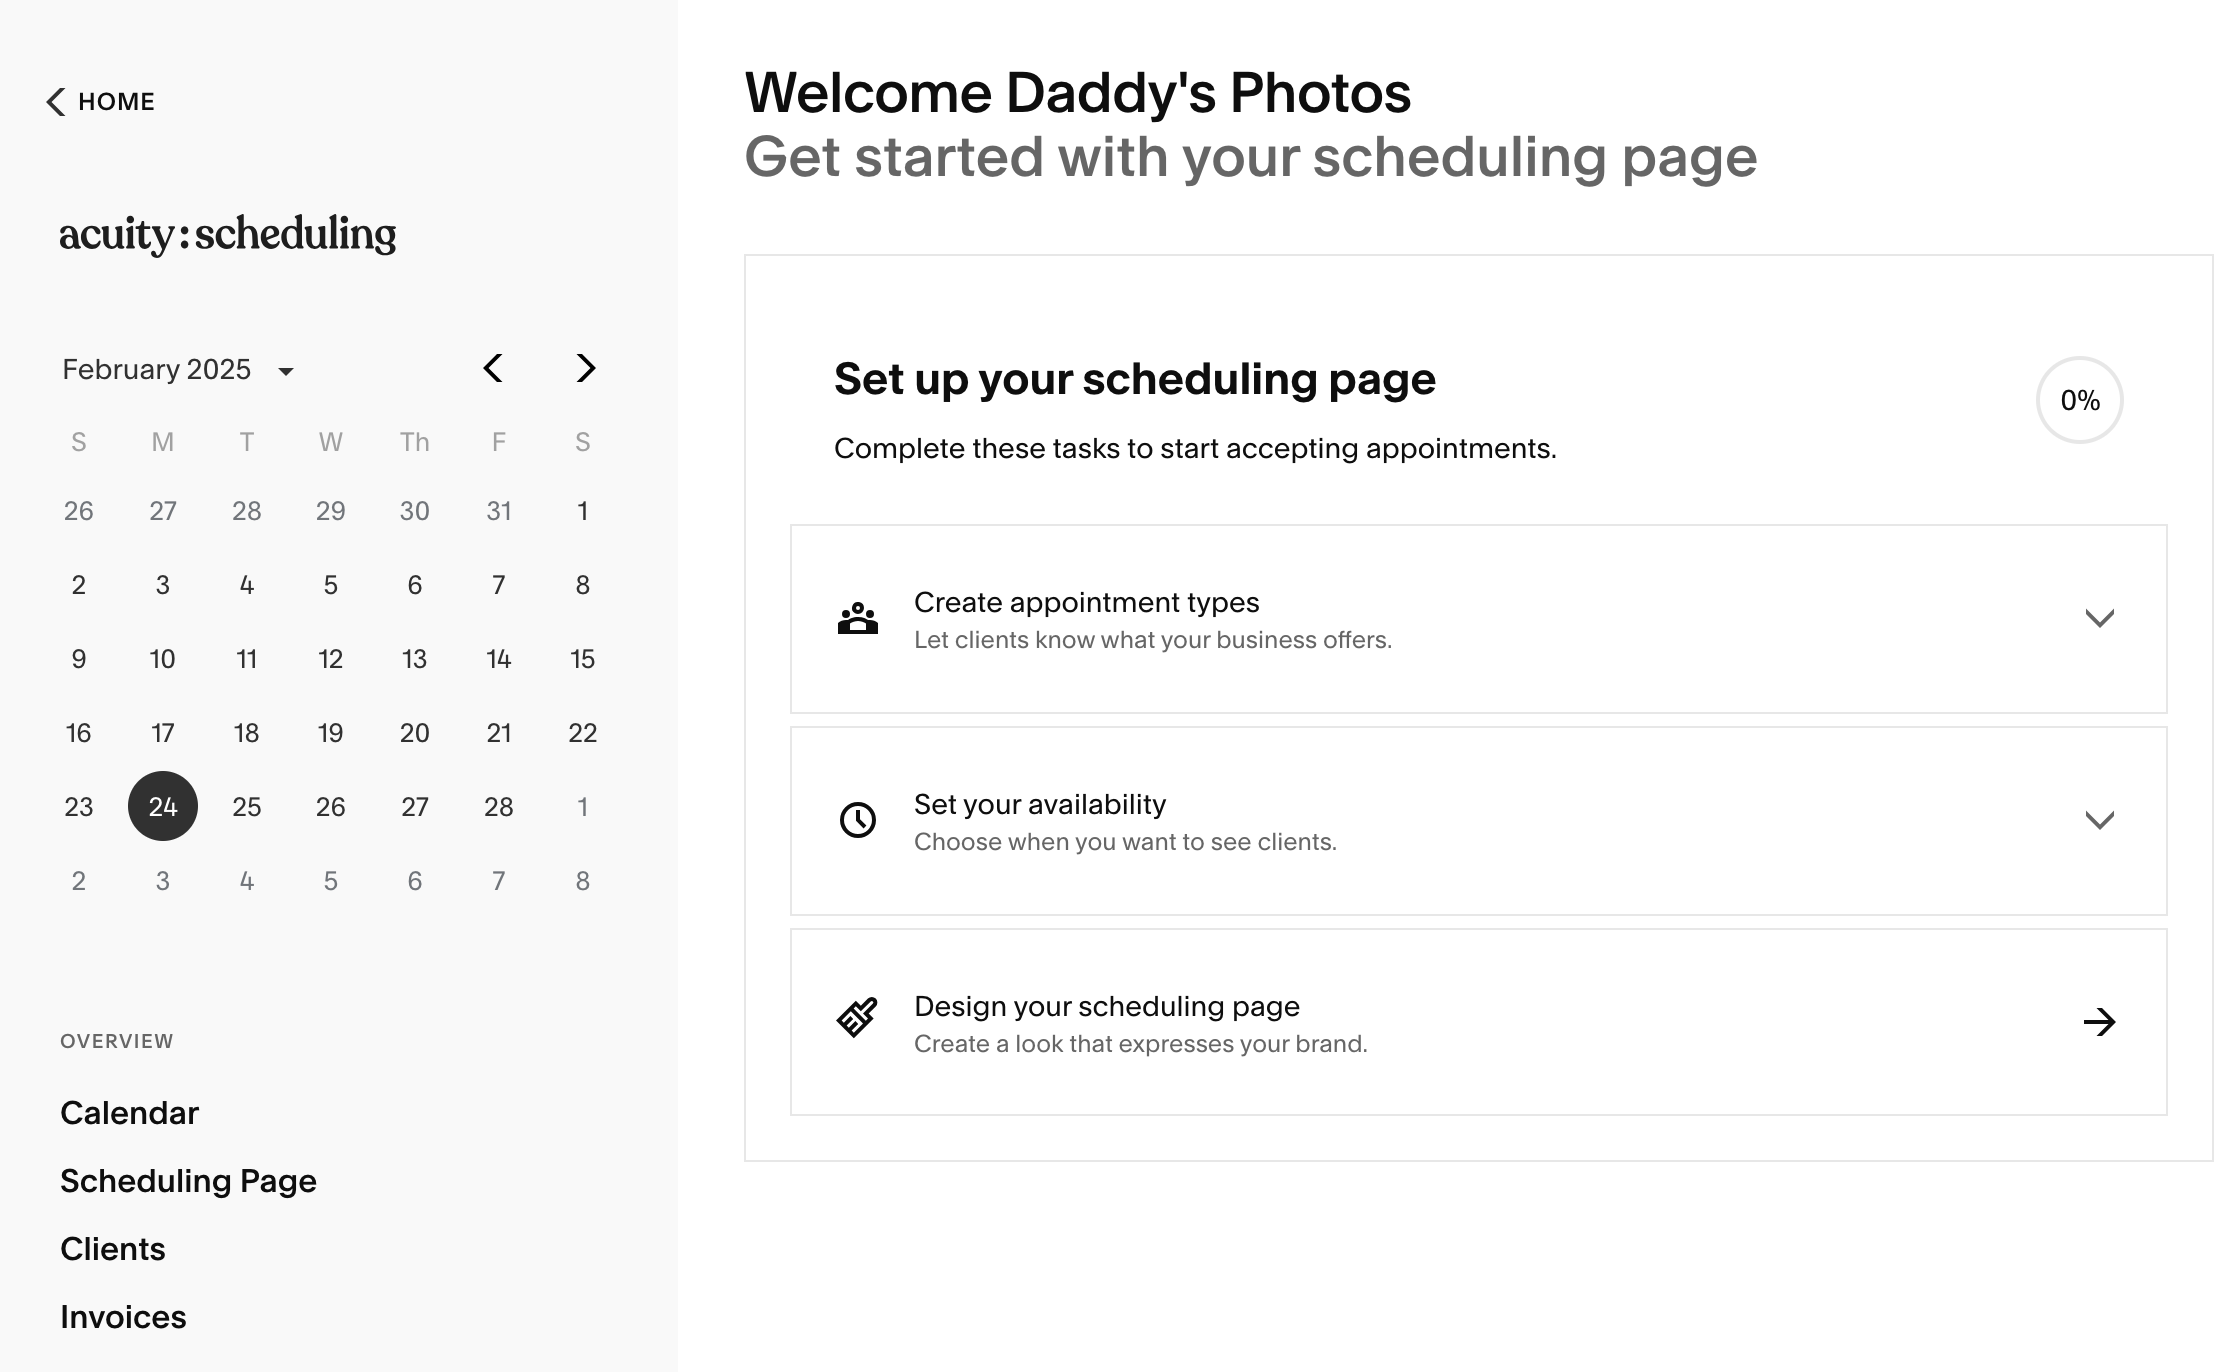
Set up your scheduling account: Squarespace Scheduling (formerly Acuity) might be included in your Squarespace plan or available as an add-on. Begin by creating an Acuity Scheduling account (you can do this via Squarespace’s interface). This tool is “our solution for clients to book appointments and classes through a Squarespace site”. Configure your availability, appointment types (e.g. 1-hour photoshoot, 30-minute consultation), and any intake questions on the Acuity side first.
Add a scheduling block to your site: Navigate to the page where you want the booking calendar to appear – for example, you might create a page called “Book a Session.” In the page editor, click an insert point (the “+” button) and choose Scheduling from the block menu. Squarespace will insert a scheduling block (a calendar/booking interface) on the page.
Connect your calendar: Click the pencil icon on the new Scheduling block to open its settings. If your Squarespace account is linked to Acuity, you’ll see options to select which scheduler to display. Choose the appropriate calendar or appointment type from the dropdown – for instance, you could show your general availability, or a specific calendar for portrait sessions only. If, for some reason, you need to use an external Acuity account not linked to Squarespace, you can select “Custom Link” and paste in your scheduler’s URL (though using a linked account is more seamless).
Customize and test: Adjust the design of the booking section if needed (Squarespace will usually match it to your site style). Save your changes, then test the booking flow as if you were a client – click on a date, select a time slot, and see that the booking form works. All Acuity plans support embedding the scheduler on Squarespace (note: if you’re on a free Acuity plan outside of Squarespace, embedded booking isn’t supported, but any Squarespace-linked plan will work). Make sure you receive the confirmation emails or notifications as expected.
With your scheduling system in place, clients can conveniently book shoots 24/7 through your website. This not only streamlines your workflow but also gives a professional touch – your site can “attract new customers and allow clients to book your services” automatically.
Practical Tip: If you prefer to vet inquiries before confirming a booking, you could instead use a simple contact form for inquiries. However, using online scheduling will save time once you’re comfortable with it. You can always set buffer times, require approval for appointments, or password-protect your scheduling page if you want control over who can book.
Creating a Basic Blog to Engage Visitors and Improve SEO
Adding a blog to your photography site is highly beneficial. It gives you a place to share stories and updates, show your personality, and incorporate fresh content that can boost your search engine visibility. Even a simple blog that you update occasionally can make a difference. Here’s how to get started:

Add a Blog page
In your Squarespace editor’s Pages panel, click the “+” and choose Blog to add a blog section to your site (Squarespace might call it “Blog” or “News” depending on the template, but it’s the same thing). This will create a blog page where you can publish posts. The template likely includes a sample post you can edit or delete. Customize the layout if desired – for example, you can typically choose between a classic blog list or grid of posts.
Start posting content
Think of your blog as an extension of your portfolio – it’s a space to engage visitors with more depth than a caption or gallery can provide. You might post behind-the-scenes looks at recent shoots, tips for clients (e.g. “How to Prepare for a Photoshoot”), personal projects, or highlights from events. For instance, you could write articles like “5 Tips for Choosing the Perfect Wedding Photoshoot Location” or “Before and After: How I Edit My Portraits”. Not only do these posts provide value to readers, they also naturally allow you to include relevant keywords (like wedding photoshoot, portrait editing, etc.) which helps with SEO.
Keep it simple and authentic
You don’t need to be a professional writer – just write in your own voice as if speaking to a client. A short 300-500 word post with a few images can be enough. The key is consistency; try to publish new posts periodically (e.g. once a month) so that your site stays active. Each new post is a fresh opportunity to “naturally incorporate keywords, which helps your site rank higher in search engines”. Plus, it shows potential clients that you’re active and passionate about your work.
From an SEO perspective, a blog is one of the best tools for a local business. In fact, Squarespace’s own local SEO guide recommends creating a dedicated blog page to share your knowledge and story. Over time, your posts (especially if they mention your locale or niche) can attract local visitors searching for those topics. So, a basic blog isn’t just for fun – it’s a strategic asset for growing your audience and climbing search rankings.
Registering a Domain and Linking It to Your Squarespace Site
A custom domain makes your site look professional and easy to find. Instead of using a Squarespace subdomain (e.g., yourname.squarespace.com), get a personalized .com that fits your brand, like janedoephotography.com.
1. Choose & Register Your Domain
Brainstorm a name that reflects your business—your name + “photography” often works well. Search for available domains in Squarespace > Settings > Domains. If your ideal name is taken, try variations or different extensions (.net, .studio, .photo).
Pro Tip: Some Squarespace plans include a free domain for the first year.
2. Connect Your Domain
Bought through Squarespace? It’s automatically linked.
Using an existing domain? Go to Settings > Domains, select “Use a domain I own,” and follow the steps to update your DNS settings on your registrar (GoDaddy, Namecheap, etc.). This may take a few hours to take effect.
3. Finalize Settings
Set your custom domain as the Primary Domain so visitors don’t see the Squarespace subdomain.
Enable SSL (HTTPS) for security (this is handled by Squarespace).
SEO Best Practices for Local Search and Attracting Local Leads
With your site live, let’s make sure local clients can find you. If you’re a photographer looking to attract inquiries in your area, follow these key local SEO strategies:
1. Use Local Keywords in Your Content
Naturally mention the areas you serve throughout your site. Instead of just saying “wedding photographer,” try “Wedding Photographer in Bridgeport, Connecticut.” Add location-specific phrases on your Home, About, and Service pages, as well as in blog posts or portfolio descriptions.
2. Optimize Page Titles & Descriptions
Your page titles and meta descriptions should clearly state what you do and where. For example:
Title: Jane Doe Photography – Bridgeport Wedding & Portrait Photographer
Description: Specializing in natural, timeless wedding and portrait photography in Bridgeport, CT. Book your session today.
Also, rename gallery sections with keyword-rich titles like “Bridgeport Wedding Photography Portfolio” for better search visibility.
3. Optimize Your Images
Use alt text to describe your photos with relevant keywords, e.g., “Bride and groom at Seaside Park wedding in Bridgeport.” Rename files before uploading (e.g., bridgeport-wedding-photo1.jpg instead of DSC_1234.jpg) and ensure images are compressed for fast loading—Google favors speed.
4. Claim Your Google Business Profile
Set up and optimize your Google Business Profile to appear in local searches and Google Maps. Include your location, website link, services, and photos. Encourage clients to leave Google reviews—they improve rankings and build trust.
5. Get Listed in Local Directories
Submit your business to platforms like Yelp, Bing Places, and local business directories. Ensure your Name, Address, and Phone (NAP) information is consistent across listings to improve credibility and search rankings.
6. Leverage Social Media & Local Connections
Link your Instagram, Facebook, and other social profiles to your website. Use local hashtags (#BridgeportPhotography) and tag locations in your posts. Collaborate with local vendors (e.g., wedding venues) to earn backlinks and referrals.
Congratulations – you now have a simple, effective Squarespace website for your photography portfolio! By choosing a suitable template (with a little AI help), showcasing your work in organized galleries, enabling easy bookings, blogging occasionally, using a custom domain, and practicing good SEO, you’ve built a strong online foundation for your photography side business. Remember to keep your site updated with new photos and info as you grow. With Squarespace’s user-friendly tools and the Blueprint AI, you’re in control – so you can focus on what you love: taking great photos.

How My 5-Year-Old Built a Squarespace Website Using Blueprint AI
A few weeks ago, my 11-year-old sat down with his 5-year-old brother, Omni, and together, they built a website.
Not a school project. Not a pretend “make-believe” website. A real, functional, live website—built in under an hour using Squarespace’s Blueprint AI. Cuz you know, a website makes it real.
And honestly? It was inevitable.
My 11-year-old built his first website at four—so when Omni saw him updating his site, he wasn’t about to be left out.
“Can I make one too?”
Sure, why not use Blueprint AI?

Omni is deep in his Godzilla era. His life revolves around big teeth, big monsters, and big booms. His drawings? Kaiju battles, volcano explosions, and dinosaurs with laser vision.
Normally, that would mean taping them to the fridge. But not today.
Today, Omni was about to go digital.

The 11-year-old took the lead. He sat down, laptop open, and started asking Omni questions while clicking through Squarespace’s Blueprint AI.
Big brother: “Okay, what kind of vibe do you want?”
Omni: “Dinosaurs and fire.”
Big brother: “There’s ‘Friendly,’ ‘Bold,’ ‘Professional,’ and ‘Quirky.’”
Omni: “Quirky. Because I like funny stuff.”
Big brother: “Alright, now colors. What’s your favorite?”
Omni: “GODZILLA FIRE.”
That’s not a real color, but it became one.
Big brother scrolled through palettes until they found something close—neon green and lava red.
Omni’s face lit up.
“This looks like a MONSTER site.”

AI as a Creative Sidekick
Then came the text suggestions.
Blueprint AI offered something polished:
“Explore Omni’s delightful world of creativity and color!”
Omni frowned.
“No. It needs to say BIG TEETH. BIG MONSTERS. BIG BOOMS.”
So big brother changed it.
AI wasn’t doing the work for them—it was laying the template.
It gave structure, but the creativity was all them.
The Grand Launch
Once they picked a Gallery layout, Omni grabbed the iPad and started choosing which drawings to upload.
Crayon Godzillas, a T-Rex mid-roar, and something that looked like a shark with jet engines.
His big brother typed up an “About Me” page, translating Omni’s thoughts into words.
Then came the final moment.
Big brother clicked “Publish.”
First visitor? Grandma.
Her reaction? “Wait… Omni made this?!”
With a little help of course.
A website made it real.

Have You Outgrown Squarespace? 7 Signs It’s Time To Move To Shopify
We love Squarespace for ecommerce, but when your business requires more advanced e-commerce tools, marketing automation, and multi-channel integrations, Shopify often becomes the next logical step.
Use this guide—and the tables below—to decide whether you’ve outgrown Squarespace and are ready for a platform built from the ground up for online stores.
1. Social Selling & Multi-Channel Integrations Are Becoming a Headache
For many store owners, the ability to sell across Instagram, TikTok, Amazon, eBay, and other marketplaces is critical. Let’s see how Squarespace and Shopify compare.
| Feature | Squarespace | Shopify | Takeaway |
|---|---|---|---|
| Native Instagram Shopping | Sync products to Meta catalog for Instagram, but no direct order sync back to Squarespace. | Built-in Instagram channel; customers can browse/purchase directly via IG shop with orders syncing automatically. | Shopify’s direct integration is more seamless. |
| TikTok Shopping | No built-in TikTok commerce integration (manual workarounds or third-party scripts required). | Native TikTok integration; can sync products, run in-app ads, and allow checkout links. | Easier multi-channel sales on Shopify. |
| Selling on Amazon, eBay, Other Marketplaces | No official integrations. Must use third-party or manual listings. | Official apps (e.g. Shopify Marketplace Connect) let you manage Amazon, Walmart, eBay directly from Shopify. | Shopify centralizes your entire multi-channel strategy. |
| Facebook & Other Social Channels | Basic Facebook integration for product catalog, but no advanced multi-channel management. | Direct Facebook, Pinterest, YouTube channels; product sync with full store data integration. | Shopify offers a complete social selling ecosystem. |
Why It Matters: Selling on multiple channels grows your revenue. If Squarespace is forcing tedious manual listing or incomplete integrations, Shopify simplifies multi-channel management—and drives more sales.
2. Your Discounts & Promotions Feel Limited
Struggling to create complex discounts (e.g., BOGO, tiered pricing) or stack multiple promo codes? Here’s how each platform handles promotions:
| Feature | Squarespace | Shopify | Takeaway |
|---|---|---|---|
| Types of Discounts | % off, flat-rate, free shipping. “Buy X, Get Y” only on advanced plan (still limited). | Supports % or $ off, free shipping, automatic BOGO, tiered pricing, stackable discounts. | Shopify offers broader discount rules to boost AOV. |
| Automatic vs. Manual | Codes can be created, but advanced auto-apply logic is limited and requires top-tier plan. | Native auto discounts (e.g., “Spend $100, get 10% off automatically”) on all plans. | Shopify’s auto discounts help you run smoother promotions. |
| Abandoned Cart Incentives | One abandoned cart email (24 hrs after), can include a generic code but no unique ones. | Multi-step cart recovery (via Shopify Email or apps) with unique code generation. | Shopify’s multi-email approach lifts recovery rates. |
| Stackable Promotions | Not supported—only one discount per order. | Multiple discount codes (up to five) allowed per order. | Shopify’s stacking enables more creative promos. |
Verdict: If you plan to use complex promotions, run multiple discounts, or rely on BOGO deals, Shopify’s discount engine is far more robust.
3. You’re Losing Customers at Checkout
The checkout experience can dramatically affect your conversion rate. If you want express checkouts, more payment gateways, or post-purchase upsells, check out this comparison:
| Feature | Squarespace | Shopify | Takeaway |
|---|---|---|---|
| Supported Payment Methods | Credit cards, PayPal, Apple Pay, Afterpay/Klarna (select regions). | Credit cards, PayPal, Apple Pay, Google Pay, Shop Pay, Klarna, Afterpay, Affirm, etc. | Shopify supports more gateways globally. |
| Express Checkout | Apple Pay for quick checkout if enabled; no brand-specific express flow. | Shop Pay for accelerated checkout across all Shopify stores, plus Apple/Google Pay. | One-click Shop Pay can reduce abandonments. |
| Checkout Customization | Limited (basic logo, colors). No integrated post-purchase upsell. | Highly customizable (esp. on higher plans). Apps for post-purchase upsells. | Shopify’s checkout is more flexible for advanced e-commerce. |
Verdict: Shopify’s checkout offers more payment choices, faster flows, and the potential for upsells. This can significantly boost conversions and AOV (average order value).
4. You’re Stuck in “Manual Mode” and Need More Automation
As your store grows, you need automation to save time and reduce human error.
| Feature | Squarespace | Shopify | Takeaway |
|---|---|---|---|
| Abandoned Cart Recovery | One email ~24 hrs after cart abandonment. Limited customization. | Single reminder built-in; expanded to multi-step email or SMS with apps. | Shopify’s multi-stage approach recovers more sales. |
| Inventory Alerts | Manual tracking, no built-in “back in stock” notifications without code. | Apps or Shopify Flow can email/text customers automatically. | Shopify can handle robust automations with minimal coding. |
| Post-Purchase Follow-Ups | Basic order confirmation. Extra sequences require manual steps or external solutions. | Built-in marketing automation for review requests, upsells, thank-you emails. | Seamless post-purchase flows on Shopify. |
| Custom Workflows (If/Then Logic) | Not available natively. | Shopify Flow (Advanced/Plus) offers trigger-based automation. | Shopify Flow streamlines complex tasks. |
Verdict: For scaling stores, Shopify’s extensive automation tools—particularly via Shopify Flow and third-party apps—can eliminate many time-consuming tasks.
5. International Expansion (Currencies & Taxes)
Selling globally requires multi-currency support and robust tax/duty calculation.
| Feature | Squarespace | Shopify | Takeaway |
|---|---|---|---|
| Multi-Currency Display | Single-currency checkout only. Third-party scripts can show other currencies, but checkout is in one currency. | True multi-currency checkout with Shopify Payments (130+ currencies). | Shopify localizes the entire transaction. |
| Automatic Tax Calculation | U.S. taxes automated; VAT/GST requires manual setup. | Automatic calculations for multiple countries/states, plus Avalara integration. | Saves time and reduces tax errors. |
| Localized Checkout & Duties | No built-in duty/import tax calculation. | Display duties & import taxes at checkout (Advanced/Plus), local payment methods. | Shopify prevents surprise fees for international shoppers. |
Verdict:
If you plan to expand globally, Shopify’s multi-currency checkout, advanced tax handling, and ability to calculate duties make it far less painful than Squarespace.
6. Your Shipping Needs Are Outpacing Squarespace
Shipping complexity increases with your store’s growth. Here’s what each platform can handle:
| Feature | Squarespace | Shopify | Takeaway |
|---|---|---|---|
| Real-Time Carrier Rates | Available on Commerce Advanced for some U.S. carriers. Limited global options. | Built-in real-time rates from USPS, UPS, DHL on most plans. | Shopify covers more carriers globally. |
| Shipping Rules & Profiles | Basic weight/price-based rules. Product-level shipping requires workarounds. | Shipping Profiles allow distinct rules for product groups. Advanced apps add complexity. | Easy to set unique shipping rates/conditions on Shopify. |
| Label Printing & Fulfillment | Can print labels (U.S. only). Other carriers require third-party solutions. | Discounted label printing for USPS, UPS, DHL. Integrates with major 3PLs. | Shopify reduces shipping headaches at scale. |
Verdict:
Shopify wins for complex shipping configurations, global coverage, and an integrated label-printing workflow.
7. You Want Better Analytics & Reporting
Growing businesses need data-driven insights to refine strategy.
| Feature | Squarespace | Shopify | Takeaway |
|---|---|---|---|
| Built-In Reporting | Basic traffic data, limited sales insights. | Advanced reports (sales by product/channel, conversion funnels, marketing attribution). | Shopify’s analytics go deeper and are more actionable. |
| Customer Lifetime Value (CLV) | Manual exports/spreadsheets if you want CLV stats. | Built-in customer reports (return rate, average spend); advanced apps for deeper insights. | Helps identify top customers & segments. |
| Marketing & Attribution | Mostly reliant on Google Analytics; limited multi-touch attribution. | Native marketing dashboards + multi-touch attribution. Broad analytics app marketplace. | Holistic view of campaign performance. |
| Data Exports & Custom Reports | Limited analytics export, mostly orders/customers in CSV. | In-depth data export, custom reporting, wide range of BI/analytics integrations. | Shopify lets you automate custom reports or import data into external tools easily. |
Verdict: If you need detailed reporting, advanced segmentation, and a data-first approach to marketing, Shopify’s analytics and app integrations will serve you better.
When Squarespace May Be Enough
Small Catalog: You only sell 10–50 products and don’t need advanced SKUs or variations.
Design + Branding Focus: Your website is mainly about showcasing content or portfolios, with minimal e-commerce needs.
Simple E-Commerce Needs: Basic shipping, straightforward discounts, limited automation.
When Shopify Is the Better Fit
Social Media/Marketplace Selling: You want to expand on Instagram, TikTok, Amazon, eBay—without hacking third-party workarounds.
Advanced Discounting & Promotions: You rely on BOGOs, stackable codes, tiered pricing, or loyalty programs.
Diverse Payment Methods: You want Shop Pay, Google Pay, local payment options, or BNPL solutions.
Complex Shipping: You need real-time rates, multiple shipping rules, or discounted label printing.
Data-Driven Growth: You want robust analytics, multi-touch attribution, customer lifetime value reporting, and marketing dashboards.
Automation & Scalability: You’re tired of manual tasks and want multi-step abandoned cart sequences, back-in-stock alerts, or custom if/then workflows.
The Last Word: Squarespace vs. Shopify
Squarespace has evolved into a decent e-commerce option—especially for businesses with smaller catalogs, who primarily need a beautiful website and basic online store functionality.
Shopify remains the top choice for serious online retailers, offering greater flexibility, advanced features, and ecosystem support (apps, integrations, marketing automations) to scale your store.
If you check off multiple items under “When Shopify Is the Better Fit,” consider migrating or at least test-driving Shopify with a free trial. The time you save and the additional revenue you generate from powerful discounts, better checkout options, and automation can pay for the migration costs many times over.
Ready for a Seamless Squarespace to Shopify Migration?
If you’ve read through these signs and feel ready to make the move, we’ve got you covered with our Done-for-You Migration Service. Here’s how we make it simple:
Free Consultation – We’ll chat about your current store, goals, and any special requirements (shipping rules, custom code, etc.).
Stress-Free Migration – Our team securely transfers your products, customers, orders, and even SEO redirects into Shopify. We’ll also help you configure payment gateways, shipping rates, and automation tools.
Smooth Launch & Ongoing Support – We’ll QA your new store, make sure everything’s running smoothly, and train you on Shopify’s features. If you have questions post-launch, we’re still here to help!