
What’s worth knowing in the Squarespace world.
For designers, developers, and people building businesses around Squarespace.

How to Offer Both Digital and Physical Variants of the Same Product on Squarespace

Are you trying to sell both physical books and their digital versions on your Squarespace site but feeling stuck?
I know exactly how you feel - I faced the same problem trying to sell my ebook and paperback in the same product listing.
Like many Squarespace users, I quickly realized the platform doesn't natively support selling digital variants alongside physical products without creating a mess. To offer both options, I was forced to either clutter my shop with duplicate listings or manually send digital files after every sale. Neither felt professional, scalable, or sustainable.
The suggested "workaround" of creating separate product entries for each format left my shop feeling disorganized and overwhelmed my customers with too many choices. For someone managing multiple products, this quickly became an administrative nightmare.
I wanted a way to offer my customers the choice between a physical book and an eBook in one clean, seamless product listing—without leaving the Squarespace ecosystem or spending hours fixing it every time I made a sale.
In this post, I’ll share the solution I discovered: a custom JavaScript workaround that dynamically customizes the order confirmation page. With this approach, your customers can download their eBook immediately after purchase, while your shop stays organized, user-friendly, and professional.

ebook variant order page

physical variant order page
Setting Up Variants for Digital and Physical Products in Squarespace
The key to keeping your shop organized while offering both digital and physical versions of the same product is using variants. Variants let you provide different options—like “eBook” and “Paperback”—under the same product listing, creating a clean and streamlined shopping experience.
Here’s how to configure and handle variants effectively:
1. Add Variants to Your Product
Edit Your Product: Go to the Squarespace dashboard, navigate to Commerce > Inventory, and select the product you want to modify.
Enable Variants: Under the Pricing & Variants tab, click Add Variant.
Create an option called
Format(or something similar) to represent the type of product.Add options like
PaperbackandeBook.
Set Pricing: Assign different prices to each variant if needed. For example, the
Paperbackmight cost $15, while theeBookis $7.
2. Use Custom JavaScript to Handle Digital Variants
Squarespace doesn’t natively deliver files for digital product variants, so we’ll use JavaScript to detect when the eBook variant is purchased and display a download link on the order confirmation page.
Here’s how to implement it:
Code to Inject:
Navigate to Settings > Advanced > Code Injection.
Scroll to the Order Status Page section.
Add this JavaScript:
<script>
document.addEventListener('DOMContentLoaded', function() {
    // Search for all spans to find if any contain 'Format: eBook'
    var allSpans = document.querySelectorAll('span');
    var ebookFound = Array.from(allSpans).some(span => span.textContent.includes('Format: eBook'));

    if (ebookFound) {
        // Target the tracking updates section and change the heading
        var trackingSections = document.querySelectorAll('h2');
        var trackingSection = Array.from(trackingSections).find(section => section.textContent.includes('Tracking updates'));

        if (trackingSection) {
            // Update the heading text
            trackingSection.textContent = 'Download Your eBook';

            // Find the parent container that holds the content to be replaced
            var contentContainer = trackingSection.nextElementSibling;
            if (contentContainer) {
                // Replace with a button that matches the Squarespace style
                contentContainer.innerHTML = `<center><button aria-label="Download eBook" width="100%" class="css-12it2aq"><a href="https://www.omariharebin.com/s/The-Corporate-Dropout-A-Memoir.zip" style="color: inherit; text-decoration: none;">Download the eBook here</a></button></center>`;
            }
        }

        // Optionally, hide shipping information
        var shippingInfo = document.querySelector('.shipping-info'); // Adjust this selector based on your actual shipping info container
        if (shippingInfo) {
            shippingInfo.style.display = 'none';
        }
    }
});
</script>
What the Code Does:
Detects the eBook Variant:
The script searches for spans on the order confirmation page that include the text "Format: eBook."
Customizes the Order Confirmation Page:
If the eBook variant is found, the script updates the heading “Tracking updates” to “Download Your eBook.”
It replaces the section content with a download button styled like Squarespace’s default buttons.
Hides Shipping Information:
For digital purchases, unnecessary shipping information is hidden for a cleaner user experience.
3. Testing Your Setup
Perform test purchases for both digital and physical variants:
For eBooks: Verify that the download button replaces the tracking section and functions correctly.
For Physical Products: Confirm that the order confirmation page remains unchanged.
Test across multiple devices and browsers to ensure compatibility.
4. Optional Enhancements
Add analytics tracking to measure how often the eBook link is clicked.
Style the download button further using CSS to better match your brand’s aesthetic.
Conclusion
By following this tutorial, you’ve not only simplified your Squarespace shop but also solved a long-standing issue for store owners selling digital and physical products. With just a few tweaks, your customers can easily choose their preferred format, and you can automate digital file delivery—all while keeping your shop neat and professional.
Advanced Customization: Handling Multiple Digital Variants or Non-eBook Products
While this guide focuses on selling eBooks as a digital variant, the same solution can be easily adapted for other types of digital products or even multiple digital variants like licenses or formats.
Adapting for Non-eBook Digital Products
If you’re selling other digital products—like audio files, videos, or software—you can tweak the script to detect specific product types and provide the appropriate download links. For example:
Music Files: Offer both
MP3andWAVformats with unique download links.Licenses: Provide
Personal UseandCommercial Uselicense options for the same product.Training Materials: Allow customers to choose between
BasicandAdvancedcourse content.
How It Works
Detect the Variant: Adjust the JavaScript to look for specific text in the product variant (e.g., "Format: MP3" or "License: Personal Use").
Match the Download Link: Use conditional logic or a variant-to-URL mapping to provide the correct file for each digital product.
Example Script
Here’s a dynamic version of the script that supports multiple digital variants:
<script>document.addEventListener('DOMContentLoaded', function() {
    // Variant-to-URL mapping
    var variantLinks = {
        'Format: MP3': '/s/Your-MP3-File.zip',
        'Format: WAV': '/s/Your-WAV-File.zip',
        'License: Personal Use': '/s/Personal-License.zip',
        'License: Commercial Use': '/s/Commercial-License.zip'
    };

    // Detect the variant
    var allSpans = document.querySelectorAll('span');
    var matchedVariant = Array.from(allSpans).find(span => variantLinks[span.textContent.trim()]);

    if (matchedVariant) {
        var downloadUrl = variantLinks[matchedVariant.textContent.trim()];

        // Update the confirmation page
        var trackingSections = document.querySelectorAll('h2');
        var trackingSection = Array.from(trackingSections).find(section => section.textContent.includes('Tracking updates'));

        if (trackingSection) {
            trackingSection.textContent = 'Download Your File';
            var contentContainer = trackingSection.nextElementSibling;
            if (contentContainer) {
                contentContainer.innerHTML = `<center><button aria-label="Download File" class="css-12it2aq">
                    <a href="${downloadUrl}" style="color: inherit; text-decoration: none;">Download the File Here</a>
                </button></center>`;
            }
        }

        // Optionally hide shipping info
        var shippingInfo = document.querySelector('.shipping-info');
        if (shippingInfo) {
            shippingInfo.style.display = 'none';
        }
    }
});
</script>
Why This Matters
This approach is scalable and adaptable:
Works for any type of digital product or multiple digital variants.
Reduces manual effort by automating the delivery of the correct file for each purchase.
Keeps the order confirmation page clean and user-friendly.
Use Cases
Audio Products: Variants like
MP3andWAVlink to separate files.Digital Licenses: Provide different license options (
Personal,Commercial) for the same digital asset.Digital Art or Stock Photos: Variants like
Web ResolutionandHigh Resolutiondeliver appropriate file sizes.
Next Steps
So while this solves the checkout page problem, we still need to get the ebook download link via email.
How to set Squarespace Portfolio project as Draft
Are you having an unfinished portfolio project on Squarespace and do not want to publish them until finished? Use Draftify Portfolio from Beyondspace to set a Portfolio project item to draft in one click!
This post is a collaboration with BeyondSpace.studio
Squarespace Portfolio is an incredible tool for showcasing your creative work, but there’s one glaring limitation: there’s no built-in draft mode for Portfolio projects. This can be frustrating if you want to hide unfinished projects from public view while still working on them.
For creators and businesses, maintaining a polished and professional portfolio is crucial. Without a draft mode, you’re left with limited options to keep incomplete work under wraps. But don’t worry—there’s a solution! Draftify Portfolio from Beyondspace offers a simple way to manage your portfolio drafts and ensure only finalized projects are visible.
Introducing Draftify Portfolio
Draftify Portfolio enables you to hide Portfolio items while you edit, ensuring they don’t appear on your live site until they’re ready. Say goodbye to awkward half-finished projects cluttering your professional portfolio.
Here’s how you can take control of your Portfolio with ease:
Step-by-step tutorial
Step 1: Install Ground Control
Draftify Portfolio is available through the Ground Control plugin. Install it to unlock the ability to manage draft and published states for your Portfolio projects.
Step 2: Create and Manage Portfolio Items
After installing Ground Control, follow these steps:
Create a new Portfolio project as usual.
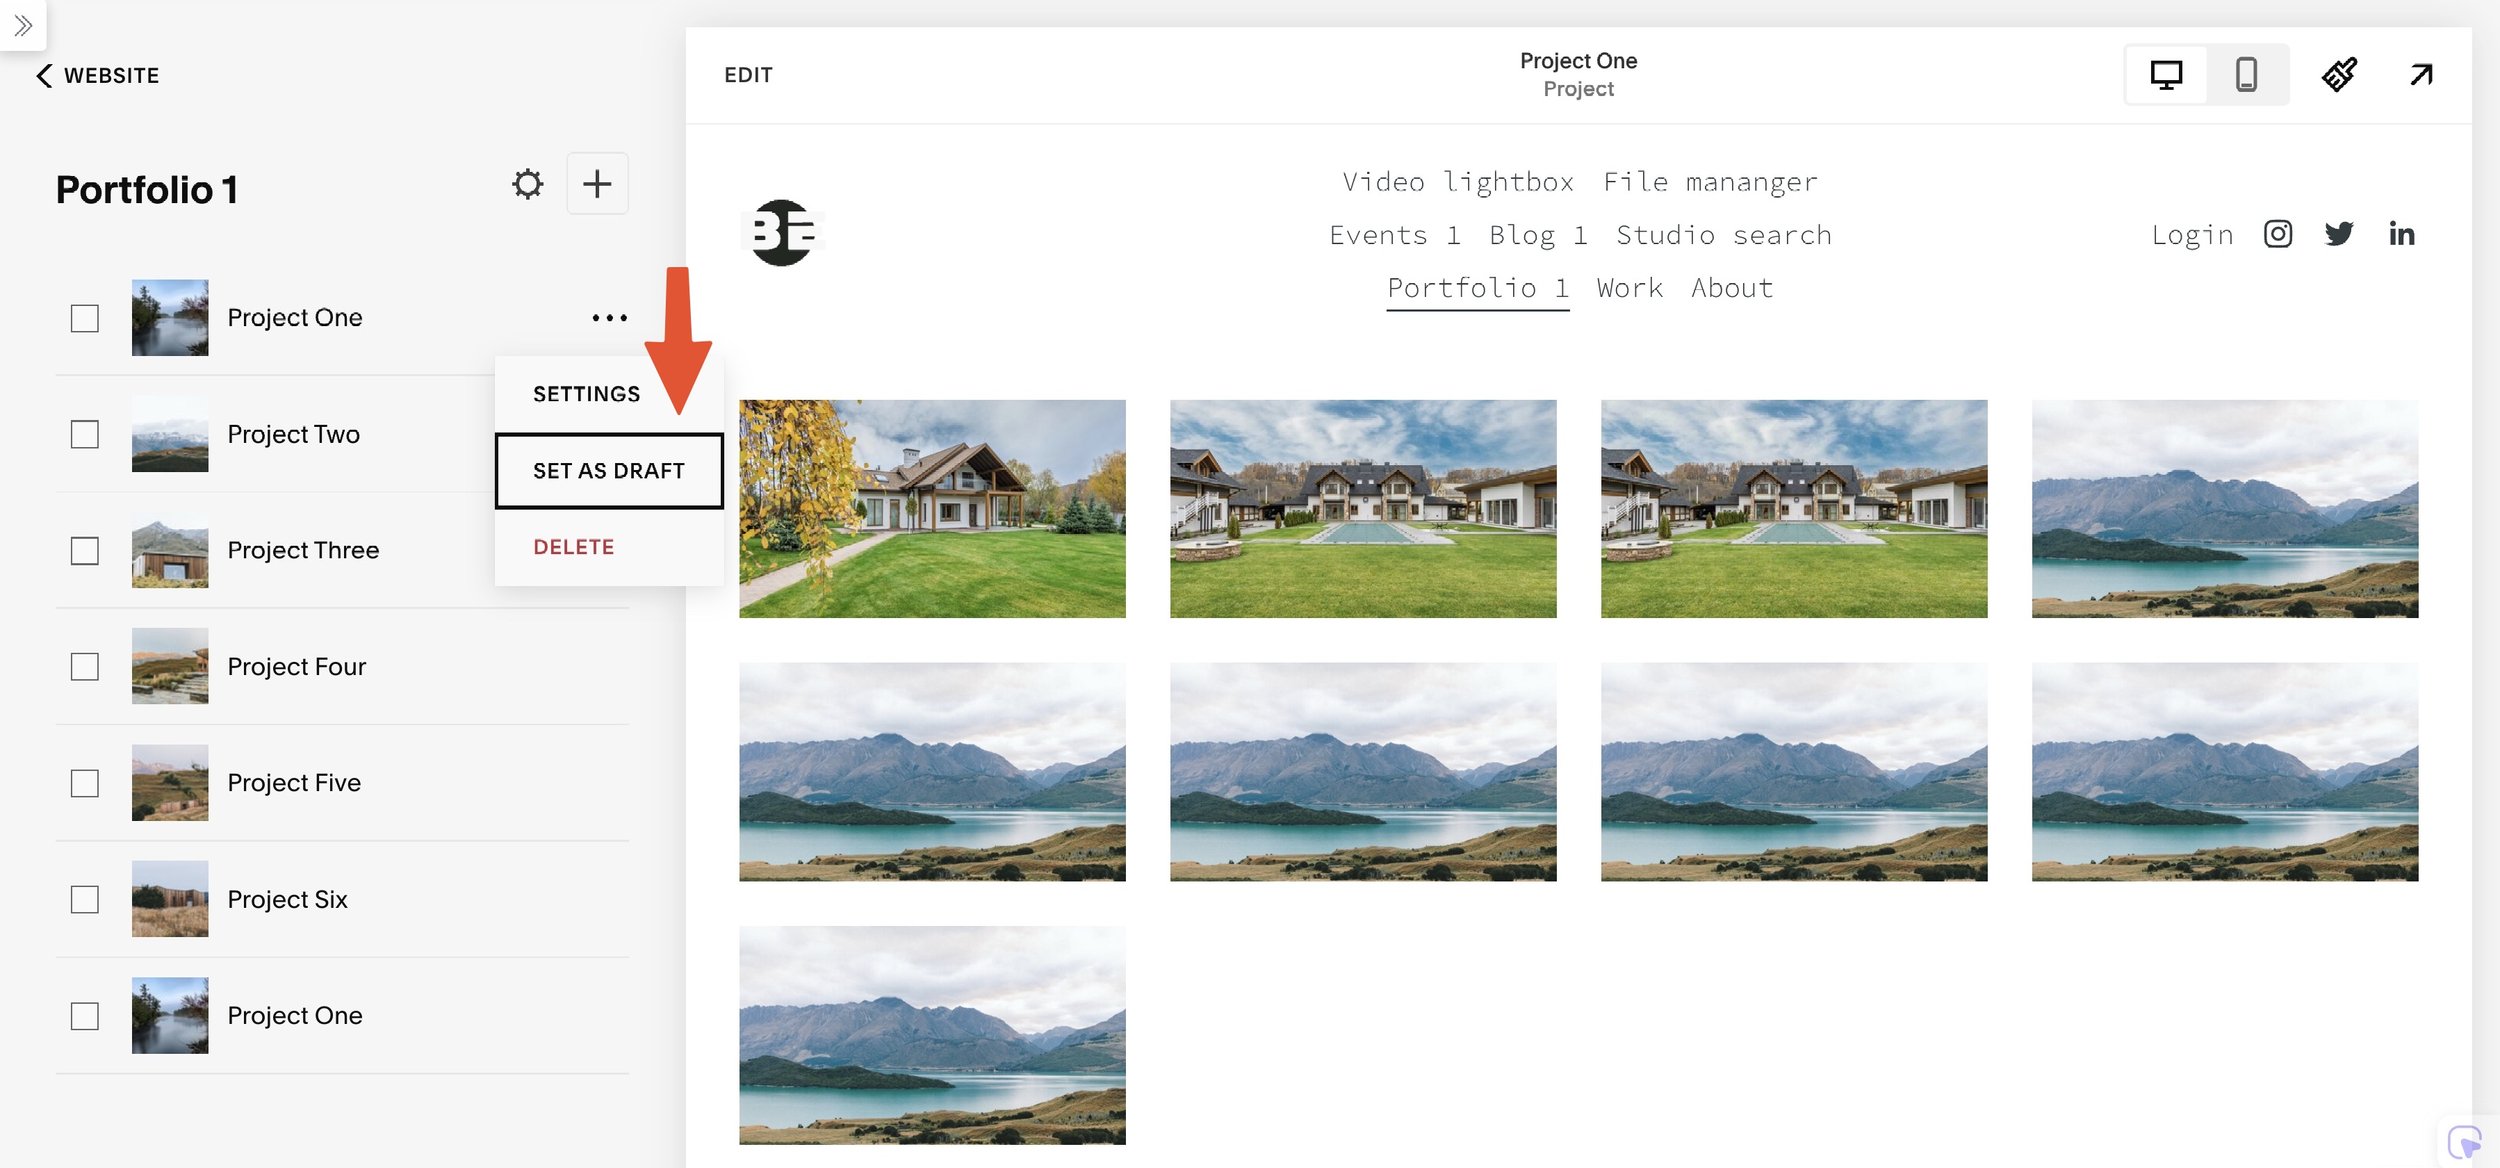
Click the three-dot menu icon next to your project in the Portfolio manager.
Use the new options:
Set as Draft: Hides the Portfolio project from public view.
Set as Published: Makes the project live and visible.
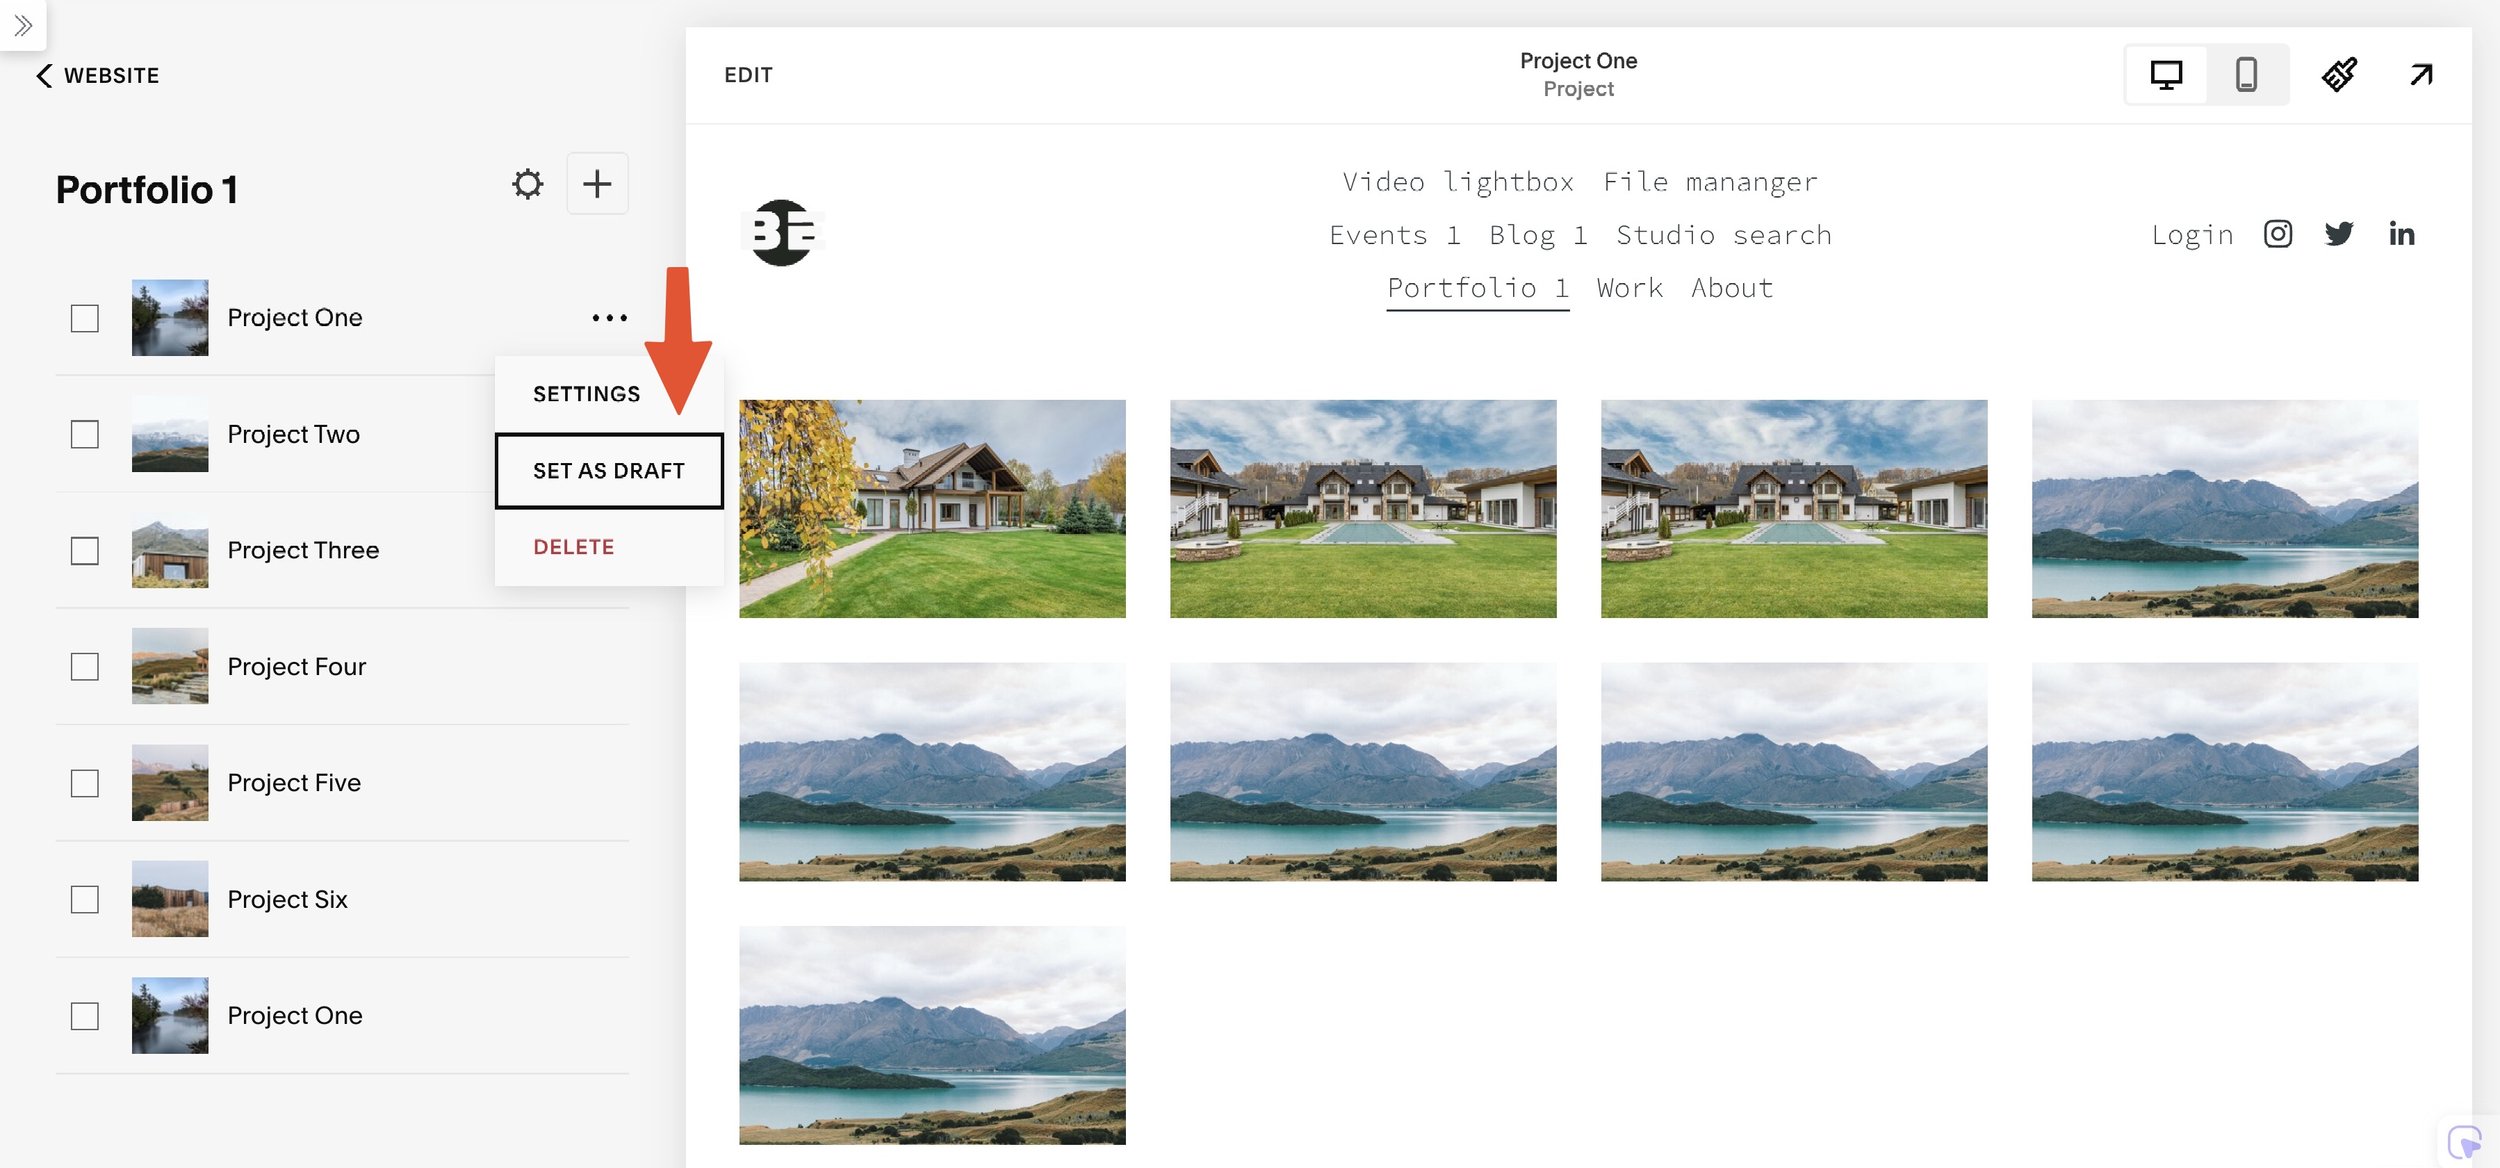
Turn Portfolio project to draft
Draft vs. Published Portfolio Projects
Draft Mode:
Portfolio items are hidden from visitors.
Draft items won’t appear in Portfolio collection pages, including Grid or Hover layouts.
Draft items will be hidden from Portfolio page’s pagination, next published projects will be displayed instead
URLs for draft items will return a 404 page if accessed.
Published Mode:
Projects are fully visible on your site.
Accessible through their URLs and appear in all Portfolio collection displays.
Redirecting 404 Pages for Drafted Items
To maintain a seamless user experience, redirect the URLs of drafted projects to your main Portfolio page. Here’s how:
Navigate to Settings > Developer Tools > URL Mappings in Squarespace.
Add the following line, replacing
your-portfoliowith your Portfolio’s actual slug:
This ensures visitors attempting to access a drafted project are redirected to the main Portfolio page instead of encountering a 404 error — especially useful when you’re editing an indexed project.
Conclusion
Using the Ground Control plugin simplifies managing your Squarespace portfolio by allowing you to set projects as drafts easily. This feature is particularly useful for creatives who want to work on projects privately before showcasing them publicly. For additional details, refer to resources such as the Draftify Portfolio for comprehensive instructions and support

How to create reusable content with Synced Blocks plugin
Create reusable content for your Squarespace with Beyondspace Synced Blocks plugin, update once and all the instances of your content will be automatically updated!
This post is a collaboration with BeyondSpace.studio
Are you tired of updating the same content across multiple pages on your Squarespace site? Say goodbye to repetitive edits and hello to efficiency with the Synced Blocks Plugin by Beyondspace!
What is Synced Blocks plugin?
The Synced Blocks plugin allows you to create reusable content elements that can be updated in one place and reflected across your entire site. Whether it’s text, images, or videos, you can manage your content effortlessly.
Key Features:
Seamless Content Management: Update synced blocks on multiple pages with just one edit, ensuring consistency throughout your site
Support for Multiple Block Types: Easily reuse various content types, including buttons, newsletters, and more
Native Block Editor Compatibility: Fully compatible with Squarespace’s intuitive block editor, making syncing and customization a breeze
The video below showcases how the Synced block works in action (there is mismatch in the Sync Details button now renamed to Sync Content
How It Works:
Create a "Reusables" Blog:
Set up a blog collection in your Squarespace admin panel to store all your Synced blocks, Reusables Blog’s slug should be /reusables/
Save Your Content:
Add a new post to the Reusables blog, insert your reusable content, and publish it.
Use the dedicated Sync Content button to save the change across Squarespace website
Insert Across Pages:
Use a Summary Block linked to the Reusables blog on any page to display your synced content.

Select Synced blocks from Reusables
Why Choose Synced Blocks?
Save time by avoiding repetitive tasks.
Maintain a consistent style across your website.
Easily update promotional content or calls to action without hassle.
Frequently Asked Questions
Question: What Are Synced blocks in Squarespace?
Synced Blocks, also known as "reusable content" or "reusable blocks," are content elements that can be saved once and used across multiple pages and posts on a Squarespace site. This feature allows users to maintain consistency and save time by avoiding the need to recreate the same content repeatedly.
For instance, a Form block can be designed once and inserted wherever needed, ensuring uniformity in design throughout the site
Question: Can I Categorize Synced blocks for Easy Organization?
Yes, you can categorize Synced blocks for easier organization. By creating different posts within your "Reusables" blog collection and categorize them appropriately, you can group similar blocks together. This makes it simpler to manage and locate specific blocks when needed
Question: What’s the Difference Between Synced Blocks and Saved Sections?
The primary difference between Synced Blocks and Saved Sections lies in their functionality. Synced Blocks are reusable content elements that can be updated centrally, reflecting changes across all instances where they are used. In contrast, Saved Sections are entire sections of content that can be reused but do not have the same automatic update feature; changes made to a Saved Section do not propagate across different pages unless manually updated each time