
What’s worth knowing in the Squarespace world.
For designers, developers, and people building businesses around Squarespace.
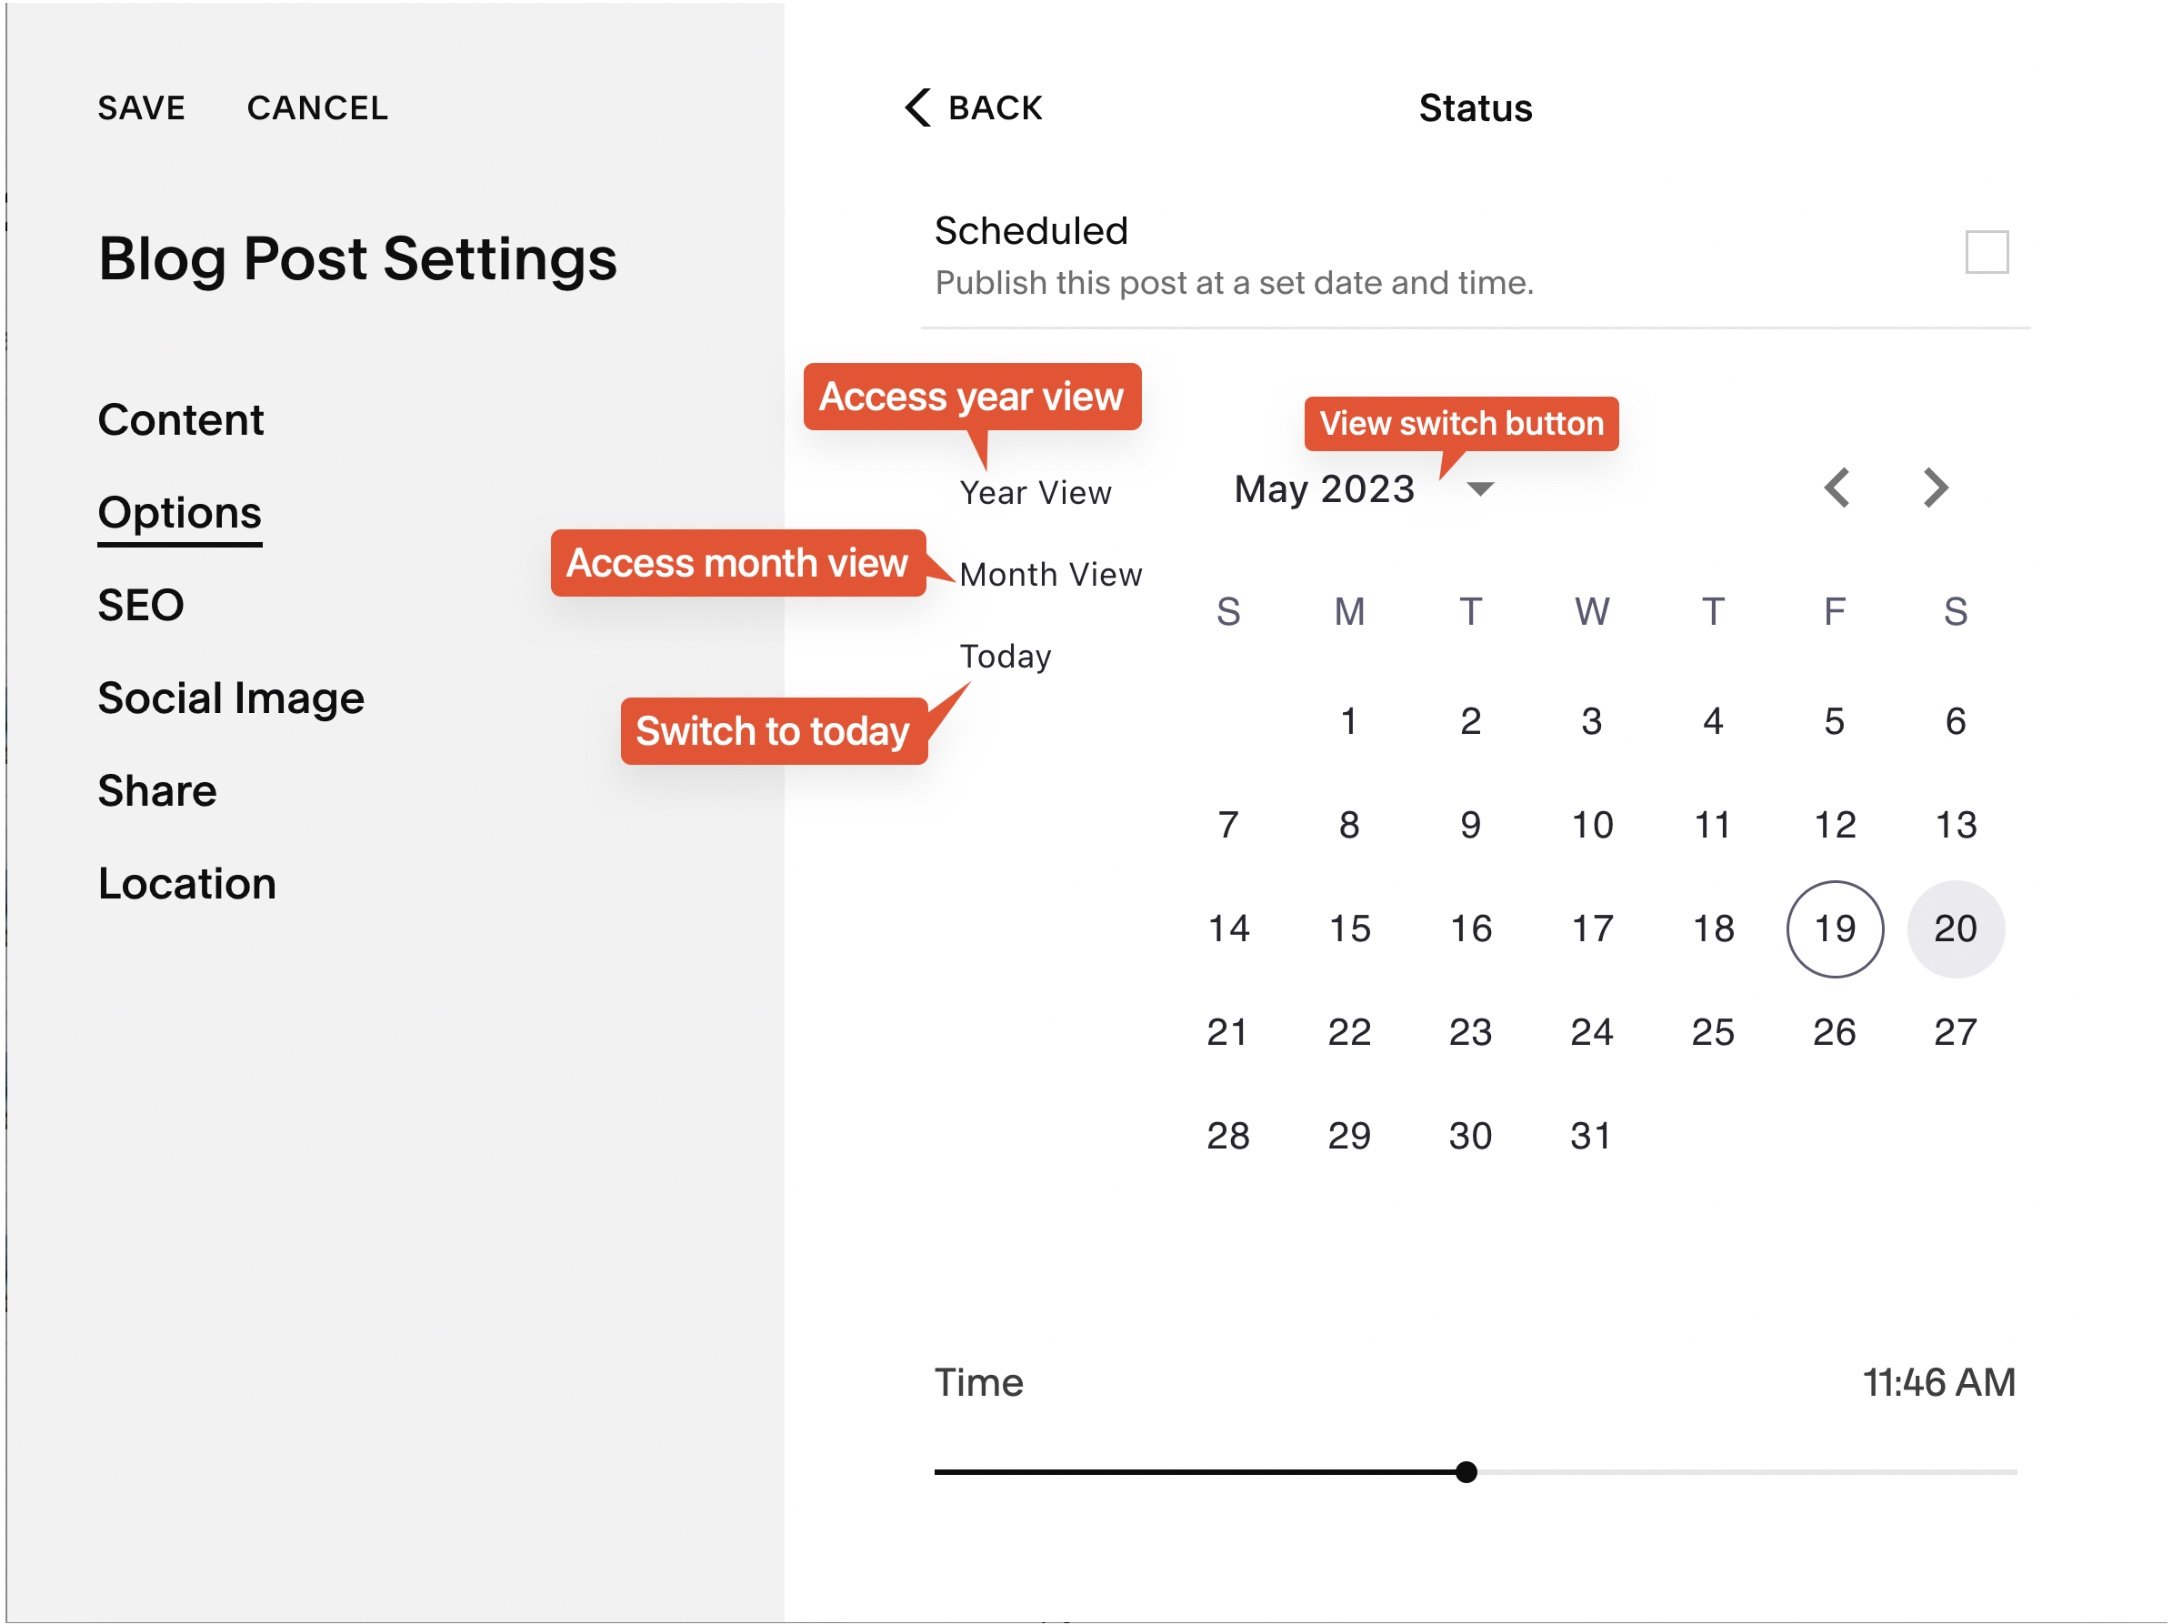
Upgrade Squarespace publication datepicker: Save time and clicks!
Quickly switch months and years in Squarespace blogs and events with Beyondspace Enhanced Datepicker. Save time editing blog posts and events. 7.1 templates supported!
This post is a collaboration with BeyondSpace.studio
Managing blog post and event publication dates on Squarespace can be tedious, especially when you're stuck navigating month by month in the default datepicker. Whether you’re updating posts, migrating content, or backdating events, the process can feel like an unnecessary grind.
But there's good news! Beyondspace Enhanced Publication Datepicker brings you a smarter, faster way to adjust dates across your Squarespace site.
New Publication Datepicker is now managed through Ground Control for easier navigation and customization. Explore Ground Control
What’s New with the Enhanced Datepicker?
Enhanced Publication datepicker
1. Calendar View with Year and Month Switching
No more endless clicking through months. This enhanced datepicker introduces quick navigation options, allowing you to jump between years and months with ease.
2. Supports Squarespace 7.1
Fully compatible with 7.1 templates!
3. Works for Blogs and Events
The enhanced datepicker is now accessible in:
Blog Post Status Dialog
Event Status Dialog
Event Start and End Time Editors


Why You’ll Love It
This tool is perfect for anyone who needs to:
Migrate content between Squarespace websites.
Reorganize blog posts by backdating or changing publication order.
Import posts from other platforms and set accurate historical dates.
No more wasted time scrolling through months. With just a few clicks, you can choose any date, no matter how far back or forward it is!

Using Publication datepicker
How to Get Started
It’s easy to add the Enhanced Datepicker to your site:
Visit Beyondspace Enhanced Publication Datepicker page and copy the snippet
Paste the snippet to the Footer Injection of your Squarespace site.
Follow this tutorial if you want to know how to change publication date of blog or event
Tip: If you’re on the Personal plan and don’t have access to Code Injection, you can use the Tampermonkey browser extension to apply the snippet to your site.
FAQs
How can I switch between months and years on the calendar?
By default, Squarespace only lets you navigate one month at a time using arrow buttons. The Enhanced Datepicker solves this problem by allowing you to select months and years from a dropdown menu or calendar grid—saving you tons of time!
Does it work for Squarespace 7.0 templates?
Not yet, but support for 7.0 templates is coming soon. Stay tuned!
Can I use this for both blogs and events?
Yes! The Enhanced Datepicker is fully compatible with blog post publication dates, event status dates, and event start/end times.
How can I edit the date format of blog posts?
To edit the date format of blog posts, you can use Beyondspace Date Format Tool. This allows you to unify and customize the date format across your blog posts, pages, and summary blocks effortlessly.
Bonus: Enhance Squarespace Forms with Custom Datepicker
Take your Squarespace forms to the next level with Beyondspace’s Datepicker plugin! Offering month and year views, disabled dates, and customizable settings, it simplifies the date selection process for your customers. Perfect for product, event, and delivery forms, this tool ensures a smooth, user-friendly experience.

How to change the Date Format of Blogs
Easily unify date formats across Squarespace blog posts, pages, and summary blocks. Customize formats and locales with a free, simple tool!
This post is a collaboration with BeyondSpace.studio
Struggling with mismatched date formats across your Squarespace blog? Whether it’s blog posts, blog pages, or summary blocks, inconsistent dates can make your website look unpolished. While Squarespace lacks an easy way to fix this problem natively, a simple solution can help you achieve consistent formatting without much effort. Let’s explore the problem and the straightforward fix.
The challenge with Squarespace date format
Squarespace users face two major issues when dealing with date formats:
No Direct Date Format Customization
Squarespace doesn’t provide a straightforward way to adjust date formats. While changing the Squarespace website’s locale might partially help, it’s a clunky and indirect solution.Inconsistent Formatting Across Different Areas
The way dates are displayed can vary significantly. Blog posts, blog pages, and summary blocks often use different formats, creating a lack of uniformity across the site.
For instance:
Blog post might display one style, like “22 Jun”
Blog list could use another, like “22/06/2019”
Summary blocks might look completely different, such as “22 Jun 2019”

Inconsistent blog date format: English (United States) locale
A Simple solution for Consistency
Fortunately, you don’t need to rely on manual fixes or advanced coding knowledge. The Beyondspace Date Format Tool provides an easy way to unify date formats across your entire Squarespace site.
This tool allows you to:
Choose Your Desired Format: Whether it's the USA format (MM-DD-YYYY), UK format (DD-MM-YYYY), or something else, the tool supports a wide range of options.
Create a Custom Format: If the default options don’t meet your needs, use date tokens to define your own format effortlessly.
Set a Consistent Locale: Standardize date formats across blog posts, blog pages, and summary blocks for a cohesive look.
Include Time Stamps: Need to display both date and time? Toggle the "Use Timestamp" option for seamless formatting.
Before you start, ensure you have the following:
Squarespace Version: 7.1 or 7.0
Plan: Business or higher to use the Footer Code Injection

Using Beyondspace date format
How to implement the Code
Visit the Beyondspace Date Format Tool.
Choose your preferred date format and locale using the intuitive interface.
Copy the automatically generated code.
Paste the code into Squarespace’s Code Injection
Within minutes, your site will display consistent date formats throughout!
Unified Squarespace date format - dddd, D MMMM YYYY
With this simple solution, you can say goodbye to inconsistent dates and hello to a more polished and professional Squarespace site!
FAQs
Can I display UK date format?
Yes! The tool supports the UK date format (DD-MM-YYYY) and can be applied seamlessly across your blog posts, pages, and summary blocks.
Can I display AUS date format?
Absolutely! The Australian date format (DD/MM/YYYY) is fully supported and can be easily set using the tool.
Can I display USA date format?
Of course! The USA date format (MM-DD-YYYY) is one of the default options available for quick setup.
What is a custom date format?
A custom date format allows you to define your own layout for dates using date tokens. For example, you can create unique formats like "YYYY.MM.DD" or "DD Month, YYYY" to suit your site's design and audience preferences. Learn all available tokens on this page
Bonus #1: Simplify backdating Blog and Event publish dates
Struggling to backdate a blog post or event on Squarespace? The default date picker in Squarespace only lets you navigate month by month, making it tedious if you're trying to adjust dates that go back years.
With Beyondspace's Publish datepicker, you can easily set past dates with a streamlined interface that eliminates unnecessary clicks. It supports Squarespace 7.1 right out of the box, saving you time and effort!
Beyondspace publish datepicker
Bonus #2: Enhance Squarespace Forms with a Custom Datepicker Field
Looking to improve the date selection experience on your Squarespace forms? Beyondspace's Datepicker Form Field replaces the standard text input with a user-friendly calendar view. It offers features like month and year navigation, disabled dates, and cutoff preorders, making your forms more functional and user-friendly. Whether for product forms, form blocks, it integrates seamlessly with your site and enhances user experience!

How to Upload an Ads.txt file to Root Directory of Squarespace
Beyondspace.studio shares a method to upload an ads.txt file to Squarespace's root directory using 301 redirects. This workaround mimics the root directory upload, allowing for successful Google ads.txt verification and other services.
This post is a collaboration with BeyondSpace.studio
Uploading files to the root directory is essential for services like Google ads.txt verification,Squarespace doesn’t offer direct access to a traditional root directory, but with the use of URL redirects, you can mimic this functionality. This guide will show you how to upload an ads.txt file and make it accessible for ad verification.
Uploading Files on Squarespace
Squarespace doesn't support a traditional root directory; instead, uploaded files are stored on its dedicated CDNs. To achieve the effect of a root directory upload, you’ll need to use 301 redirects.
When ads.txt is uploaded to the root directory, it is accessible at top-level domain as such your-domain.com/ads.txt
Step-by-Step Guide to Uploading Ads.txt
Step 1: Download Your Ads.txt File
Get the ads.txt file from the verification service (e.g., Google AdSense).
Step 2: Upload the File via Link Manager
Go to your Pages in Squarespace.
Add a Link in the Main Navigation.
Choose File as the Link Type and upload your ads.txt file.
Exit the Squarespace Link Editor without saving since we’re only using it for uploading the file.
This will store the file in your Squarespace CDN and it will be accessible at /s/ads.txt, eg: your-domain.com/s/ads.txt

Upload ads.txt file
Pro tip: explore all the gateway to Squarespace Link Editor to upload and manage file in this post.
Step 3: Trace the File URL
Use a URL tracing tool like WhereGoes or Beyondspace Redirection tracer to get the real URL of the file. Paste your your-domain.com/s/ads.txt URL into the tool and trace it to its CDN source URL.

Trace ads.txt file
Step 4: Set Up a Redirect in URL Mappings
Go to Settings > Developer Tools > URL Mappings in your Squarespace dashboard.
Add the following redirect:
/ads.txt -> {real-file-path} 301
Replace {real-file-path} with the traced CDN URL.
Pro tip: If you used Beyondspace Redirection tracer to trace the redirection, simply copy the redirection in Root Directory Redirection after the trace completed.

Set redirect ads.txt
Step 5: Verify the File
Complete the verification process for your external service by providing the redirected URL (e.g., https://your-domain.com/ads.txt).
How This Works
Using a 301 redirect makes the file accessible at the root directory, even though it is hosted on Squarespace’s CDN. Google supports such single redirect to external domain (this case, redirection from your domain to Squarespace static CDN) for ads.txt verification, making this method effective for those using Squarespace.
Supported Services
Google ads.txt verification
Conclusion
Squarespace doesn’t have a traditional root directory, but by using URL redirects, you can effectively upload verification files like ads.txt and meet the requirements of external services. This method works for all Squarespace plans, including the Personal plan.